This article will teach you how to create a WordPress staging environment using the staging feature in the WordPress Manager.
What is a WordPress Staging?
Mistakes can happen, and sometimes plugins or themes don’t work as intended. To avoid ruining your live site, you can test changes on a staging site instead. Keep reading to learn what a staging site is, when to use one, and how to create one with WordPress.
A staging site is a private copy of your website where you can test changes without affecting the live, public version. Since staging environments aren’t public, only the people working on the site can see and use them.
When to Create a Staging Site?
You probably don’t need a full dress rehearsal just to add a missing comma to a blog post—go ahead and give that punctuation mark its moment in the spotlight! But when you’re planning more dramatic plot twists for your website, a staging site can be your trusty sidekick.
Let’s dive into some of the top reasons why folks set up these secret test labs for their WordPress sites.
- Major Updates: Before updating WordPress core, themes, or plugins, test the updates on a staging site to ensure compatibility and prevent potential conflicts.
- Design Overhauls: If you’re redesigning your site or changing its layout, a staging environment allows you to preview the new design without disrupting the user experience on your live site.
- Adding New Features: Planning to add new functionalities like e-commerce capabilities, forums, or membership areas? Test them on a staging site first to ensure they work seamlessly.
- Debugging Issues: If your live site is experiencing issues or errors, use a staging site to troubleshoot without affecting your visitors.
- Security Enhancements: When introducing new security measures or plugins, it’s wise to test them in a controlled environment to ensure they don’t inadvertently block legitimate users or functionalities.
By utilizing a staging site in these scenarios, you can confidently implement changes, knowing they won’t negatively impact your live website.
Are WordPress staging environments added to my install limit?
No, staging sites are not considered separate instances, and they do not count toward your WordPress installs limit.
How to Create a WordPress Staging Using the WordPress Manager
We’ll assume that you’ve already installed WordPress. If you haven’t installed WordPress on your site, this article will tell you how.
To create a staging environment for your WordPress instance using the WordPress Manager, follow these steps:
Step 1) Log in to the WordPress Manager.
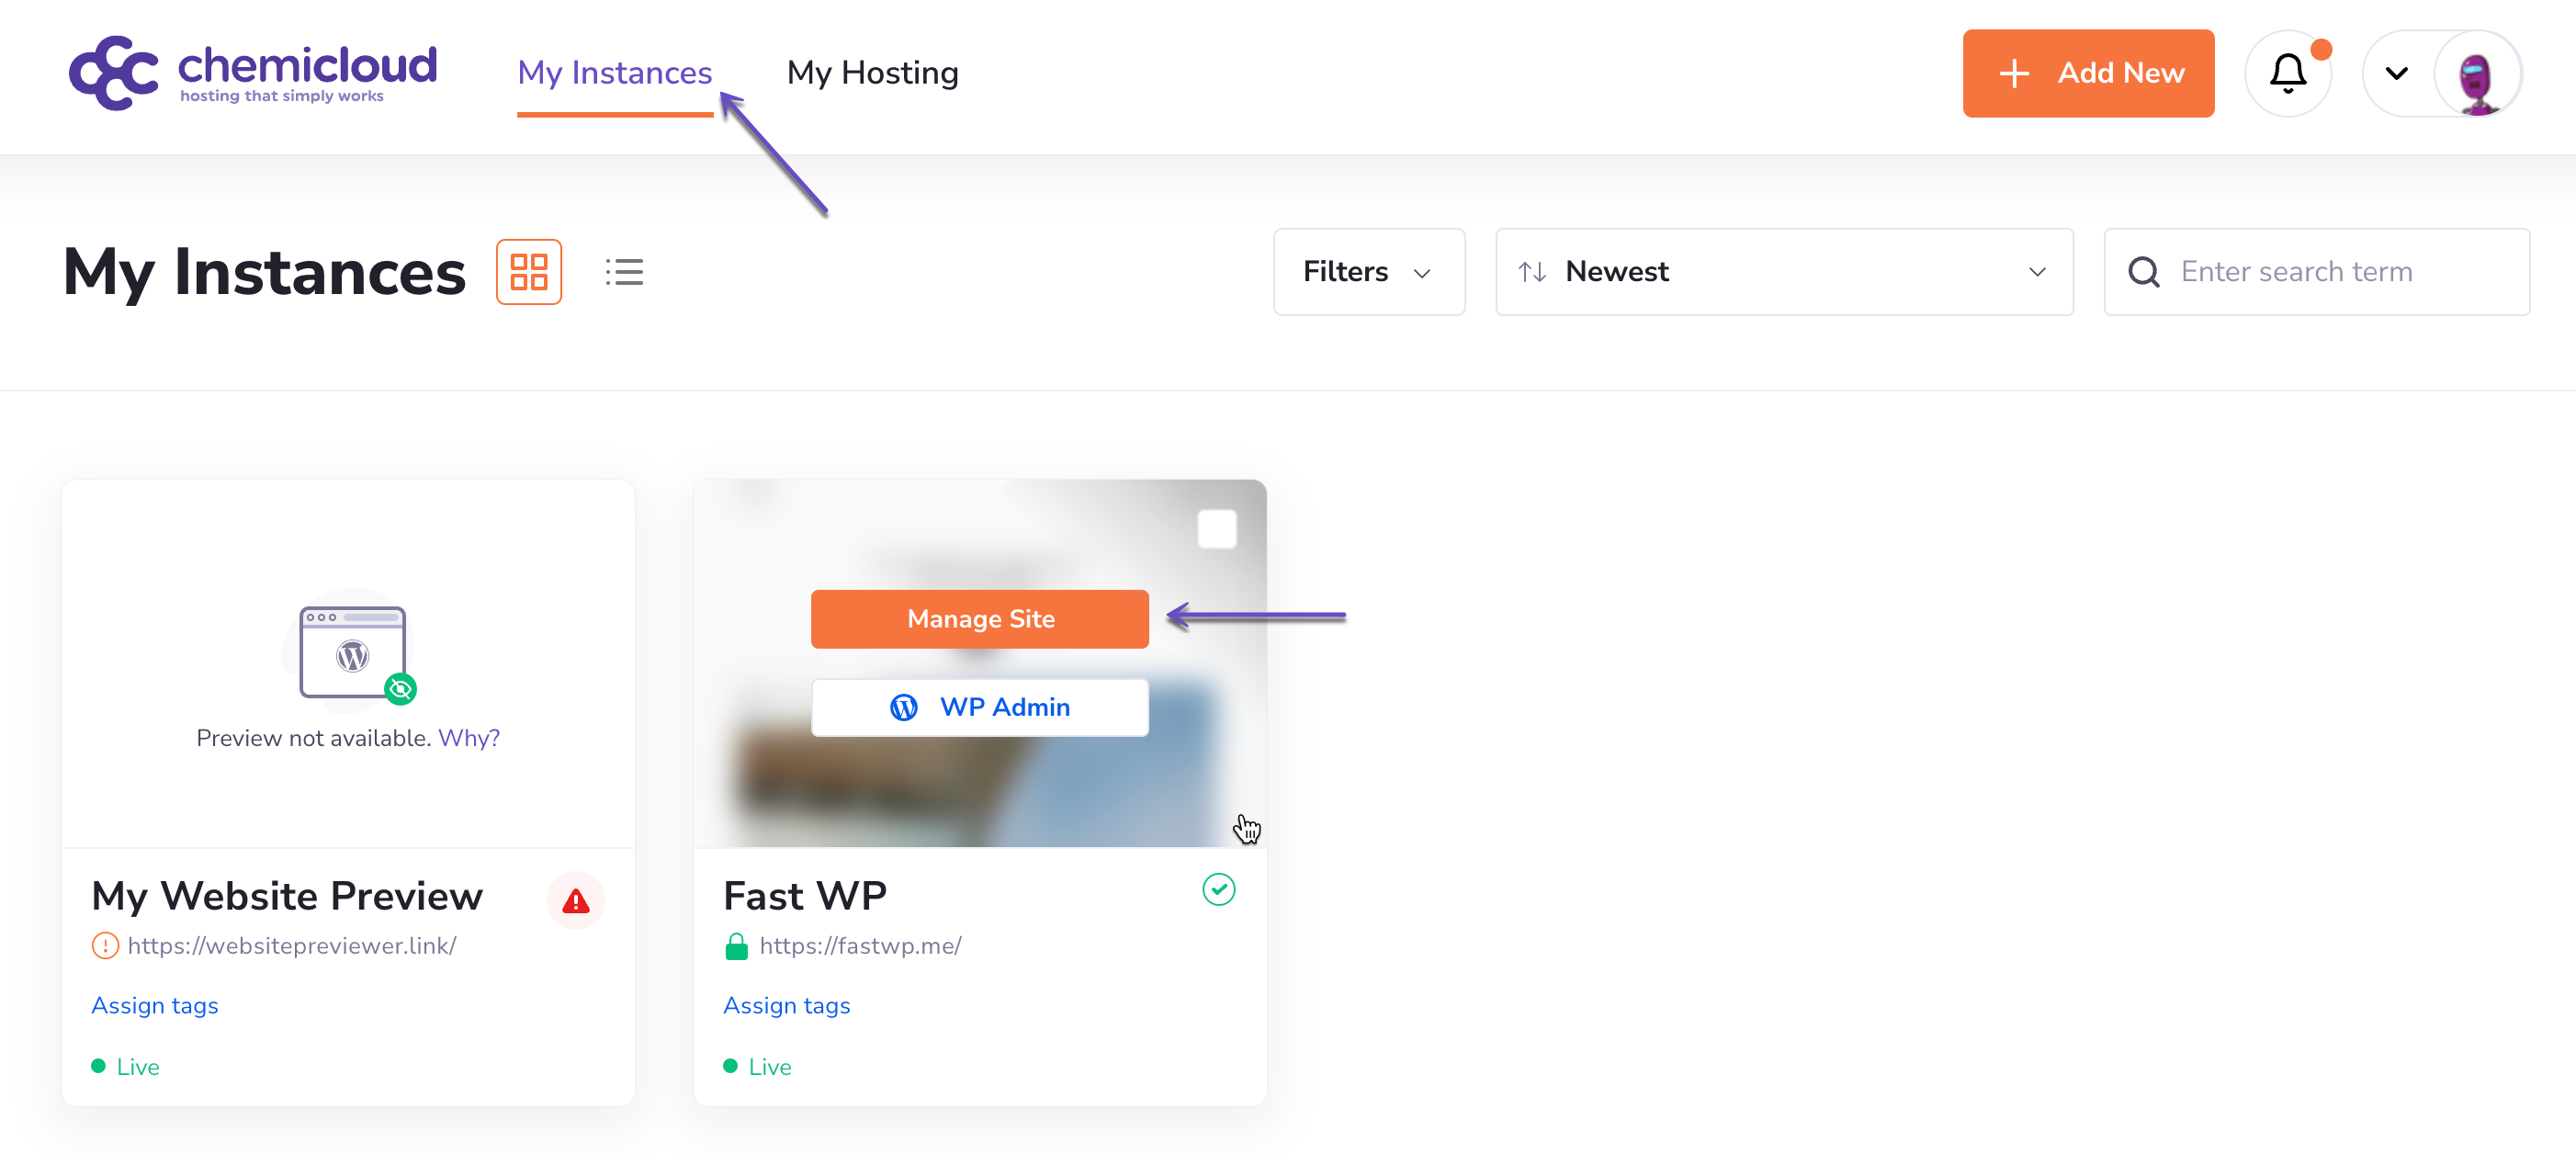
After logging into your WordPress Manager, you’ll see a dashboard with all your instances.
Step 2) Click on the “Manage site” button corresponding to the WordPress instance you wish to create a staging site.
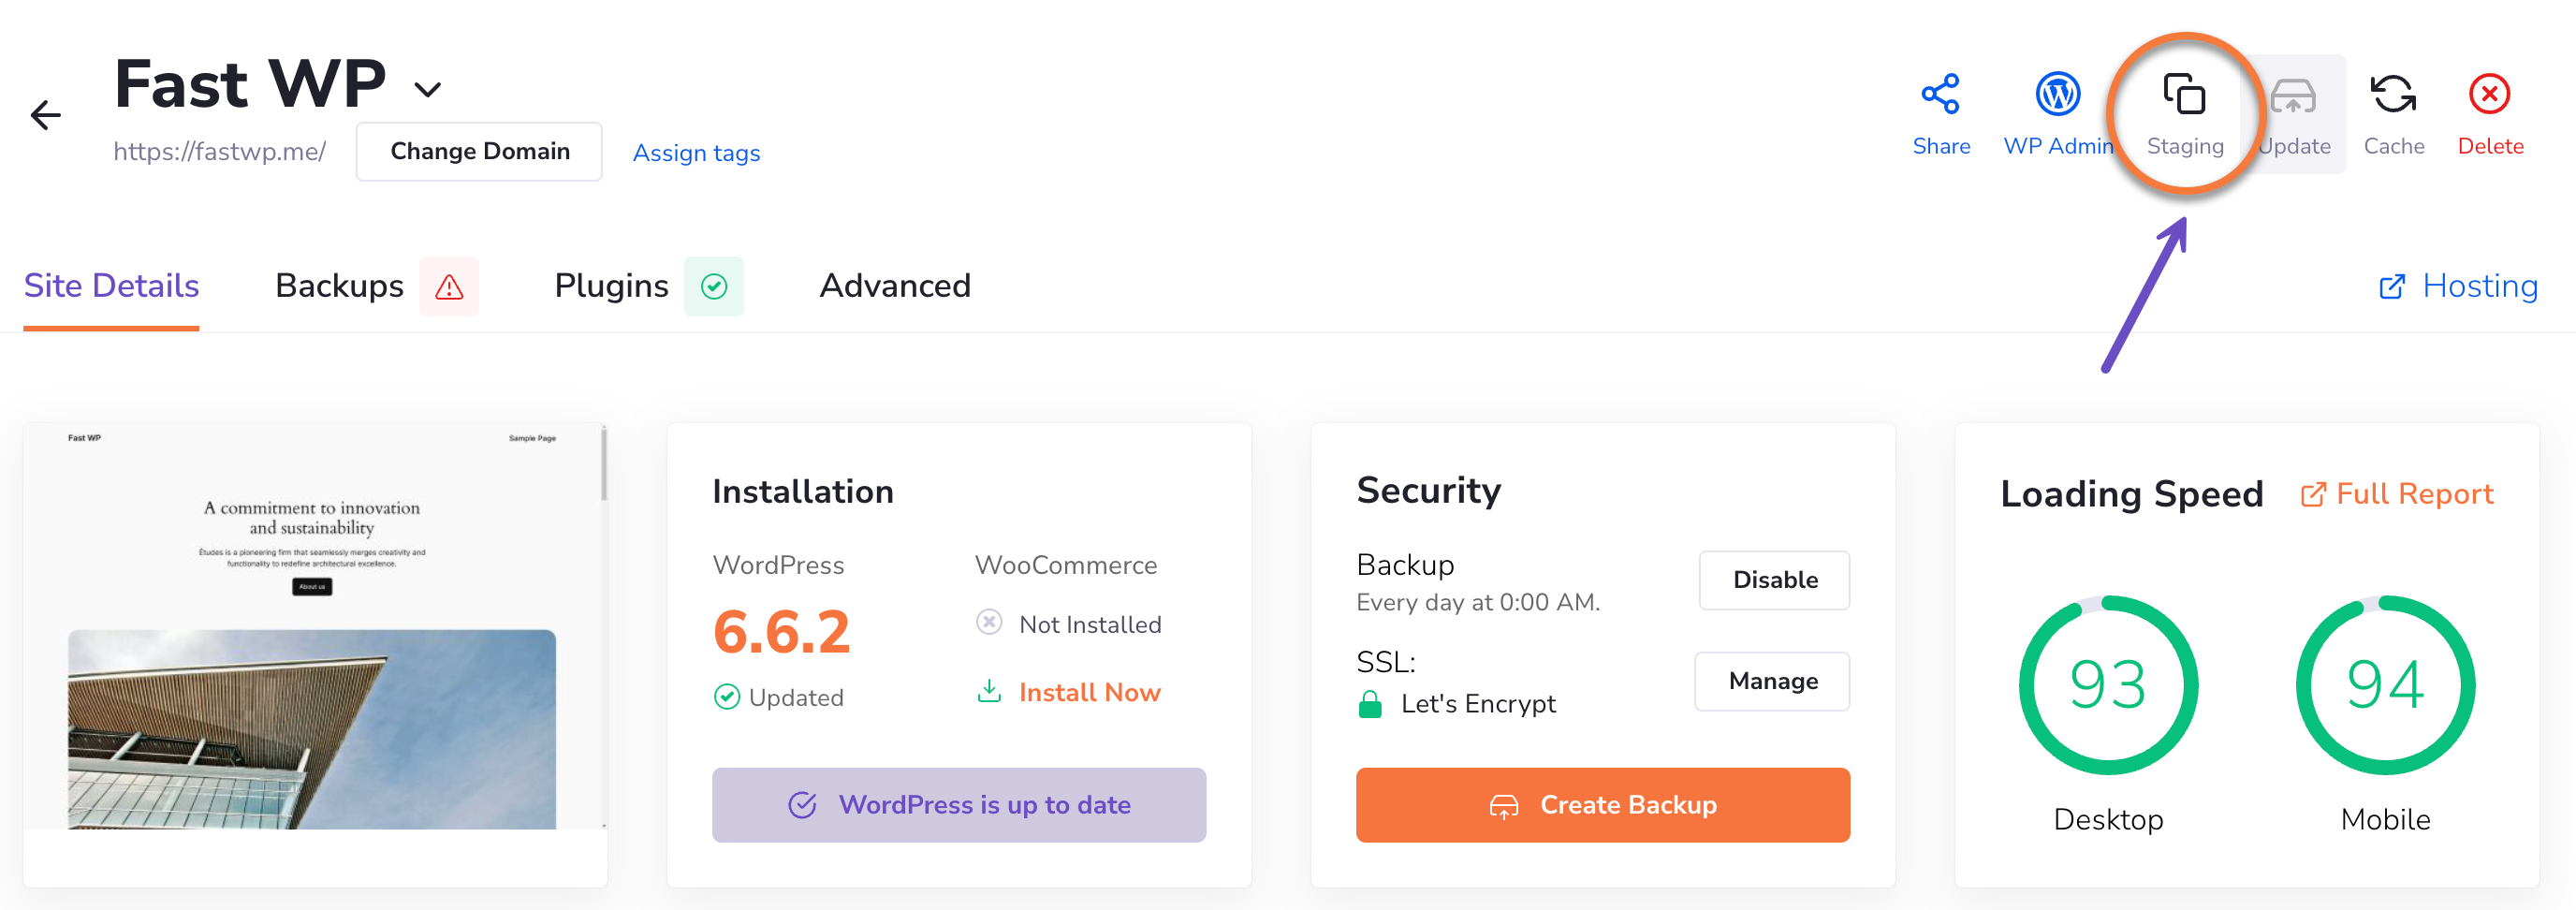
Step 3) Click the Staging button in the top right corner, under the quick actions menu.
Step 4) Enter the domain for the staging site (e.g., staging.yourdomain.com or dev.yourdomain.com)
In my example, I’ll leave the name of the directory blank so it will create the staging on staging.fastwp.me)
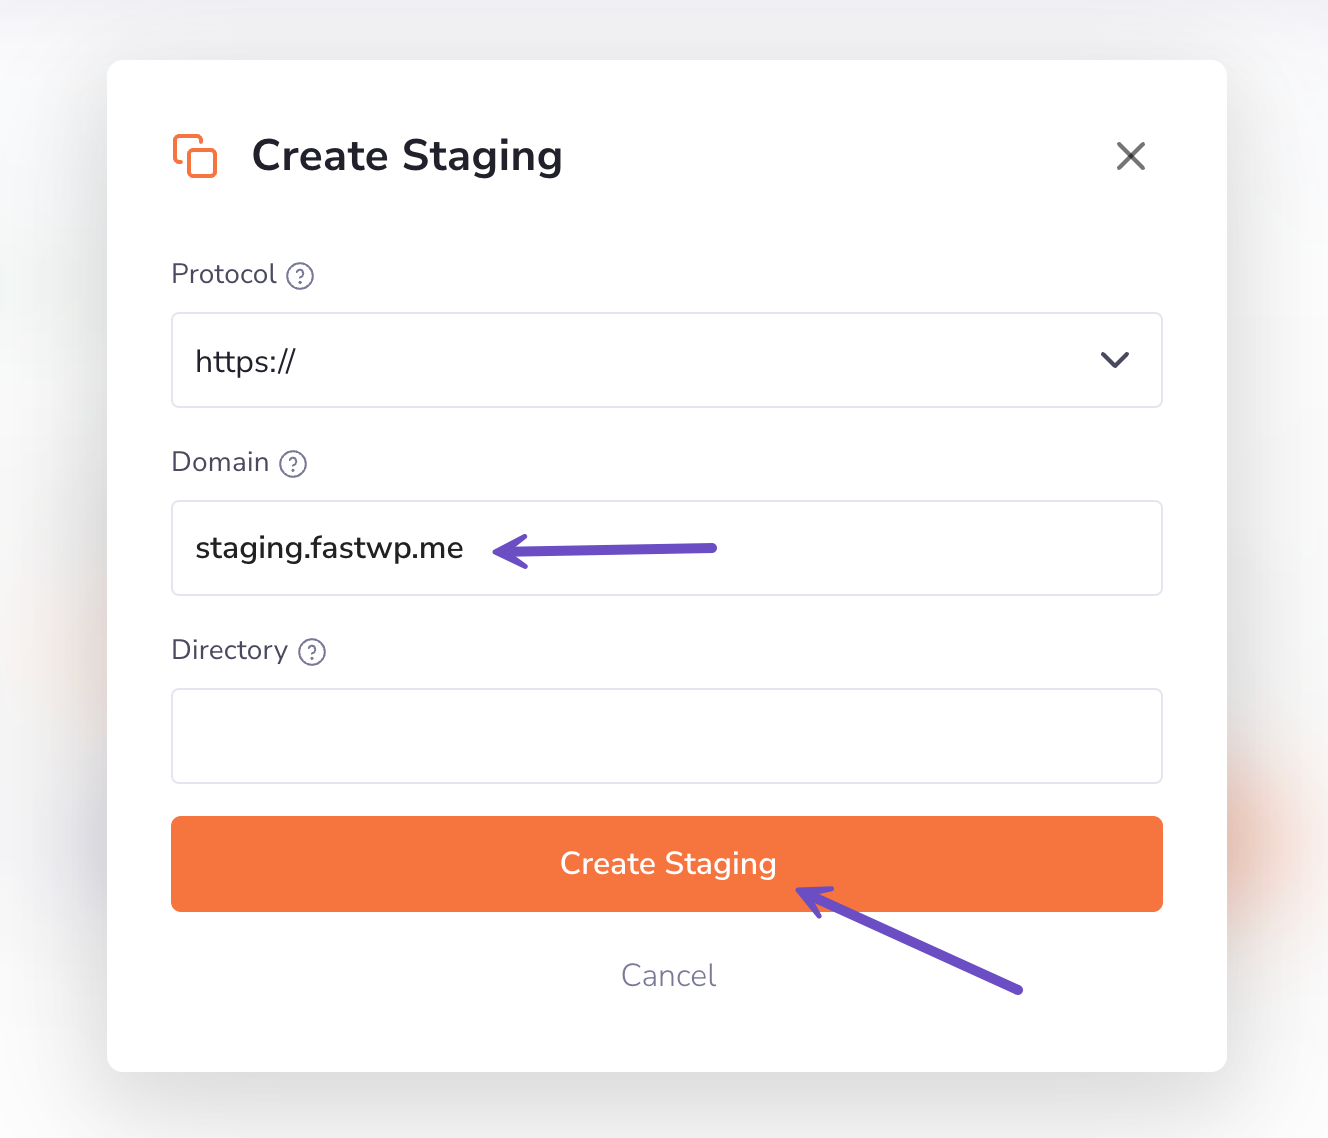
Specify the name of the directory (e.g., v1, v2) only if you wish to create multiple staging sites under the same subdomain (e.g., staging.yourdomain.com/v1; staging.yourdomain.com/v2). They’ll have different folders where they’ll be installed.
Step 5) Once you click Create Staging, our system will begin creating the staging environment for your website and you’ll be able to see the progress as shown below:
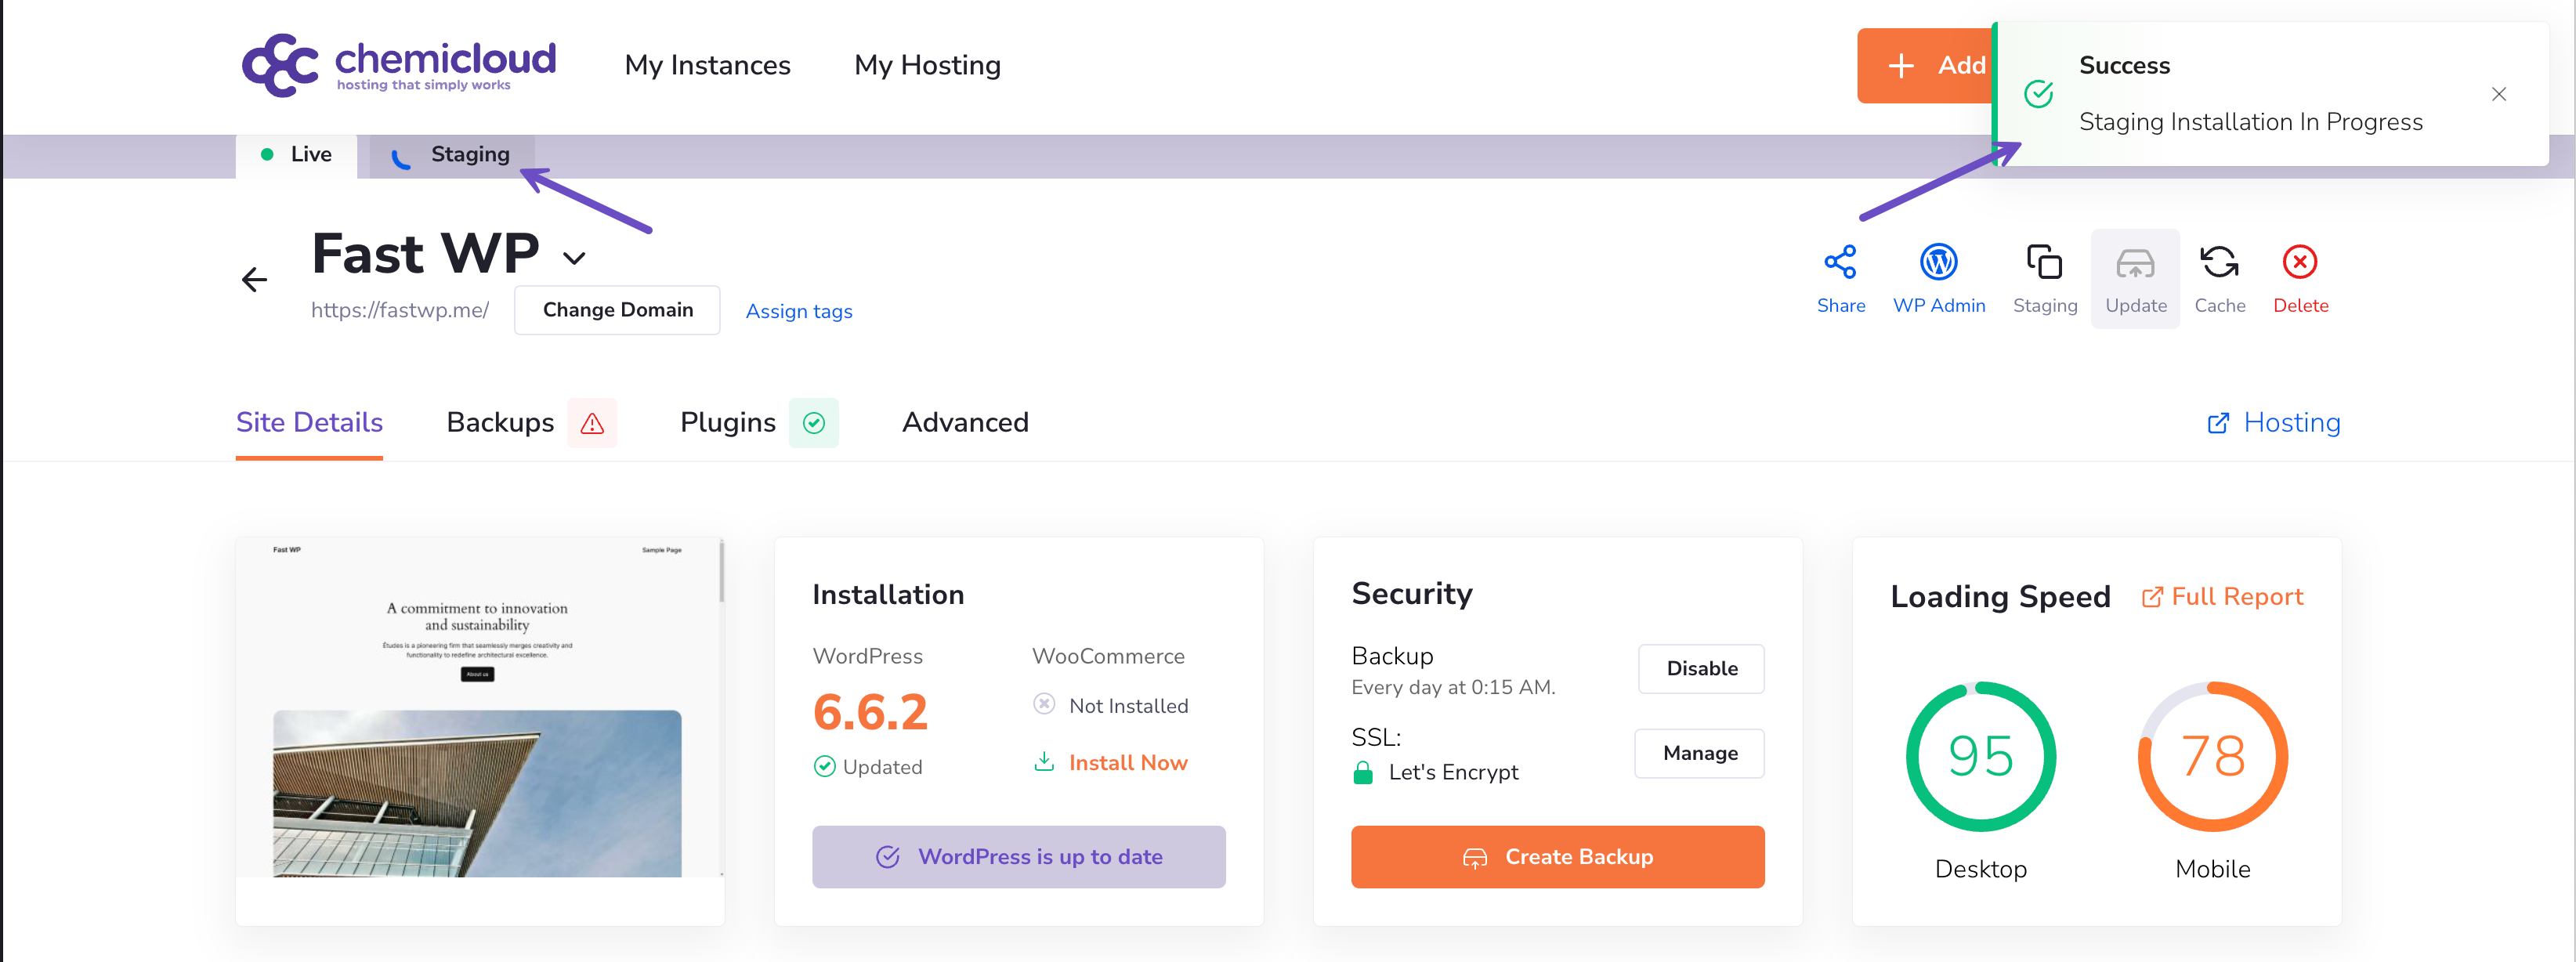
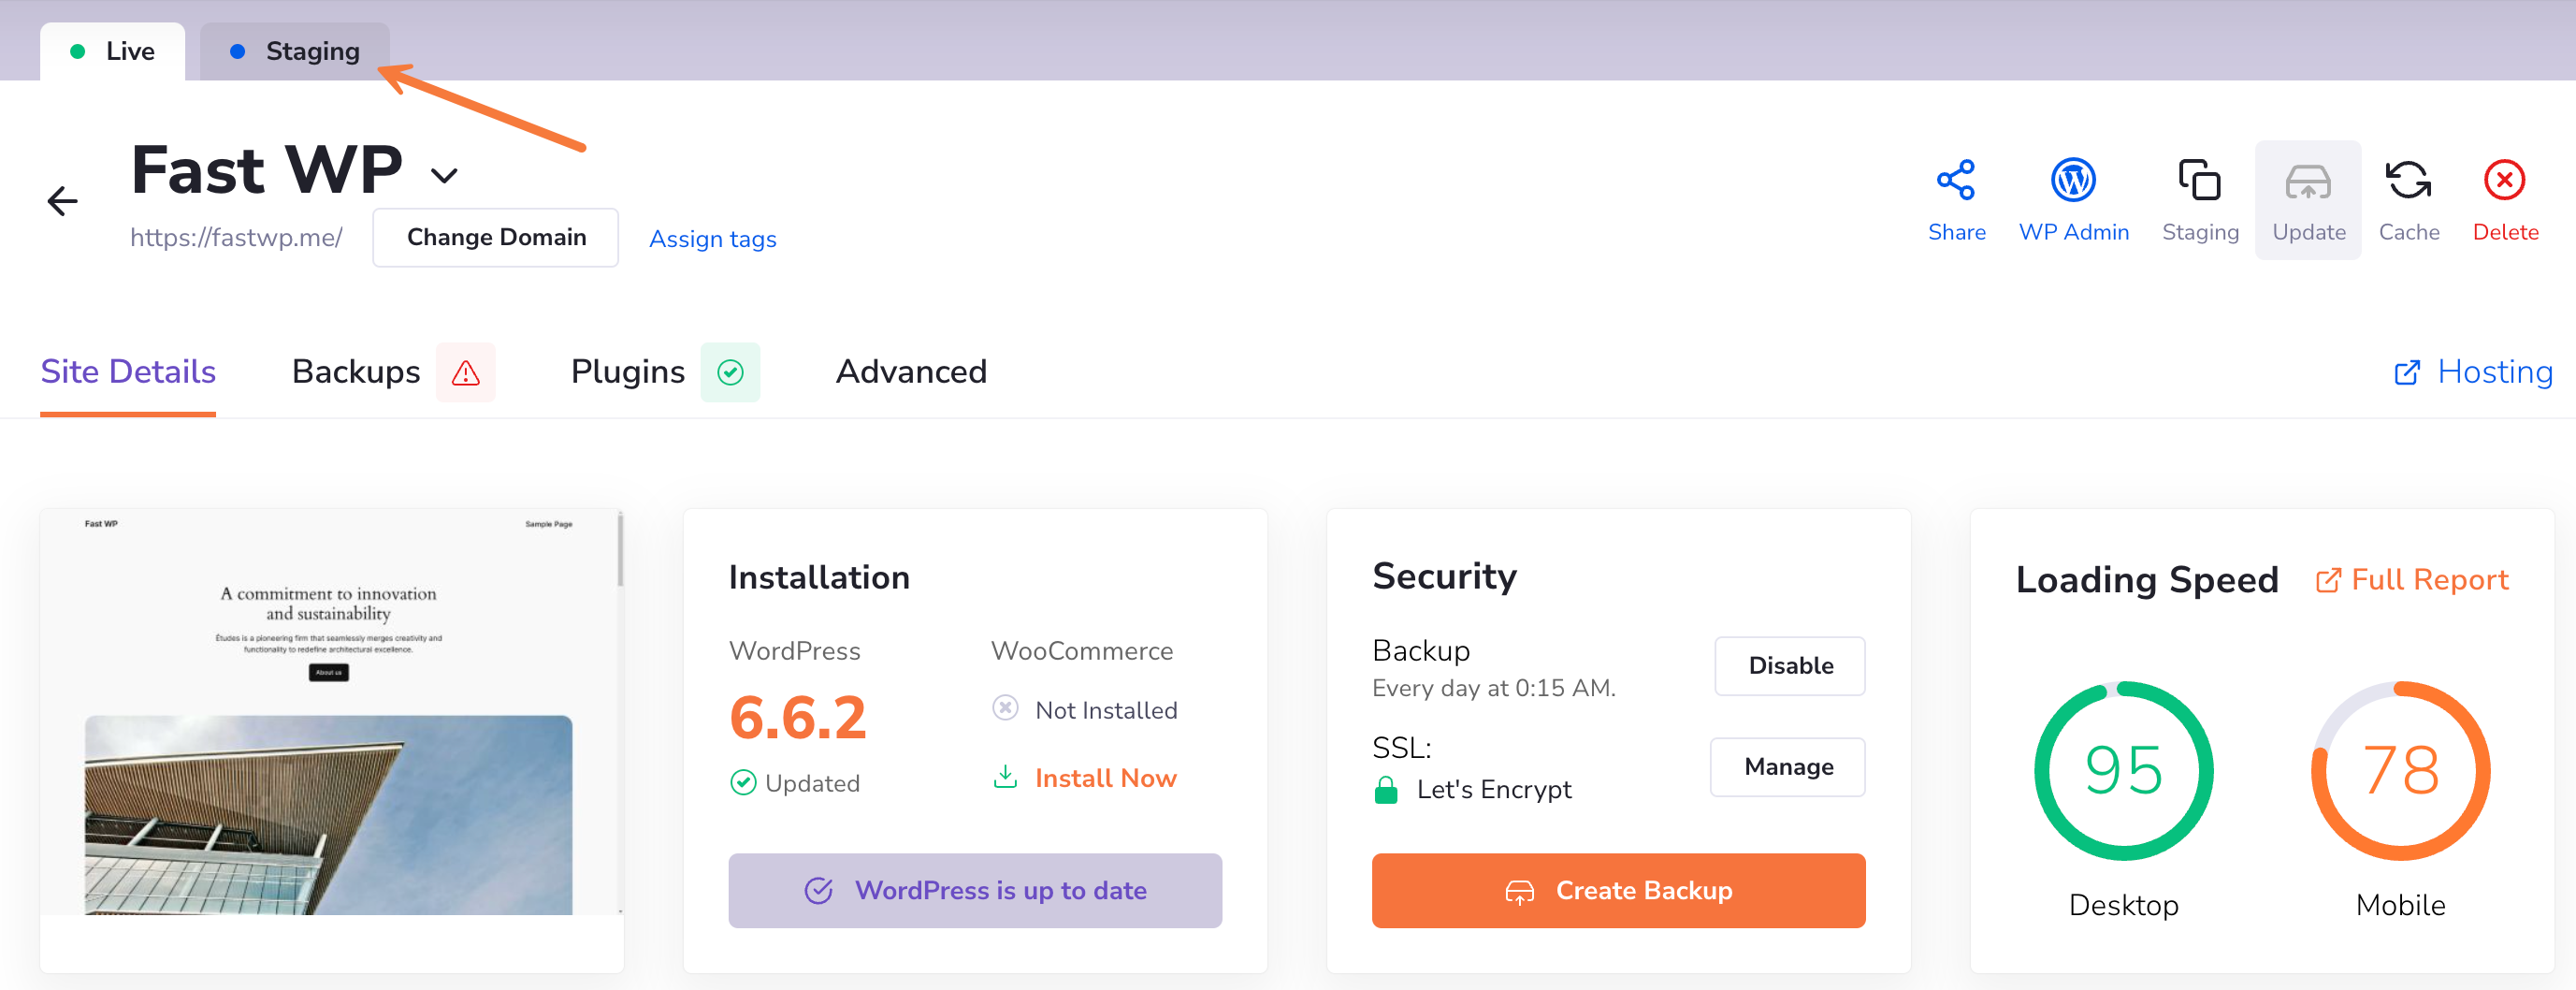
Step 6) To manage your new WordPress staging site, click on the “Staging” tab for your site.
How to Push Changes from Staging to Production (Live)
Now that you’ve worked on your website in the staging environment, it has come time to push any changes in production, which means pushing any changes to the live website.
To do so, please follow the steps below:
Step 1) Log in to the WordPress Manager.
After logging into your WordPress Manager, you’ll see a dashboard with all your instances.
Step 2) Click on the “Manage site” button corresponding to the WordPress instance you wish to add a new collaborator.
Step 3) To manage your new WordPress staging site, click on the “Staging” tab for your site.
Step 4) Click on the Push To Live option in the quick actions menu to push any changes to the live website

Step 5) To push the total changes you’ve made, select both files and database options. In case you wish to push only specific changes to your live site database, use the tables or structure push options.
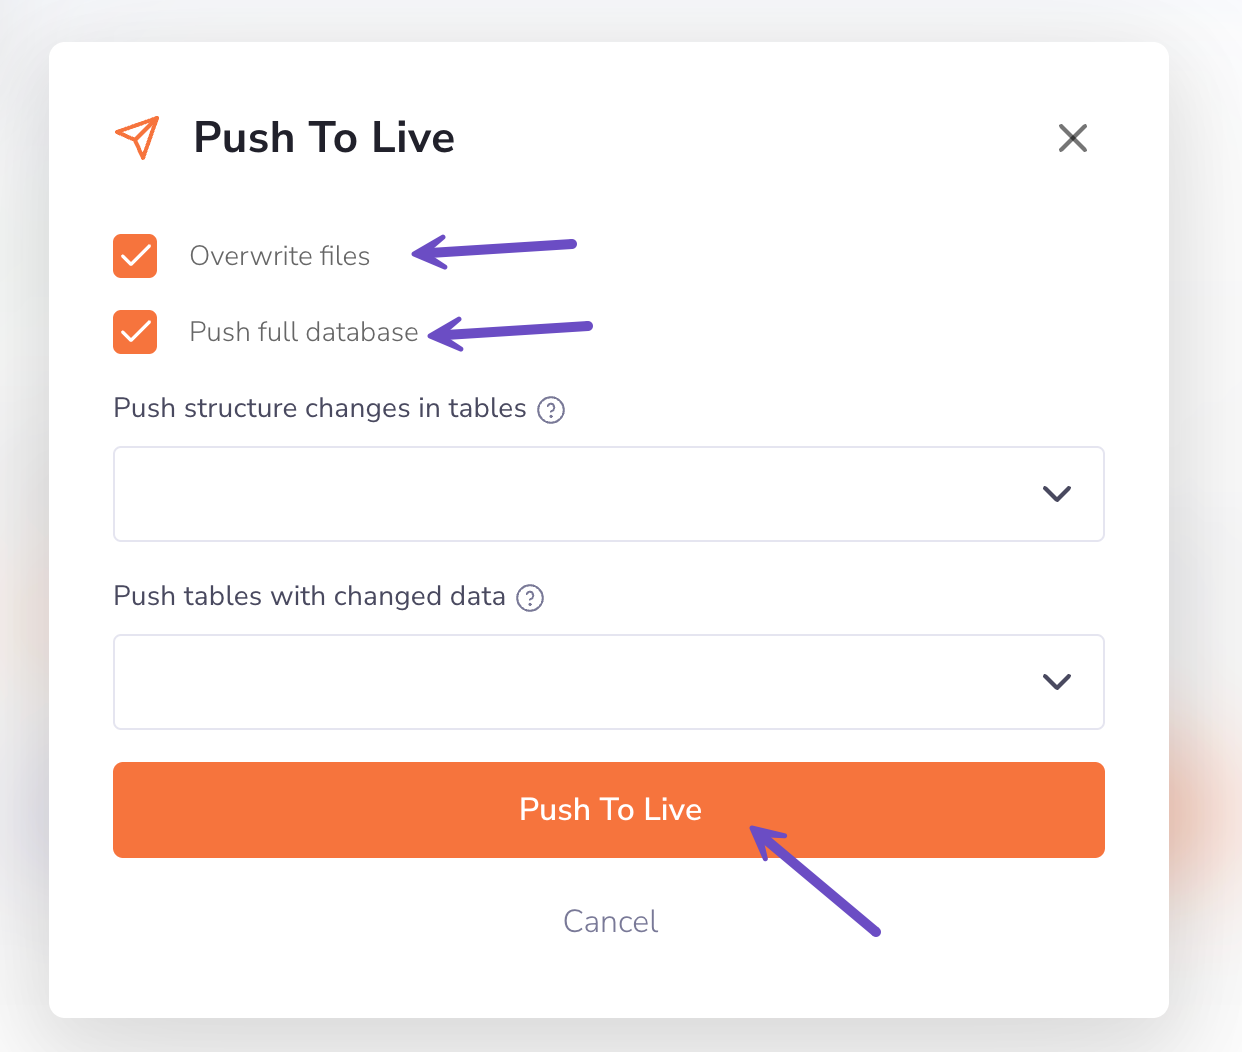
Step 6) When ready, click the Push To Live button.
That’s it !! Your staging changes have been pushed to your live website.
How to Remove a WordPress Staging Instance
In case you don’t need the staging instance anymore, or you want to free up your disk space, you can easily remove your WordPress staging instance.
To do so, please follow the steps below:
Step 1) Log in to the WordPress Manager.
After logging into your WordPress Manager, you’ll see a dashboard with all your instances.
Step 2) Click on the “Manage site” button corresponding to the WordPress instance you wish to add a new collaborator.
Step 3) To manage your new WordPress staging site, click on the “Staging” tab for your site.
Step 4) Click on the Delete option in the quick actions menu to completely remove your WordPress staging site.

Step 5) To remove anything related to the WordPress staging, please select all the options in the dialogue screen.
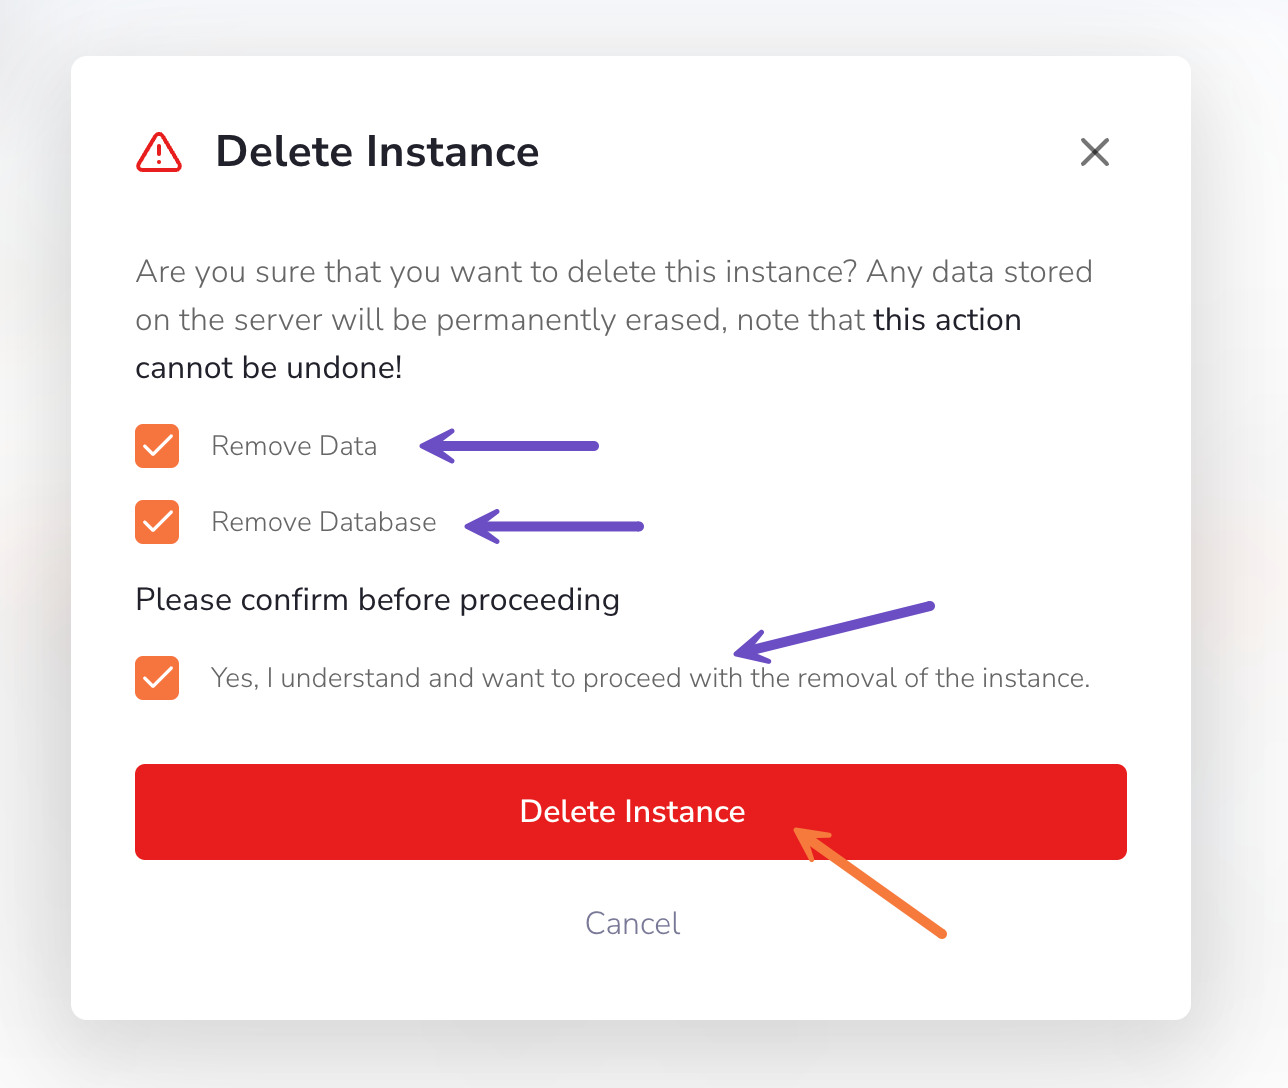
That’s it !! Your staging has been completely removed.
Summary
In this article, you’ve learned how to create a WordPress staging environment using the staging feature in the WordPress Manager and how to manage various aspects of the staging feature.