If you’re reading this, chances are you’re fed up.
Maybe you’ve hit your breaking point with Hostinger’s support delays. Maybe you’re tired of hassling with AI chatbots with no answers. Or maybe you’re just done with inconsistent performance that quietly drains your traffic, your time, and your sanity.
Whatever the reason — you’re not alone.
Thousands of site owners reach this exact moment each year: frustrated, stuck, and wondering how hard it really is to cut ties with their hosting provider.
The good news?
It’s easier than you think.
In this guide, you’ll discover:
- The most common reasons people cancel Hostinger (you might relate to more than one)
- What to do before pulling the plug
- Exactly how to back up your site and secure a refund
- The surprisingly simple steps to make a clean, painless switch
And yes — I’ll even show you how to move your site without downtime.
Let’s start with the real issue most users never see coming…
Table of Contents
Why People Cancel Hostinger (And Why You Might Too)
At first glance, Hostinger looks like a steal. Affordable pricing, a sleek website, and big claims about performance.
But dig into the reviews, and a few patterns emerge:
- Support delays: Long waits. Unhelpful replies. Scripted responses that leave you in limbo.
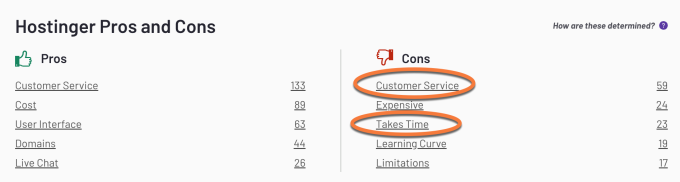
- No cPanel: If you’ve used traditional cPanel hosting before, switching to Hostinger’s hPanel can feel like trading a toolbox for a toy.
- Unexplained resource issues: Spikes in CPU or I/O usage with little explanation (and limited ways to investigate the cause).
The biggest red flag? When your site runs into trouble, you’re often left without the tools — or the help — to fix it.
If that’s where you’re at now, you’re not alone. But you don’t have to stay stuck.
What to Do Before You Cancel Hostinger
Don’t rush to cancel your Hostinger account without a plan. You’ll want to:
1) Choose Your Next Hosting Provider Wisely
Before you jump ship, make sure you’re not going from one problem to another.
Before making a decision, make sure to ask these essential questions. Understanding their answers will help you determine whether the provider suits your needs.
Ask any prospective host:
- How long have you been in business?
It’s understandable to be wary of new web hosts that have been around for less than a year, however, one should not automatically assume that an older host is better either. While there are some established companies in the industry who offer quality services, there are also those who have been in business for many years yet still provide substandard services. - Do you offer free migrations — and how many?
The process of switching web hosts can be quite the endeavor. Those who have done it before will not feel much of a burden, yet those who are going through the migration for the first time should plan to dedicate an adequate amount of hours into this project. - Do you have global server locations?
When searching for a web hosting service, it is important to consider where their servers are located. This can have a major effect on how quickly and smoothly visitors can access the content of your website. Taking the time to ensure that your host has appropriately placed their servers is crucial to making sure that visitors have an effortless experience when they visit your site.When determining the suitable server location for your website, it is essential to consider the geographic distribution of your target audience. By considering the geographic distribution of your target audience, you can optimize server locations to serve them best. If you target a global audience, you can utilize a content delivery network (CDN). - Will you provide me with a reliable backup system for my websites?
It cannot be stressed enough how significant it is to make sure your website is backed up. Even with the best security measures in place, data loss and hacking can still occur, so having a backup system in place is always wise.It’s important to exercise caution when researching web hosting companies, as many will advertise that they back up websites. However, you must verify whether or not these backups are actually stored offsite. - How do you protect against malware and downtime?Unfortunately, widely used web applications, such as WordPress, are a prime target for malicious hackers. It is essential to ensure that preventative measures are in place to safeguard against brute force/hacking attempts and that the hosting infrastructure has been fortified to minimize the risk of malware infecting your site.
- What’s your refund policy if I’m not happy?Before investing in a hosting service, it is important to understand what kind of satisfaction guarantee it provides. This way, you know that your money isn’t at risk. Many reliable hosting companies, including ChemiCloud offer a 45-day period for a refund on most of their hosting services.
- Is support actually handled by experts — or outsourced?
- Will your support team help me solve more complex technical issues?
Providing amazing customer service should be your topmost concern. Don’t make the mistake of leaving it to chance… even experts may find themselves in need of website assistance sometimes, and when this occurs it’s essential that you have the ability to access timely and efficient help!Before making the commitment to sign on, it pays off to ask some technical questions.
Red flag: If your next host can’t answer these confidently, keep looking.
Want a shortcut?
Here’s what thousands of former Hostinger users have discovered: ChemiCloud offers fast, secure hosting with real human support, free site migration, and a 45-day money-back guarantee.
2) Back Up Your Website – How to Generate a Backup of Your Website with Hostinger
Never cancel your account before downloading your files and database. Once your Hostinger account is gone, so is your data.
Before you cancel your Hostinger account, it is essential to make sure that you have a backup of your site. You can download the most recent backup and save it on your computer. Note that once you terminate the account, any website backups taken and stored with Hostinger will no longer be accessible.
Pro Tip: If you’re moving to ChemiCloud, we’ll handle this for free. No tech headaches, no downtime—just a smooth transition.
Backing Up Your Files:
Using Hostinger’s Site Tools, you can easily do a backup for your site’s files.
To do this, please take the following steps:
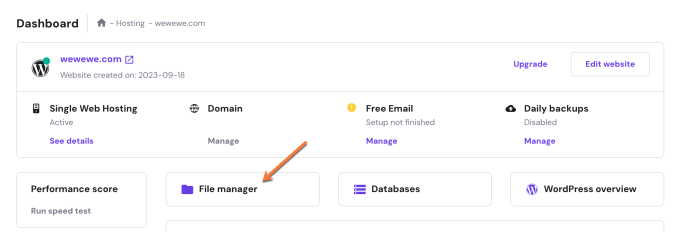
Step 1) Log in to your Hostinger Dashboard
Step 2) Go to Websites > Manage.

Step 3) Click File Manager.
Step 4) Right-click on the public_html folder and choose Download.
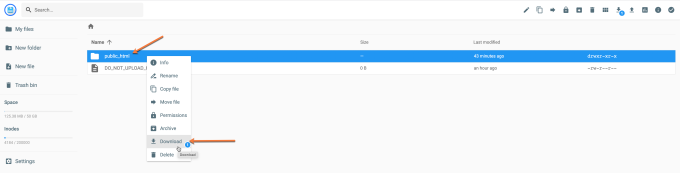
Step 5) Choose the archive format (.zip is fine) and name your backup.
The archive download will start right away. The time to download the archive depends on the size of your site.
That’s it; now that you have a backup of your site files, the next step is to do a backup for your site’s database.
Backing Up Your Databases
Using Hostinger’s Dashboard, you can easily do a backup for your site’s database. To do this, please take the following steps:
Step 1) Log in to your Hostinger Dashboard, and locate the Websites option in the top menu. Once in the Websites section, click the Manage button under your website’s details.
Step 2) On your site’s dashboard, click the Databases option.

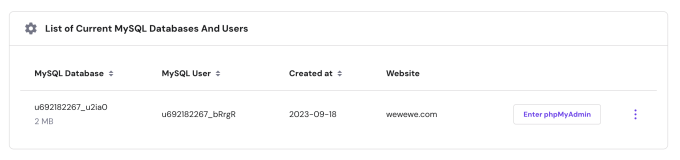
Step 3) Scroll down to the List of Current MySQL Databases And Users, then click on the Enter phpMyAdmin button corresponding to your website’s database.
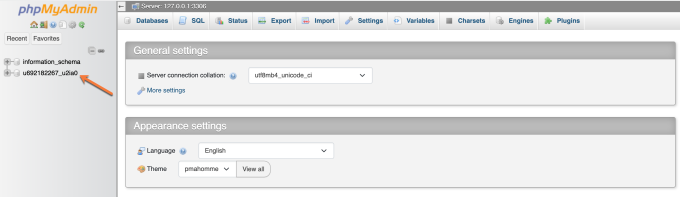
Step 4) Once inside phpMyAdmin, select the database by clicking on it from the left-hand side menu.
Step 5) The next step is to click on the Export tab, and finally to click on the Export button in the next window.
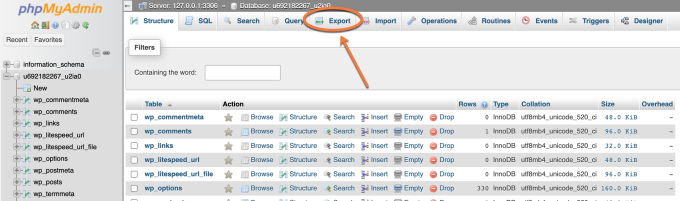
Downloading your site’s database to your computer will start immediately. The time to download the backup depends on the size of your database.
That’s it. Now you have a full backup of your website.
How to Make the Switch Without the Stress?
Migrating your site doesn’t have to be complicated — or risky.
With ChemiCloud, you get:
- Free white-glove migration (we’ll move everything for you)
- 24/7 real human support — no more AI chatbots. No scripts. Just helpful, experienced support from people who care
- 17 server locations to choose from
- Daily backups and advanced security — included.
Plus, our 45-day money-back guarantee gives you plenty of time to test the waters risk-free.
So… if you’ve had enough of the slowdowns, the outages, the support frustrations — this is your escape plan.
Let us handle the migration. You focus on growing your site.
👉 Get your Hostinger Escape Plan
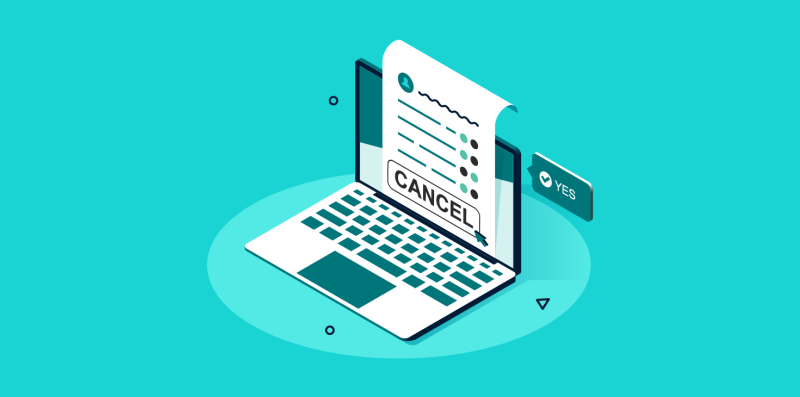
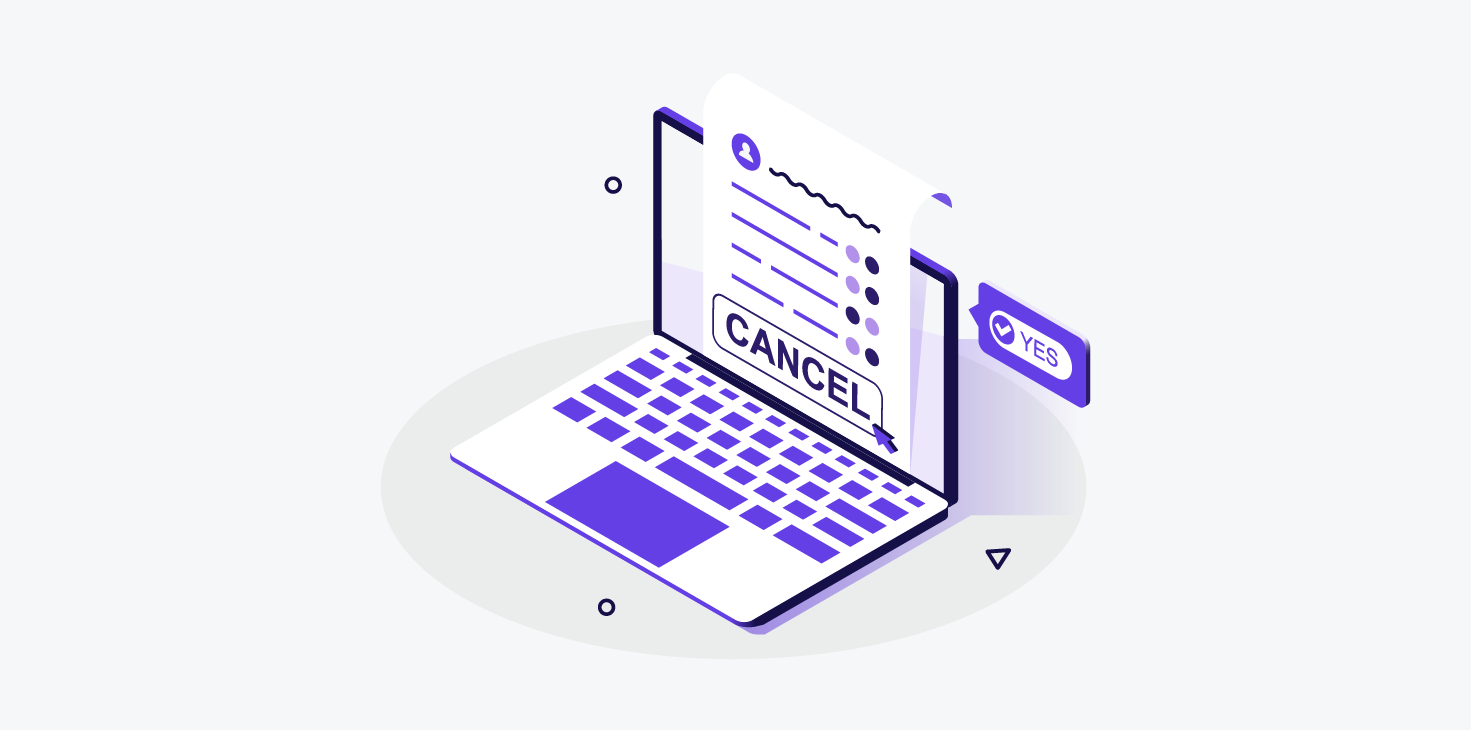
How to Cancel Your Hostinger Account and Get Refund (If Eligible)
Now that you’re ready to cancel your Hostinger account, the next step is understanding how to proceed.
Before continuing, you must decide which services you would like to discontinue. Of course, this step can be skipped if you only have a single hosting plan.
In addition to web hosting, Hostinger also offers domain registration services. Canceling both services is unnecessary, but it is an option for those who prefer it. Furthermore, after canceling your hosting, you can still transfer your domain from Hostinger.
Here are four straightforward steps that will help you cancel your Hostinger account and request a refund:
Step 1) If you want to cancel your hosting plan while keeping your Hostinger account, you’ll have to contact their Customer Support team, who’ll help you.
Alternatively, you may disable the auto-renewal of your hosting service. This way, your hosting plan will not be automatically renewed at the expiration date. (See the steps to follow in the FAQs section).
Step 2) Visit this link to initiate an automated refund process. Once accessed, you will see all the invoices paid within the last 30 days.
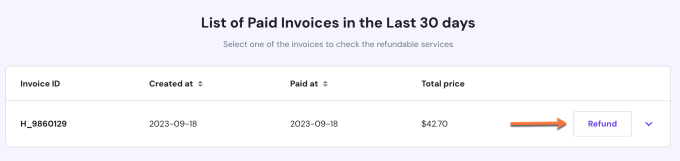
Step 3) Find your latest invoice and click Refund.
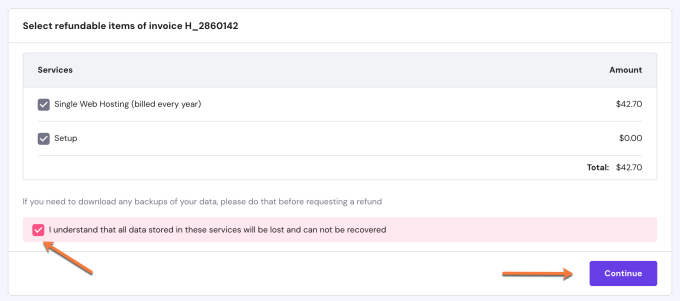
Step 4) Acknowledge the data loss warning and click Continue.
Step 5) Enter your reason for cancellation.
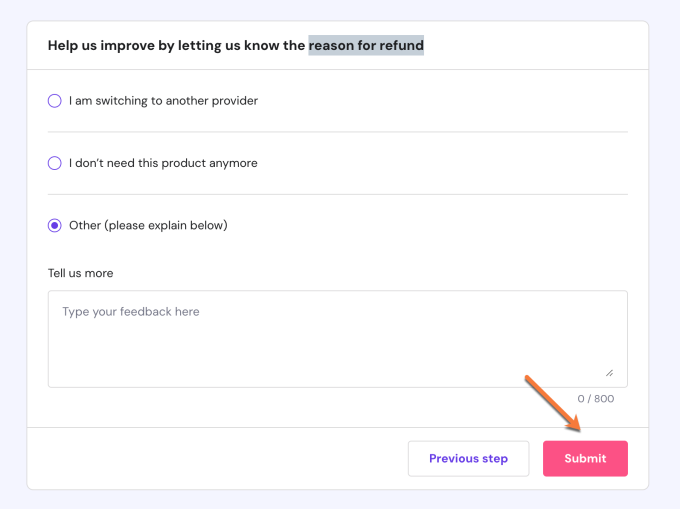
Step 6) Confirm and submit your refund request.
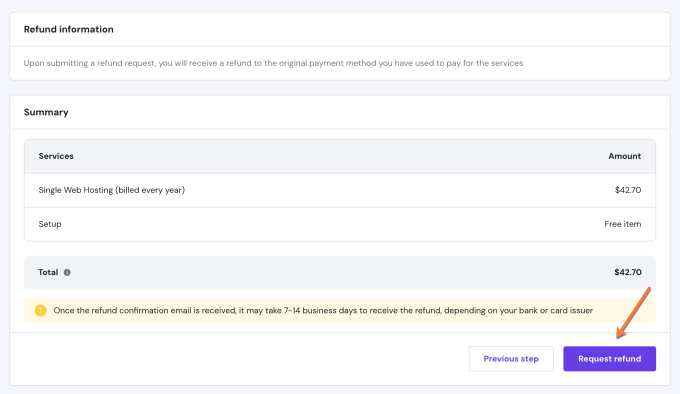
Thats it! Once the refund confirmation email is received, it may take 7-14 business days to receive the refund, depending on your bank or card issuer.
Cancel your Hostinger Account (FAQs)
Now that you have a good idea of the steps to follow when cancelling your Hostinger account, let’s make sure we haven’t missed anything by discussing the following commonly asked questions.
Can I Get a Refund for My Hostinger Account?
For those who have recently signed up with Hostinger, you may be eligible for a refund within 30 days. However, it is important to note that there are certain conditions in order to qualify for this refund.
For hosting services that are cancelled within 30 days of payment, a full refund is possible as long as the new term has not yet begun.
Unfortunately, no refunds are available for domain names or other add-ons purchased as part of your plan. Furthermore, any paid support or third-party services are excluded from the money-back guarantee.
How to Request a Refund at Hostinger (if Applicable)
New customers of Hostinger can take advantage of a 30-day money-back guarantee for all shared hosting plans and a 14-day money-back guarantee for cloud hosting plans. Once you decide to cancel a service eligible for a refund, you will receive an on-screen notification with the exact sum of money you are due back. The refund will be issued without delay as soon as you confirm the cancellation request. Your bank should reflect this transaction in your statement within 7-10 business days, depending on their own processing times.
How to Disable Hostinger’s Automatic Renewal?
Should you decide against automatic billing, then the Hostinger billing system won’t be able to process payment, and your plan won’t be renewed.
To disable the automatic renewal of your Hostinger service, follow the steps below:
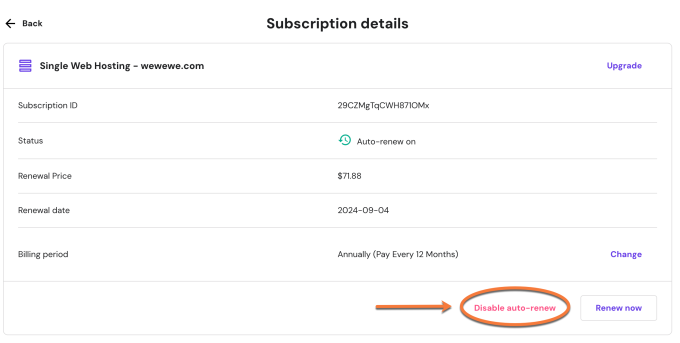
1) Log in to your Hostinger Dashboard and locate the Billing section in the top menu.

2) Once in the Subscriptions section, click the arrow next to the service to see more options.

3) This should bring up Subscription details. Click the Disable auto-renew option.
4) The next step is to click the Disable auto-renewal button.
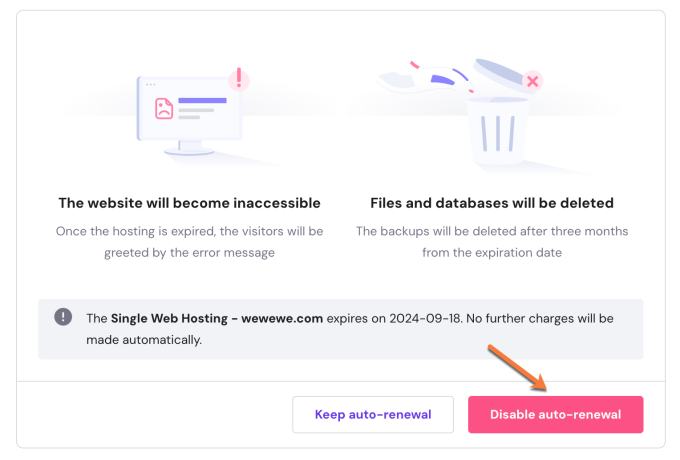
5) Provide the reason for disabling auto-renewal, then click on the Submit and disable auto-renewal button.
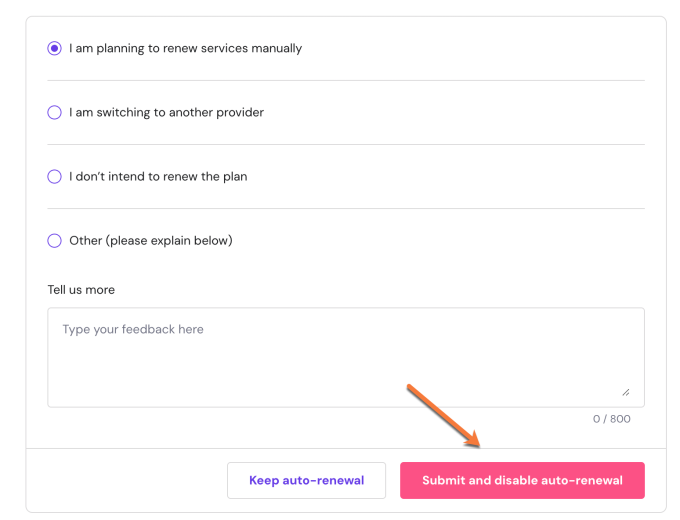
That’s it; now you know how to disable the automatic renewal of your hosting service with Hostinger.
If you decide to cancel your Hostinger account instead, please follow the above mentioned cancellation process.
Final Thoughts
Canceling Hostinger doesn’t have to be a tech nightmare.
Yes, their dashboard can be clunky. Yes, the support can be slow. But with a little preparation, you can move your site safely, get your refund, and start fresh on faster, more supportive hosting.
You don’t have to settle for poor service. And you don’t have to do this alone.
Leaving Hostinger?
Don’t waste hours figuring it out alone.
Get your Hostinger Escape Plan — includes step-by-step instructions to safely cancel your account, back up your data, and migrate away from Hostinger in less than 1 hour, with no downtime.
✅ A proven checklist for a smooth switch
✅ Free site migration details
✅ Bonus tips to avoid common pitfalls
No spam. Just expert help to migrate away and cancel your Hostinger account stress-free.