

If you run a WordPress site, there’s a significant probability you use one or two of Google’s many, many services. You might be using something like Analytics and Search Console, or AdSense for monetization, or PageSpeed Insights for performance insights.
With the near-endless growth of WordPress, Google recognized that many users need some help setting up the various Google services on their WordPress sites, and acknowledged many people may not know the full breadth of offerings from Google. For example, a user may not know about Page Speed Insights but may have heard of Search Console. It happens.
The Google Site Kit plugin is a fantastic little plugin that helps users connect their WordPress sites to 6 of Google’s services:
Four of these utilities feature integrations into the Site Kit plugin and allow you to interact with them. For example:
- With PageSpeed Insights, you’re able to see insights about your site’s performance.
- You can view Google Analytics and Search Console information for your entire site or specific pages.
- Assist you in inserting Ads and viewing your AdSense earnings.
With Optimize and Tag Manager, the Site Kit plugin will help you add the code needed to make these work to your site, but you’ll still need to use their individual websites to create A/B tests and manage tags.
At ChemiCloud, we recommend the Site Kit plugin to people new to WordPress and experienced with WordPress. After all, depending on which plugins you were using, this could replace a couple of plugins for you and reduce plugin overhead in your WordPress installation as well as the overall memory footprint required to make your site work. This author also uses all of the sites they manage and finds it to be a super convenient plugin.
How to Install and Set Up The Google Site Kit Plugin
Before we walk through how to install the Site Kit plugin, you need to know you’ll need a Google Account to use it. If you don’t have a Google Account, you can create one by clicking here. Also, when configuring this plugin for the first time, you should ask yourself if you want the plugin to associate itself and your Website with your personal Google Account, or if you you want to create a separate, new, Google Account just for your website.
This author likes to keep things separate. Makes it easy that way!
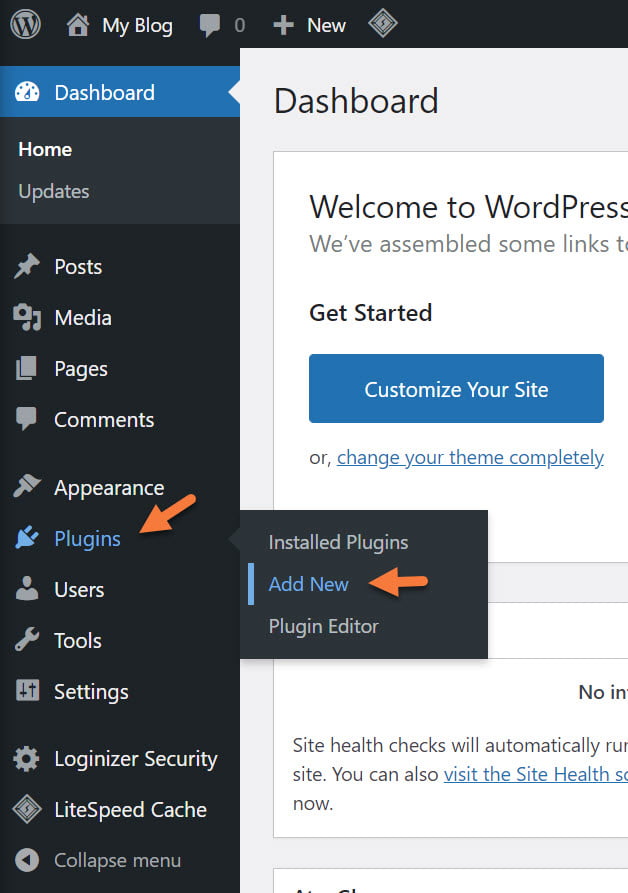
Step 1: Log in to your /wp-admin and hover over Plugins on the left menu bar. In the little menu that opens, click Add New.
Step 2: In the Plugins area, use the Search feature located in the top right to search for Google Site Kit. You don’t need to hit enter/return on your keyboard, the search results will populate shortly after you stop typing. 😏
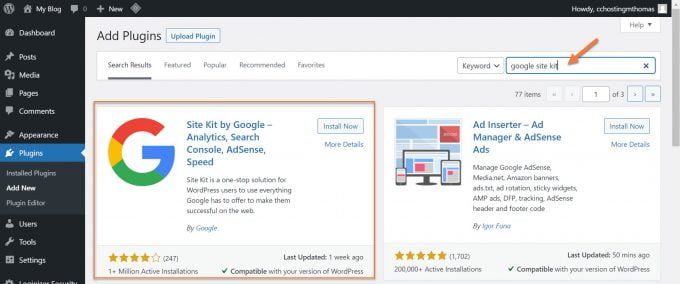
Click the Install Now button.
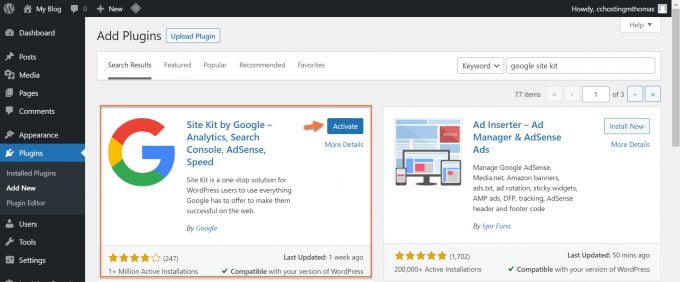
The plugin will be downloaded and installed. When this has finished, click the blue Activate plugin to enable the plugin.
You’ll be returned to the Plugins area where you’ll see a banner like the one below asking you to Start Setup:
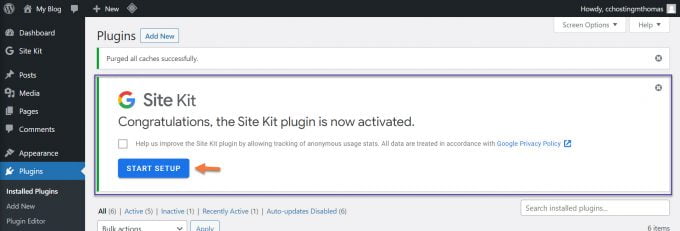
Step 3: Click the Star Setup button. You will be taken to a page that looks like the image below:
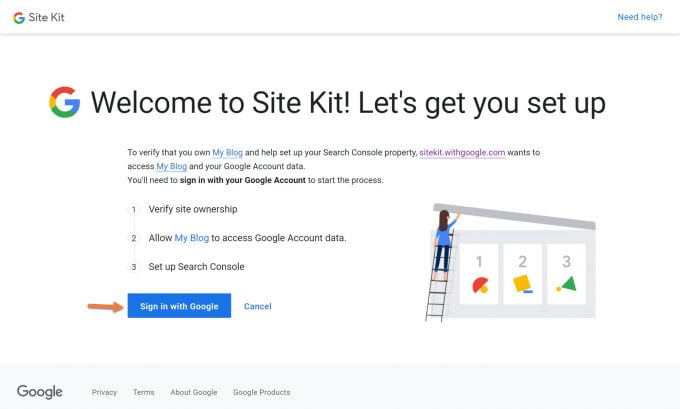
This is the step where you’ll link your Google Account to your Plugin (and by extension, your Website). Click the blue Sign in with Google button to proceed.
You’ll be presented with a list of Google accounts in which you are presently signed, and the opportunity to Use Another Account. Pick whichever account you want to use and click it to proceed, or sign in if needed.
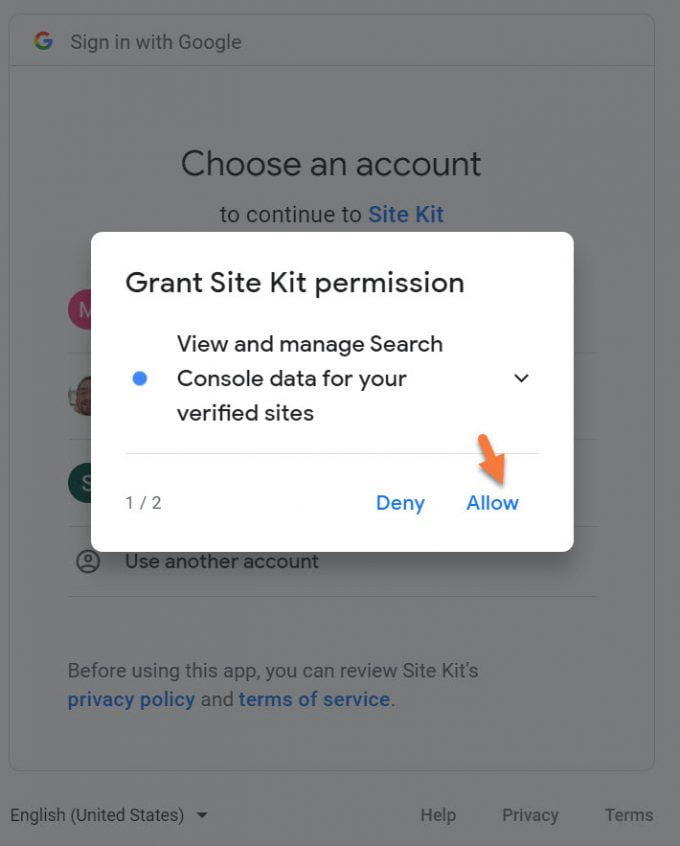
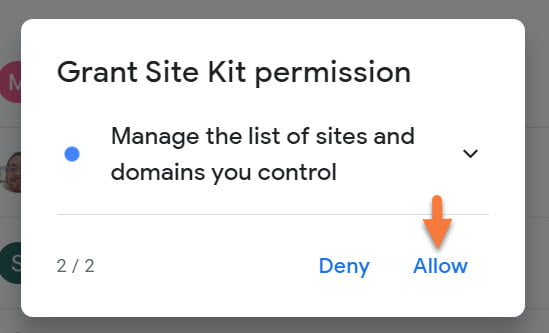
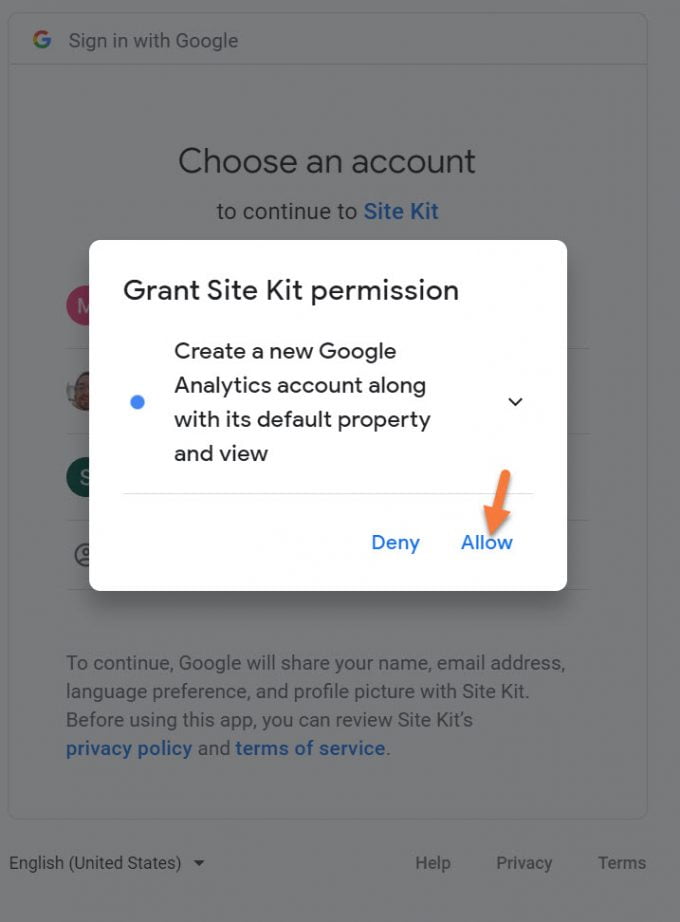
You’re going to see a modal that’s asking you to Grant Site Kit permission to access specific sites of your site and control a few things. To proceed with this, you must click Allow. (Don’t worry, as Privacy Invasion goes here, it’s not too bad.)
and
After clicking allow for each permission, you’ll see a confirmation page with a summary of the changes taking place to your site:
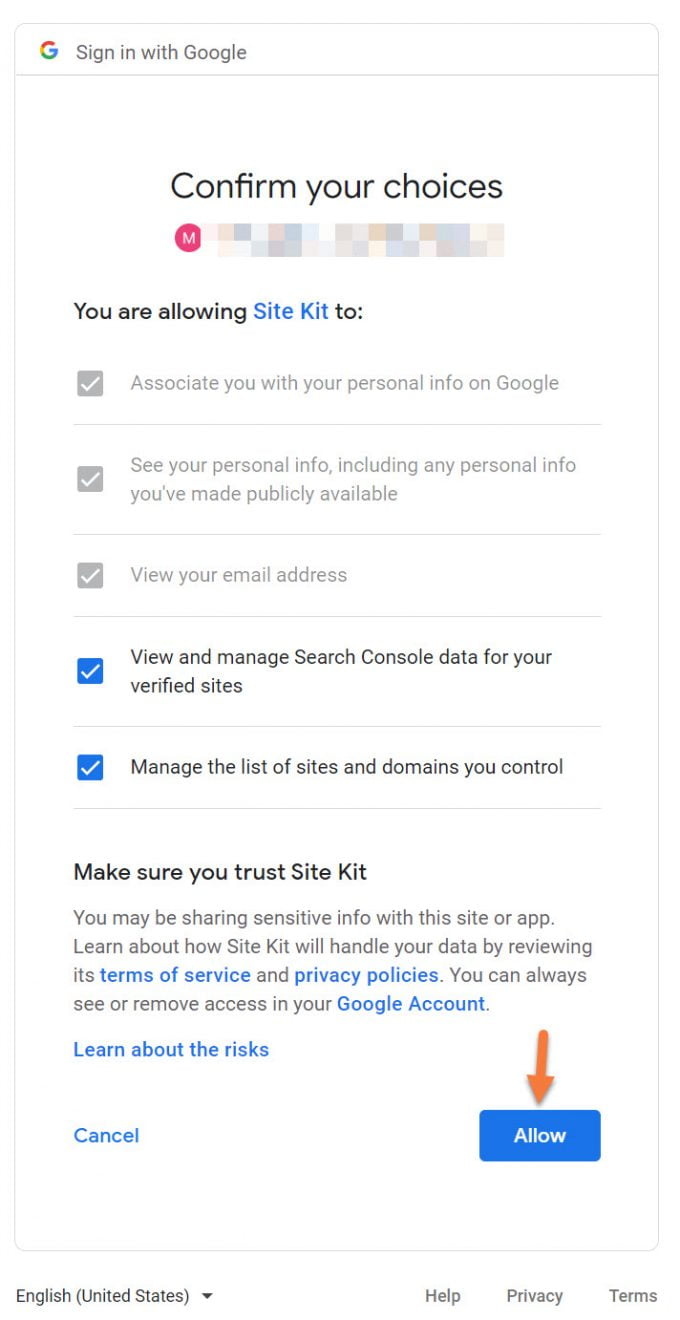
Just click the blue Allow button to finish up the account link process.
Step 4: Next, you’ll be able to run thru the actual setup of the Site Kit plugin.
First, you’ll need to prove to Google you own your site, which the Plugin will help you do. Second, you need to allow your site to access data from your Google account. And finally, you will set up search console.
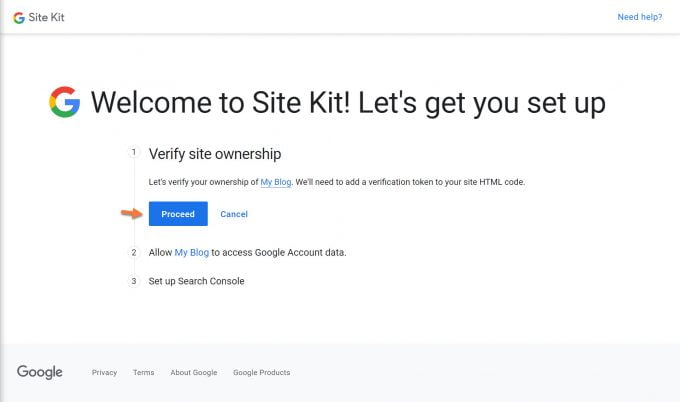
Let’s click the Proceed button.
Behind the scenes, Google will place a verification token in the code of your website and then verify it is able to read that token from your domain. If it’s able to do so, you’ll see the message below:
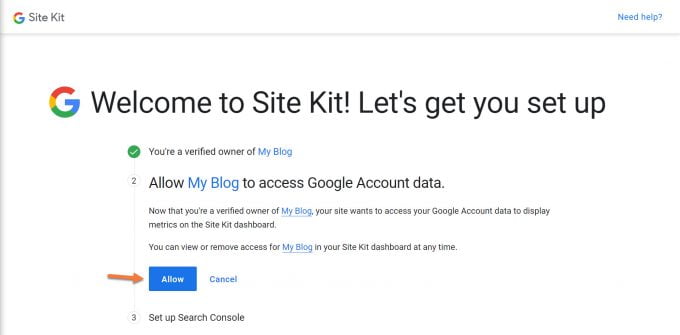
The next step is to allow “My Blog” (which is the name of my WordPress Site. For your installation, the name of your website will appear there) to access data from my Google Account.
Simply click allow to continue.
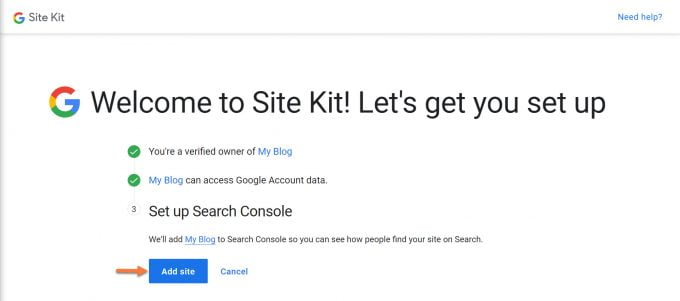
Finally, click the Add Site button to add your WordPress site to Google Search Console so you can see how people find your site using Google Search.
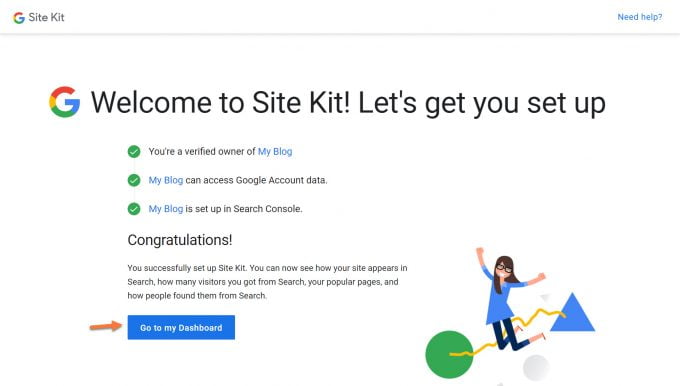
Congratulations! You have successfully set up Site Kit. You can now see how your site appears in Search, how many visitors you got from Search, your popular pages, and how people found them from Search.
Click the blue Go to my Dashboard button to proceed.
How to Configure your Dashboard and Connect Other Google Services
The first time you open your Site Kit Dashboard, it will look something like this:
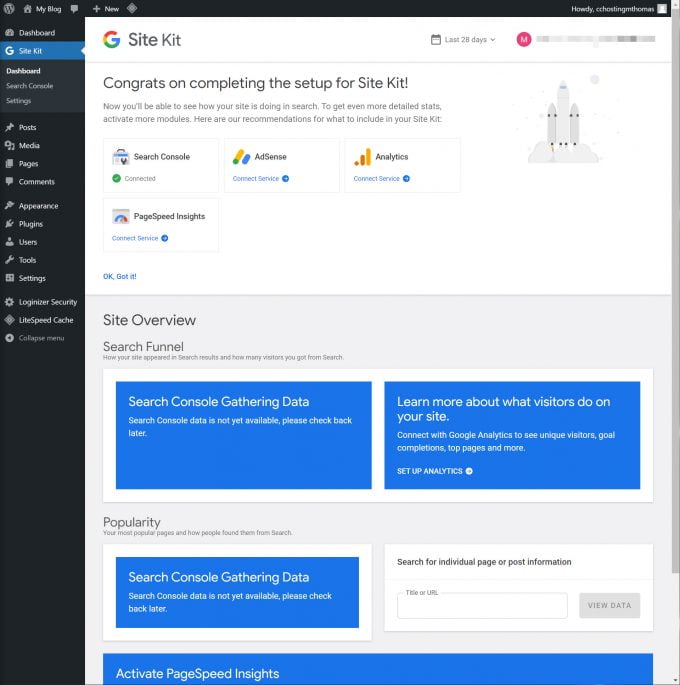
You need to connect your Site Kit Dashboard to these Google Services:

To do this, just click Connect Service below each of the options.
For each service, you will be asked to Allow Permission for the Site Kit plugin to do something. It’s safe to Allow these permissions.
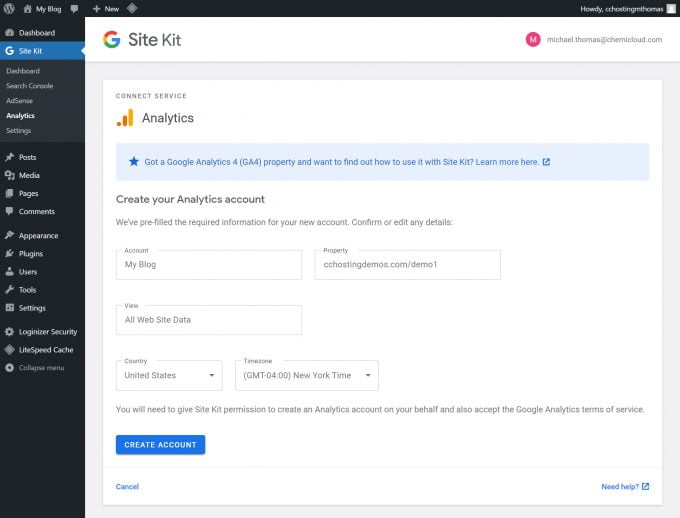
When you go to link Analytics, you will be asked to create an account. This account isn’t separate from your Google Account. It’s just written this way because from a corporate and business perspective, Google is structured differently with AdSense and things like Gmail and Photos, so the accounts are still linked to your Google Account, but inside of Google, it’s a separate system. 🙂
Let’s analyze what you have to do on this page to set it up properly.
To create your Analytics account, you need to give the Account a name. This is pre-filled in our image above as My Blog because that is the name of my website. Yours will be pre-filled with the name of your site, which is, in my opinion, a suitable name for keeping track of your Analytics account.
Next, you need to give your Property a name. Your Property in this context is your domain name/website URL. You can leave this as is if you want.
Thirdly, you’ll need to name the default view. A “view” in the Google Analytics platform is the term used for the way you are looking at data, like how many people have looked at your site in the last 30 days, where all of these people are from, and what browser they tend to use.
I like to keep this as All Web Site Data because when I look at my Analytics, that is the data I want, most of the time.
Next, choose what Country and Time Zone you are in, then click the blue Create Account button.
You will be asked again to sign in to your Google account, and give the following permissions:
And that’s it!
When you return to your Site Kit Dashboard after linking up all the Google Services, it will look similar to this: (pardon the large image)

It will take a few days for Google to populate statistics and data for your site, so check back in about a week. 🙂
How to Disconnect Google Site Kit from WordPress
You can sever the connection between your WordPress site and Google if you wish.
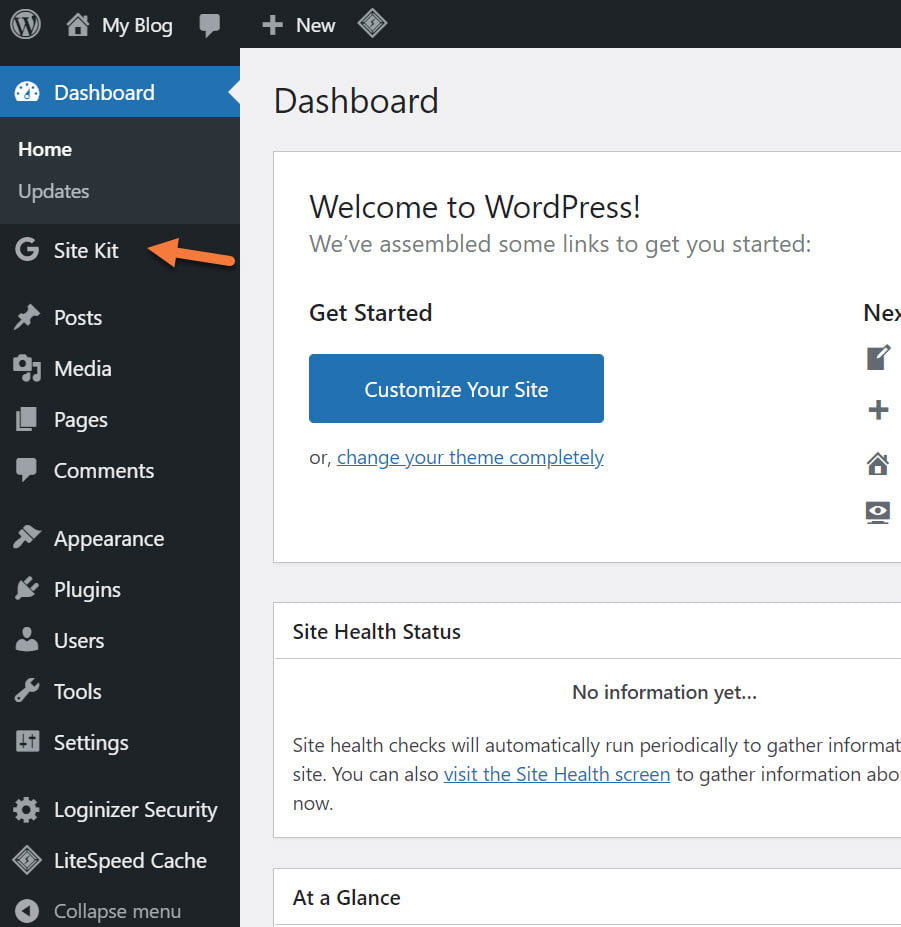
Step 1: To disconnect Site Kit, open your /wp-admin and click Site Kit from the left toolbar:
Step 2: In the upper right corner, click where your email address is displayed and in the menu that appears, click Disconnect. 
This will disconnect the Site Kit plugin from your WordPress website.
ChemiCloud Recommendations for the Site Kit Plugin
Making the most out of Site Kit is pretty easy! ChemiCloud recommends:
- Visit your Site Kit Dashboard a couple of times per week and see if there are any significant changes in the way users are finding your site. If you’ve posted some content and it went viral, this will be one of the many ways you’ll first find out.
- Compare the highest performing pages and from which channels the most visitors originated. You can divine from this information if the content about a particular topic or product attracts more visitors from certain social networks, like Twitter and Facebook.
- With PageSpeed Insights plus Analytics, you can see if your page load time is affecting your page bounce rate.
Exciting News: Introducing Our fastest WordPress Hosting stack 🚀 Ready for speed? Try it for just $1!
Final Thoughts
In conclusion, the Google Site Kit plugin for WordPress is a great way to get your feet in the door with the hodge-podge of applications Google affords its users. The plugin is super useful not only for webmasters but if you are an Admin and others write for your WordPress site, the plugin is super useful for those Editors to see how their content is performing on your site.
A lot of people, myself included, are removing plugins that effectively duplicate the functionality of the Google Site Kit plugin, lowering the plugin and memory footprint of their WordPress installation. I know I don’t miss the 3 plugins I removed to get the same functionality as the Site Kit plugin. As long as Google continues to maintain the plugin and doesn’t abandon it, (ahem, killedbygoogle.com) I believe the plugin will continue to be a staple in the installation of many WordPress users and allow users to Grow With Google.
What are your thoughts on the Google Site Kit for the WordPress plugin? Had you heard about it before today? Are you using it? We want to know! Share your thoughts in the comments below.