cPanel allows users to manage email accounts created under their accounts. This knowledge base article will cover all the options available for managing an email account.
Managing an Email Account in cPanel
First, let’s examine the overall UI of the Email Accounts area.
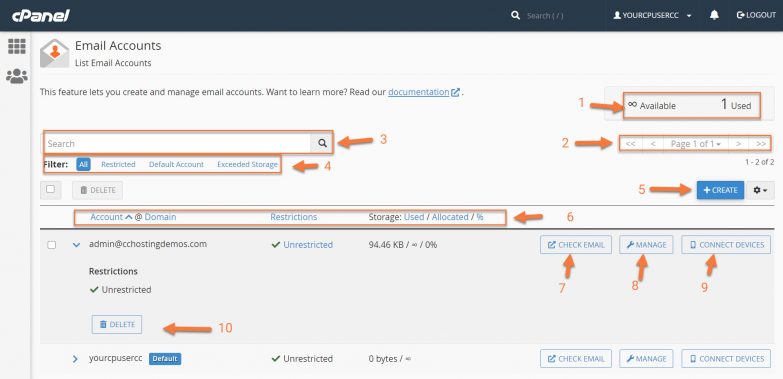
Legend:
- This indicates the number of email addresses our cPanel account can create and how many we have created. The default account is permanently excluded from this count.
- This is the pagination feature. If you have many email addresses, they may be listed on multiple pages.
- You can use the Search to find accounts quickly.
- With the Filter feature, you can show all accounts with restrictions, the default account, and accounts that have exceeded their storage limits.
- With the Create button, you can create new accounts. Adjacent to the Create button is the Cog, which allows you to set the number of entries listed per page.
- These are the column headers for the accounts list. Using traditional ascending or descending sort methods, you can sort by account name, accounts with restrictions, and order accounts by the amount of storage.
- You can log in to one of these email accounts using the Check Email feature.
- Manage allows you to manage aspects of the account, such as its password, storage, and restrictions.
- Connect Devices will help you set up that email account on things like mobile phones and tablets.
- This is the delete feature. Using this will delete the email account.
Struggling with email issues? ChemiCloud is the hosting solution designed to save you time! 🤓 Check out our web hosting plans!
Next, let’s take a look at the Manage Account Screen:
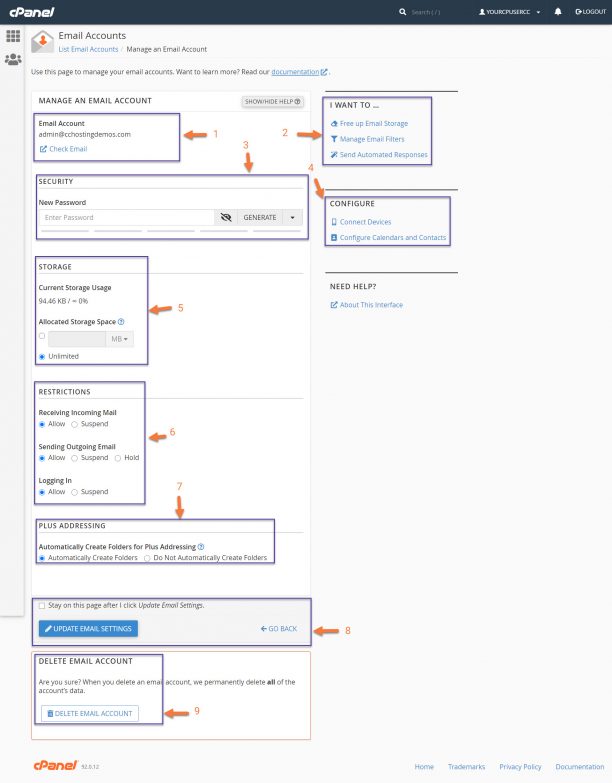
Legend:
- This indicates which email account you’re Managing, in case you need a reminder. You also have a link here to log right into that account.
- This section helps you perform quick tasks, such as freeing up email storage, managing filters for this account, and sending automated responses, which can be handy depending on how you use this account.
- This is the password change area. You can set a new password here, and there is also a password generator.
- The configure area helps you locate the proper information for adding your account email, calendar, and contacts to your mobile devices, like iOS, Android, and more.
- The storage area shows you how much storage the account is currently using and the current limit. You can set the account to have unlimited storage or a fixed limit, depending on your needs. Remember, though it may say unlimited storage, the storage pool email storage draws from is the storage assigned to your overall hosting account.
- The restrictions features allow you to change whether an account can receive email, send email, or even login.
- The plus addressing feature automatically creates a folder when this email address receives a message that uses plus addressing. For example, the system would place a message addressed to “[email protected]” in a new folder called “plusaddress”.
- The check box here lets you stay on the page after clicking update, and clicking the blue update box saves any changes you’ve made here.
- This option deletes the email account and all messages inside of it.