
Do you manage multiple WordPress sites? Are they running a similar configuration with the same themes and plugins? Have you ever thought, there has to be a better way to manage all these sites rather than juggle all these logins manage updates individually? Well, there is!
It’s called WordPress Multisite, or WPMU for short. WPMU is a type of WordPress installation which allows you to create and manage an entire network of websites using a singular WordPress Dashboard. Yep, that’s right! One dashboard to rule them all!
With WordPress Multisite, you can create a multisite network for yourself that only you have access to, or you can open it up to friends and colleagues, who can create their own WordPress sites inside your network, but limit them from accessing all of the sites using powerful user features.
It’s really good to know that all sites in the WordPress Multisite network share the same themes and plugins, but the websites created do not share the same media directories. This means they have their own separate folder of images, videos, and other media assets which are uploaded, instead of sharing a ‘bucket’ of storage.
When is it a good idea to consider using WordPress Multisite?
WordPress Multisite may seem very exciting and powerful, but it’s not for everyone. Here are some best uses cases for WPMU:
Agencies and Advertisers
WordPress Multisite is very popular amongst agencies that manage websites for their client. Whether you’re a music label exec who manages the sites for all the bands you’ve signed, or a realtor who manages 50 sites for each of your apartment complexes, WordPress Multisite has something useful for you.
Education
A school may have several websites running under a network. A perfect example of this would be a University where each department and Professor have their own site for their classes. There could also be a site dedicated to staff and employees to handle things related to Scheduling and more, as needed.
Hospitality
If you own a hotel, you probably have a few different websites for it that market the property from a different angle to gather the most clientele possible. Using WordPress Multisite could be a great way for you to handle all the different websites from one portal, rather than having to manage several different logins or even possibly hosting providers.
Media
If you are a media agency that runs a network of blogs that cover the gamut of everything from current affairs, international politics, tech, and gadget news, and finance, you may find that having a central dashboard to control these sites is super handy for managing their ad campaigns and other administrative tasks.
When is it not a good idea to consider using WordPress Multisite?
WordPress Multisite is very different from standard WordPress and has many advanced features. Because of that, it can be a bit heavy to manage. There are some cases in which you probably shouldn’t be using WordPress Multisite unless you have a real edge case.
You only plan to have one, mayyyyybe two WordPress websites.
WordPress Multisite is for users who manage multiple WordPress websites. If you’re working with just one site, you really don’t need this, and even two WordPress sites might be pushing the use case for it, but, to each their own of course.
You need to host the websites at different hosting providers.
WordPress sites run under a WordPress Multisite configuration have to be run from the same server. You can’t have the WPMU Dashboard at Host A, and each website running below that at a different host. WordPress Multisite sets itself up much like a Shared Hosting environment, where you could compare the WMPU Dashboard to WHM and each site to a cPanel beneath that WHM.
Some websites in your network have higher database security needs than others.
If you have an e-commerce site that’s in your network, that site is probably processing credit cards. This is an example of information, along with home addresses and telephone numbers, of data that require higher security. Websites like these would need a separate database with more security applied to it, which isn’t possible in a WordPress Multisite environment.
Your hosting isn’t suitable for WordPress Multisite
Let’s be honest, WordPress is a resource-hungry mamma-jamma. Many hosting companies place a limit on the number of resources that a single site can consume and don’t expect you to be operating a network of sites 5, 10, 20+ deep beneath you on a single shared hosting account. Imagine taking your average WordPress site which has about 10 plugins and having it run an additional 5 or 10 times…. the sites would be slow, likely crash due to server processes recognizing the user account spawning these processes is exceeding its allocated resource limitations, and you’d get a nasty-gram in your email from your web host asking you to upgrade or get out!
It’s über critical to have excellent hosting backing your WordPress Multisite Network. The average shared hosting isn’t gonna cut it, bud.
Administrators in your network want total control over their sites
You may find over time there’s the odd site administrator who wants total control over everything to do with their site. Whether it’s the code it’s running on, plugins, or themes, WordPress multisite just doesn’t support this. The Super Admin has the majority of the control over all the websites in the multisite network and are able to add and remove plugins from the system, while Site Owners are only able to deactivate them on the sites to which they have access.
How to Enable WordPress Multisite
It may sound like WordPress Multisite is a version of WordPress that you download and install, but it’s not. To enable WordPress Multisite you just need to make a teeny tiny modification to the code in your wp-config.php file.
Follow the steps below for a full walkthrough!
Step 1: Install WordPress. You can do this with Softaculous, or the old school way if you prefer. If you aren’t familiar with installing WordPress, you’ve picked a daunting topic to go through as a first-time install, but you can review our guide on How to Install WordPress with Softaculous here.
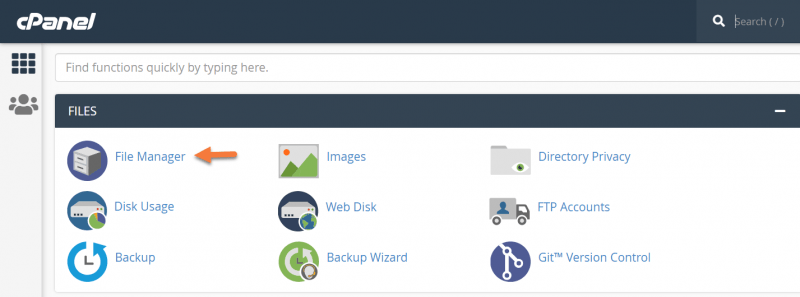
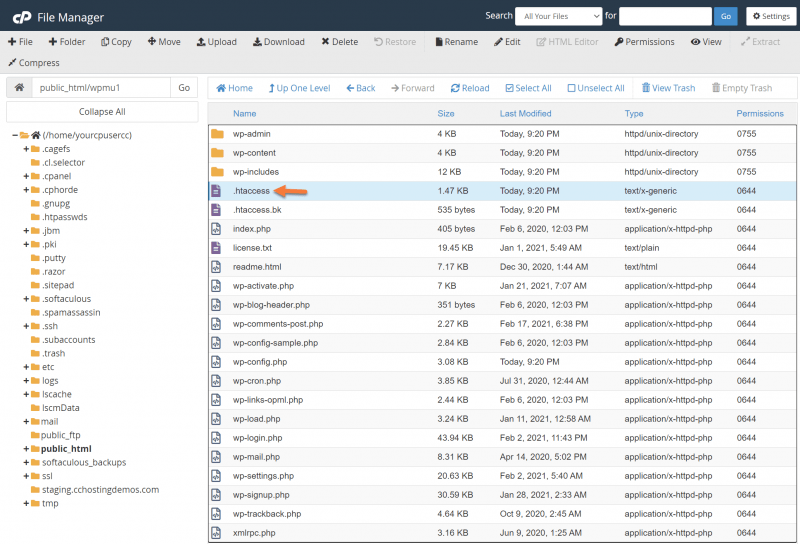
Step 2: We’ll be using cPanel for this. Open up your cPanel and go to the File Manager.
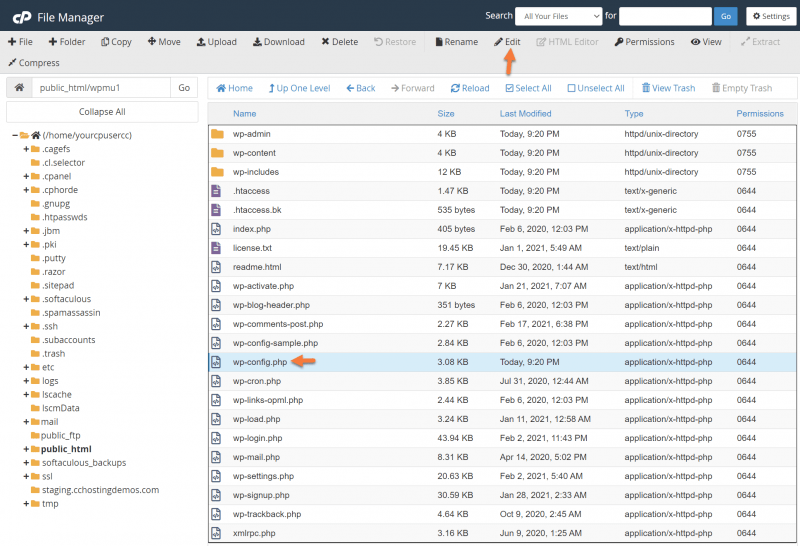
Once your File Manager is open, navigate to where your WordPress installation is located. Typically this is in /public_html.
When you find it, locate the wp-config.php file, then click Edit from the row of tools at the top.
You may see an encoding check dialog open, which you can ignore since we’re editing in the English language. When the editor opens, you want to add the lines of code (below) at the end of the wp-config.php file just before the part that says “That’s all, stop editing! Happy publishing!.
/* Multisite */
define("WP_ALLOW_MULTISITE", true);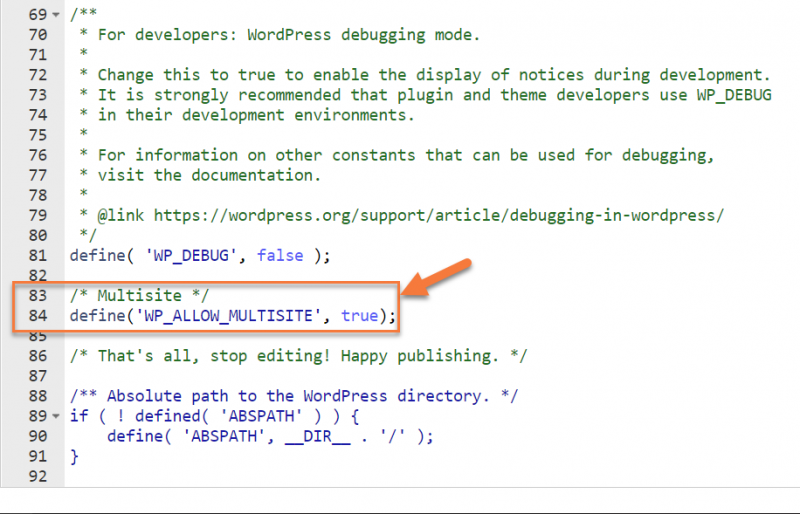
Click the Save Changes button from the top right corner to save your changes.
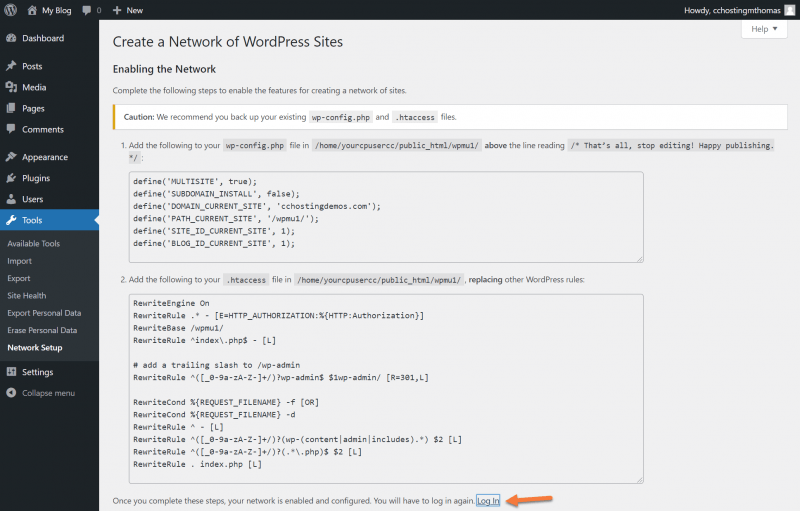
Step 3: Return to your wp-admin, log out, and back in. Then go to Tools > Network Setup. This is where you’ll configure your Multisite Network.
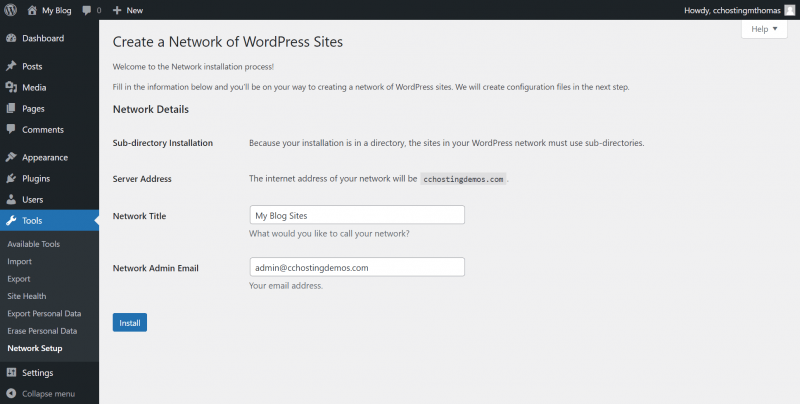
Give your network a name and a valid email address for the Administrator Account, then click the blue Install button.
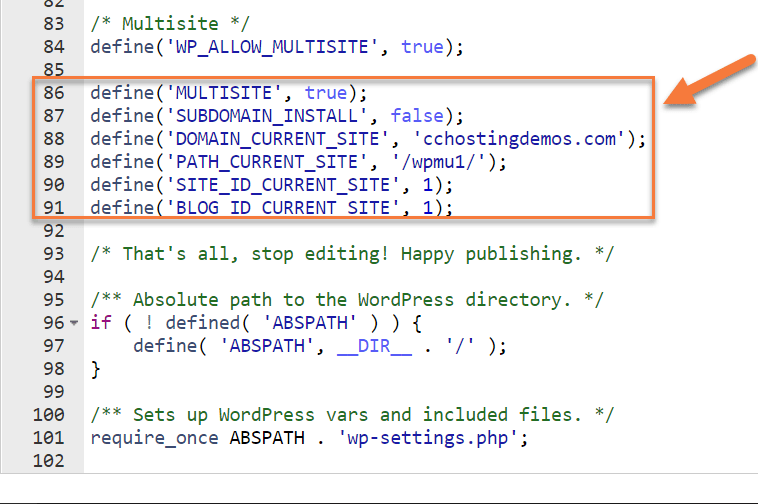
You’ll be given more code you need to add to your wp-config file:
define('MULTISITE', true);
define('SUBDOMAIN_INSTALL', false);
define('DOMAIN_CURRENT_SITE', 'yourdomain.tld');
define('PATH_CURRENT_SITE', '/path-to-current-site/');
define('SITE_ID_CURRENT_SITE', 1);
define('BLOG_ID_CURRENT_SITE', 1);
As well as some code you need to add to your .htaccess file:
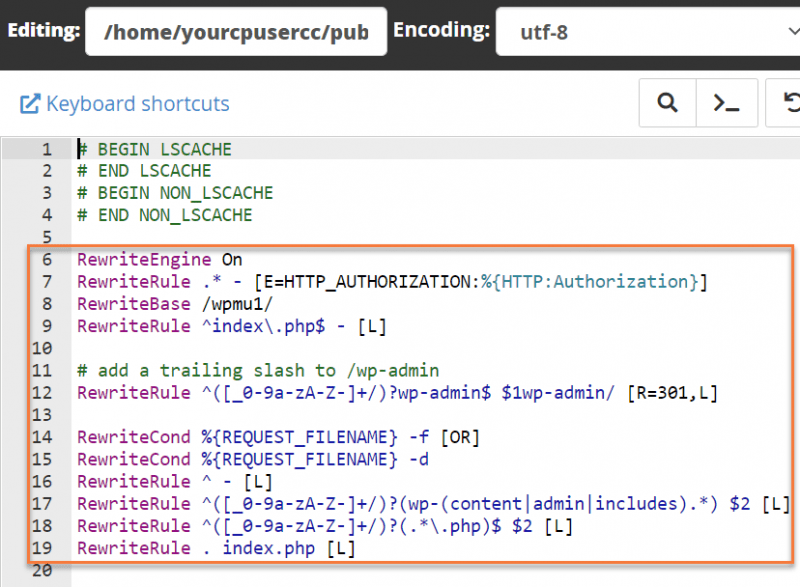
RewriteEngine On
RewriteRule .* - [E=HTTP_AUTHORIZATION:%{HTTP:Authorization}]
RewriteBase /wpmu1/
RewriteRule ^index\.php$ - [L]

# add a trailing slash to /wp-admin
RewriteRule ^([_0-9a-zA-Z-]+/)?wp-admin$ $1wp-admin/ [R=301,L]

RewriteCond %{REQUEST_FILENAME} -f [OR]
RewriteCond %{REQUEST_FILENAME} -d
RewriteRule ^ - [L]
RewriteRule ^([_0-9a-zA-Z-]+/)?(wp-(content|admin|includes).*) $2 [L]
RewriteRule ^([_0-9a-zA-Z-]+/)?(.*\.php)$ $2 [L]
RewriteRule . index.php [L]
Step 4: In a new browser tab, return to your cPanel and open the File Manager, then navigate to the directory where your wp-config.php file was in the previous step.
Once again open the editor for the wp-config file, and at the end of the file, below the code, you inserted to activate the WordPress Multisite functions, paste the code you were given.
Step 5: Return to your cPanel’s File Manager and look for the .htaccess file. It’s located in the same directory as your wp-config file, but at the top, because it has a . in front of the file name.
Click Edit from the row of options at the top. A new browser tab will open. The key in this step is you are replacing the text that’s already in your .htaccess file with the text given on the Network Setup screen.
Click Save Changes in the top right then return to the tab where WordPress is open and you were given the code to insert. Click the login link that’s at the bottom:
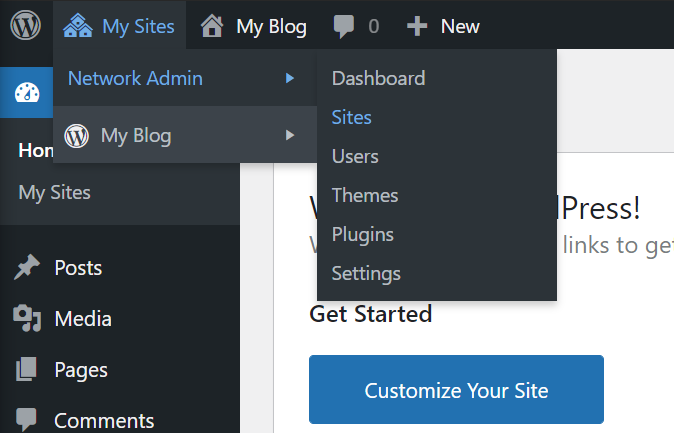
Upon logging in, you’ll note the addition of a My Sites in the top left corner:
Congrats! You’ve configured WordPress Multisite!
How to Add a Site to WordPress Multisite
Adding a site is super easy!
Step 1: Hover over My Sites in the top left, then hover over Network Admin, then click Sites.
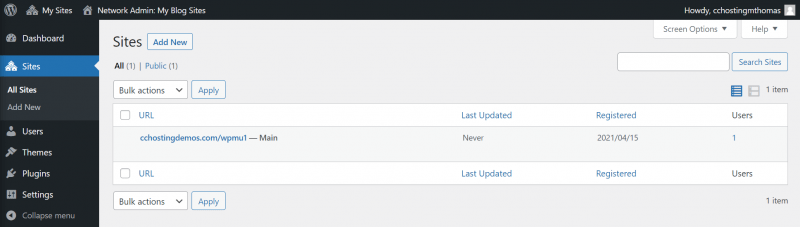
Click Add New at the top to add a new site.
You’ll be presented with a few options.
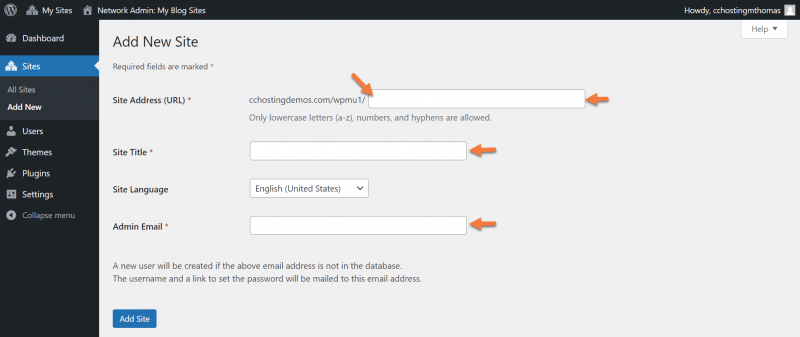
First, you need to give the site a URL. If you examine the image above, you can see the directory under which the new site will be is /wpmu1. Please note, this is because of the way I have my demo installation configured. However, the site added will always be in a directory beneath the main WordPress installation.
For this reason, I recommend using a holdings domain as the primary domain, and using subdomains to access the individual sites, which we’ll talk about how to do later!
For now, give your new site a URL, a Title, choose your language and enter an email for the Administrator. Then click Add Site.
Once you add the site, you’ll see a note at the top of the page:
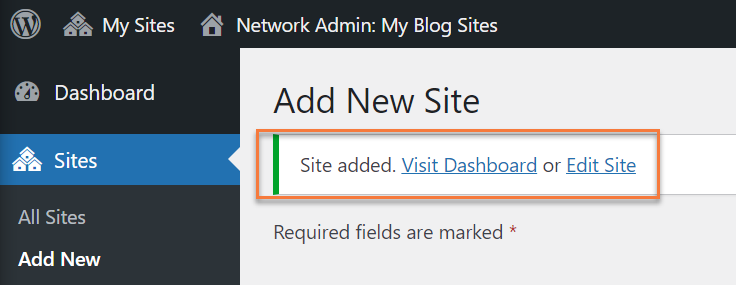
Here you can see the site has been added. You can access the Dashboard of the site by clicking the Visit Dashboard or Edit the Site’s settings by clicking Edit Site.
How to Delete a WordPress Multisite
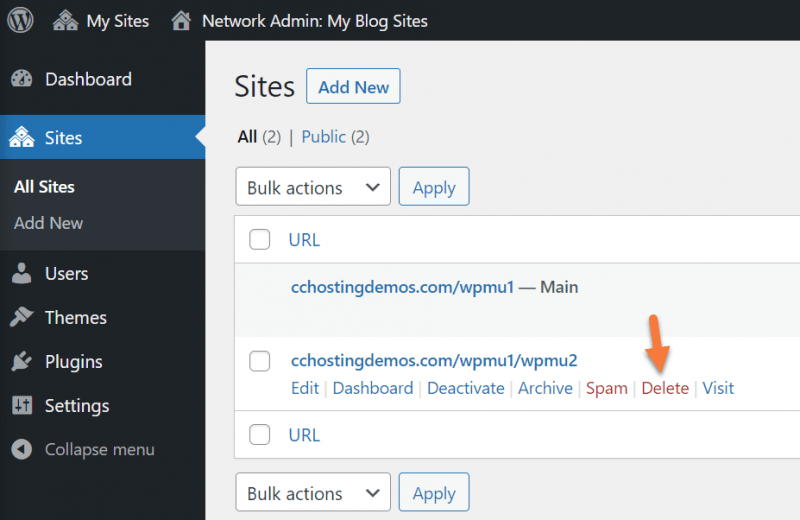
Deleting a site from your WPMU network is really easy. Just go to the Sites > All Sites in your Network Admin page, then hover over the site you want to delete, and click Delete.
How to Point a WordPress Multisite to a Subdomain
Let’s say you own this domain, news.today, for example, and you have it configured as a WordPress Multisite. You could have each of your sites be news.today/tech, or news.today/finance, but wouldn’t it be better if they were tech.news.today or finance.news.today?
Darn, right they would be! Let’s make that happen.
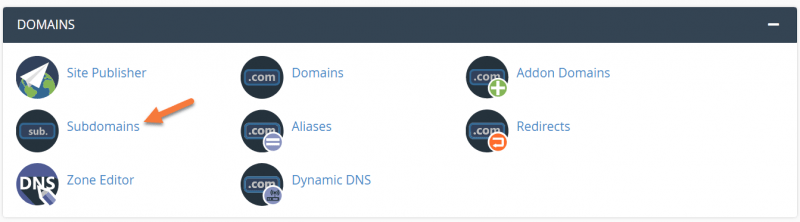
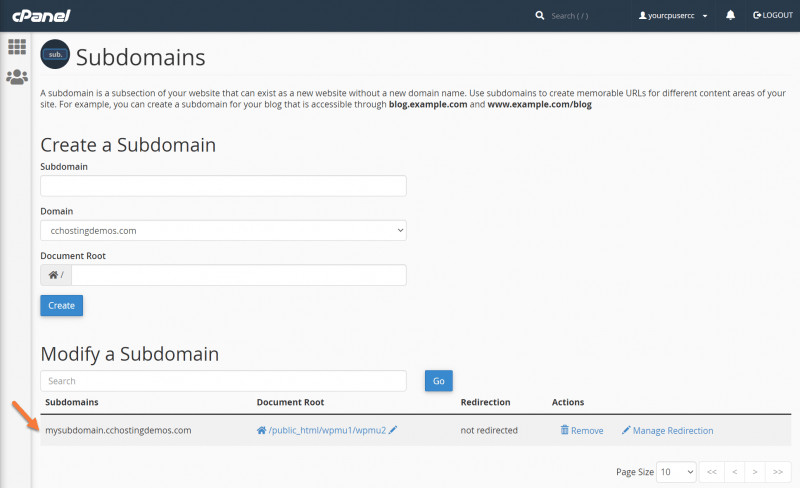
Step 1: Open your cPanel and go to the Domains section, then open Subdomains.
Step 2: We need to create a subdomain and point it to the directory where our WordPress MU site is installed. Remember when you added your Site to the WPMU Network Setup and you gave it a directory? That’s where we’re going to point the subdomain.
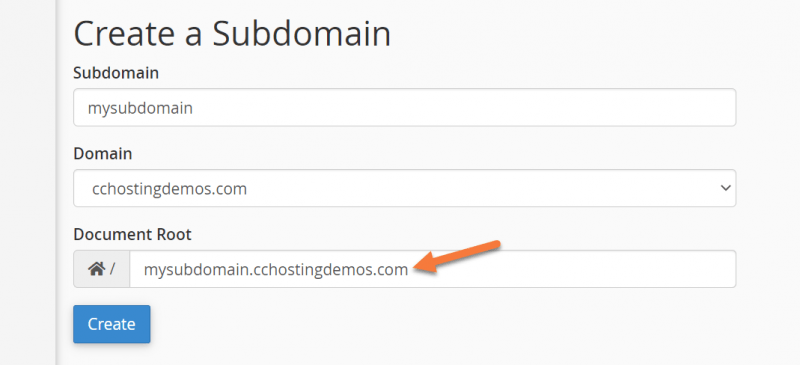
To do this, enter the subdomain as I’ve done above, but where the Document Root is, that needs to be changed.
Clear that out, and enter the path to the WPMU Site.
In this case, my WordPress Multisite installation is installed in a directory inside my public_html folder. So the path would look like this: /public_html/wpmu1/wpmu2 (where wpmu2 is the site I’m using for this subdomain.) Your path will be different of course, so if you aren’t sure, use the File Manager to check. 😉
Then click create.
You’ll see a message that says, Success, <subdomain.yourdomain.tld> has been created. Click Go back to return to the Subdomains area where you’ll also see the subdomain listed.
Now open a new tab in your browser and load up that subdomain! You should see your WordPress Multisite load up. 🙂
WordPress Multisite Best Practices
If I had to offer any suggestions or best practices for WordPress Multisite users, it would be the following:
- Take regular backups. It is up to the user to take reliable backups, not just the host. Don’t take your host’s backup tech for granted!
- Keep your plugins and themes updated! If there is one way to hack into a WordPress site, it’s going to be thru plugins or themes that have vulnerabilities that are exploited because the user didn’t update them! Don’t be this user. Web hosts hate this guy.
- Use plugins that are compatible with WordPress Multisite. Not every plugin is compatible with this, advanced plugins that make use of the media libraries especially should be double and triple checked for compatibility.
- Don’t have too many Admins. For obvious security reasons, it’s best to give WPMU access to just one or two people you trust. The more people who have access, the more threat there is.
- Use brute force protection plugins. WordPress is a popular application and working with it means your website is always a target for malware and brute force attacks. Make sure your login pages are protected against brute forces.
Wrapping Up
WordPress multisite is a popular WordPress feature that has not only made managing multiple websites easier but is also easy to set up. It is even easier when you set up WordPress multisite on a managed WordPress hosting solution like ChemiCloud, where we offer the best WordPress hosting in the industry.
If you any questions regarding WordPress multisite feel free to leave a comment.