Cloudflare services are enabled for a given domain name and once activated can also be applied for any of its subdomains.
Before you can use Cloudflare for a subdomain, you would have to enable the service for your main domain.
If your subdomain is created using cPanel, the process of enabling Cloudflare for it involves additional steps to ensure proper DNS configuration.
Here’s how you can do it:
- Login to cPanel:
- Access your cPanel account provided by your hosting provider.
- Create the Subdomain (if not already created):1) Locate the ‘DOMAINS’ section and click the Domains icon
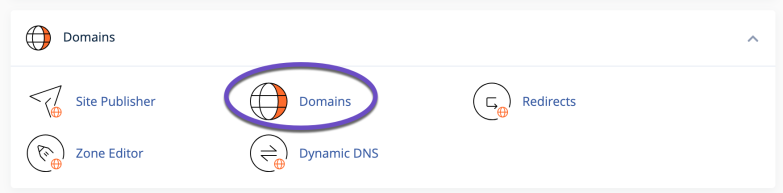
cPanel > Domains 2) Click on the Create A New Domain button
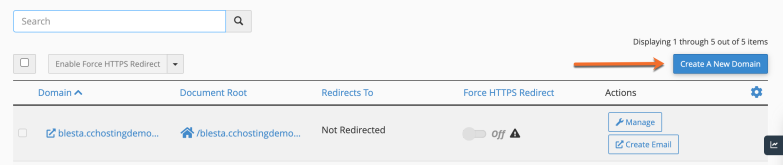
cPanel > Domains > Create a New Domain 3) Enter the following information:
Domain: enter the subdomain that you want to create
Document root: leave the checkmark empty for the Share document root option.
Home icon: choose a subdirectory for it in your account’s home directory (above public_html). This subdirectory will store your subdomain’s files.
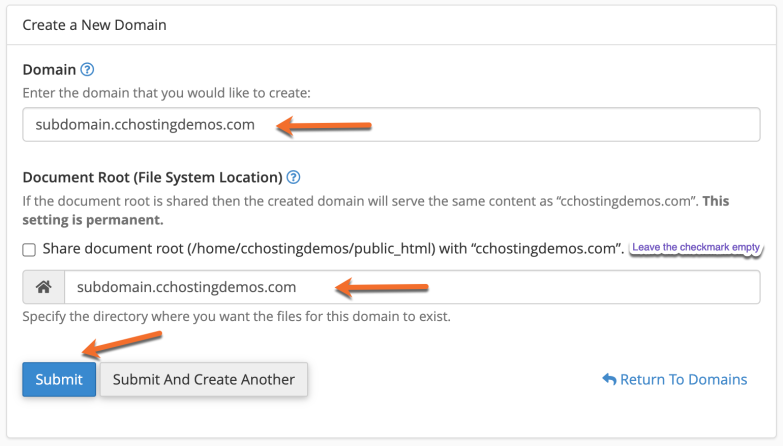
Domains > Create a New Subdomain 5) The last step is to click Submit button. The subdomain will be created.
- Login to Cloudflare:
- Go to the Cloudflare website and log in to your account.
- Add Your Main Domain:
- If you haven’t already added your main domain to Cloudflare, you’ll need to do this first.
- Click on “Add Site” and enter your main domain name.
- Follow the prompts to configure your DNS settings and update your nameservers to Cloudflare’s.
- Navigate to DNS Settings in Cloudflare:
- Once your main domain is added and the nameservers are updated, go to the dashboard.
- Select your domain to open its settings.
- Click on the “DNS” tab to access the DNS management page.
- Add a DNS Record for the Subdomain:
- In the DNS management page, you will likely see the DNS records that were automatically imported.
- Check if the subdomain record exists (it should if created via cPanel).
- If it does not exist, add a new DNS record:
- Choose the type of record (usually “A” or “CNAME”).
- For an “A” record, enter the subdomain in the “Name” field and the IP address of your server in the “IPv4 address” field.
- For a “CNAME” record, enter the subdomain in the “Name” field and the canonical name (the domain that this subdomain should point to) in the “Domain name” field.
- Ensure the cloud icon next to the DNS record is orange, indicating that Cloudflare’s proxy is enabled. If it is grey, click it to toggle the proxy on.
- Configure SSL/TLS Settings (Optional but recommended)**:
- Go to the “SSL/TLS” tab.
- Choose the appropriate SSL mode (Flexible, Full, Full (strict)) based on your server’s SSL configuration.
- It’s generally recommended to use “Full (strict)” if you have a valid SSL certificate installed on your server.
- Page Rules for Subdomains (Optional)**:
- If you want to create specific rules for your subdomain, go to the “Page Rules” tab.
- Click “Create Page Rule” and enter the subdomain URL (e.g.,
sub.example.com/*). - Configure the settings as needed, such as caching level, SSL settings, etc.
- Test Your Configuration:
- After setting up the DNS record and SSL settings, wait for the DNS propagation to complete.
- Visit your subdomain in a browser to ensure it’s resolving correctly and is being proxied through Cloudflare.
By following these steps, you should be able to enable Cloudflare for your cPanel-created subdomain successfully. If you encounter any issues, you can check with your web hosting provider for additional help and troubleshooting.
You find this article useful? Click here to learn more about ChemiCloud web hosting experts and what else we can do for you!