Have you ever tried to upload an image to your WordPress’ media library and experienced problems? Quite possibly! For many people, image upload errors can be quite confusing because they can appear seemingly out of nowhere.
Not to worry! This tutorial will get you sorted in no time flat!
How To Fix WordPress Image Upload Issues
If you’re uploading larger files, you may encounter an error because your Maximum File Upload Size is lower than the total size of the files you’re trying to upload. You can fix this quite easily.
Increasing the Memory Limit in cPanel
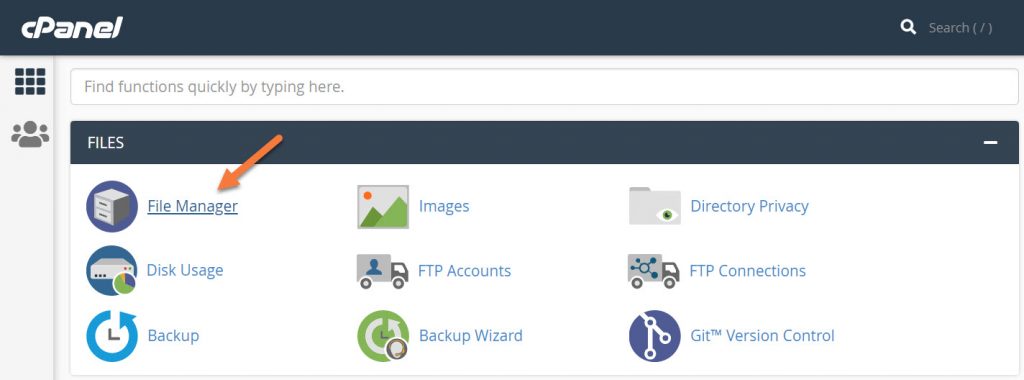
Step 1: Login to your cPanel.
Once your cPanel is open, look for the Files section and open the File Manager.
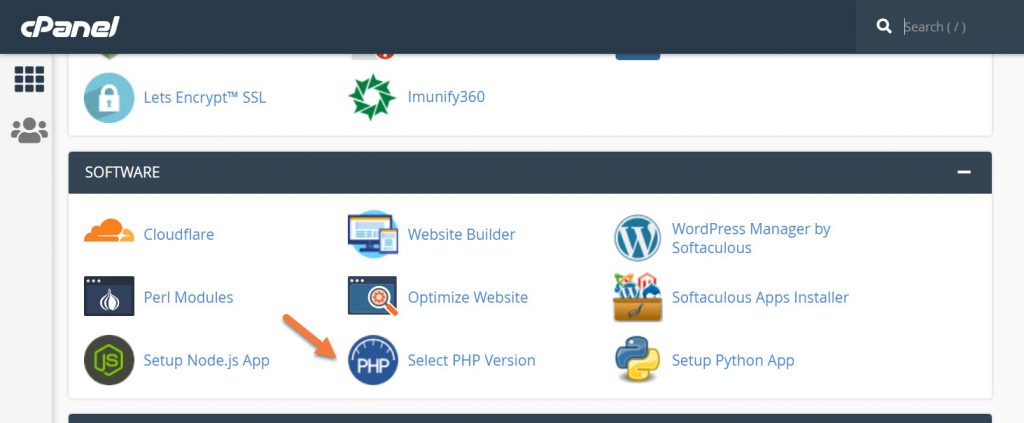
Step 2: Scroll down and look for the Software section. Inside this area, click Select PHP Version.
Step 3: Once the PHP Selector opens, click the Options tab at the top.

Step 4: On the Options page, scroll down and look for two options. The first is called post_max_size, and the second is upload_max_filesize.
Generally, these should be the same, or the post_max_size slightly higher than the upload_max_filesize.

At ChemiCloud, the default for both of these is 100M (Megabytes). Since you’re likely going to upload more than 100 Megabytes of files at once, you can increase these to 1 Gigabyte.

In the latest version of cPanel, the changes are saved automatically. You don’t need to look for a Save Changes button.
Struggling with WordPress troubleshooting? ChemiCloud is the hosting solution designed to save you time and money! 🤓 Try our Managed WordPress Hosting plans for just $1!
Now, return to your WordPress site, refresh the Media Library page and try to upload your files again. If you don’t get an error, you’ve solved your problem.
Increasing the Memory Limit in wp-config.php
Step 1: Locate your site’s configuration file (wp-config.php). It’s usually in your site’s root directory, where your WordPress site is installed.
Step 2: Once you have located the wp-config.php file, you must edit it.
Step 3: Add the following lines of code at the bottom of your wp-config.php file.
define( 'WP_MEMORY_LIMIT', '1024M' ); // increases WP base (front-end) limit
define( 'WP_MAX_MEMORY_LIMIT', '1024M'); // increases WP admin (back-end) limit
The above lines of code will increase your WordPress front and back-end memory limit to 1024M.
After changing the memory_limit, return to your WordPress site and check if you are getting the same error.
Now, return to your WordPress site, refresh the Media Library page and try to upload your files again. If you don’t get an error, you’ve solved your problem.
If the steps above didn’t solve your issue, you might need to restore the website files from a backup if you have one available. If you’re a ChemiCloud customer, you can rest easy!
Sleep like a baby with ChemiCloud’s nine different backup options for your sites through JetBackup. 🛌 Check out our WordPress hosting plans!