Cloudflare provides an excellent interface to manage DNS on their platform. Their UI allows you to add/remove/update DNS entries for a variety of DNS record types.
In this KB article, we will explore how to add and remove DNS records from the Cloudflare DNS Management area, and we’ll talk about what the various records are.
How to manage DNS records in Cloudflare
Accessing the Cloudflare DNS Editor
The first time you add your domain to Cloudflare, a scan of common DNS records is performed in an attempt to automatically add all of the domain’s DNS records to Cloudflare. Sometimes you may need to add, remove, or update DNS records later on though. To do that, use the steps below.
Step 1: Open the Cloudflare Dashboard by clicking here then proceed to sign in.

Step 2: Once your Cloudflare Dashboard is open, click on the domain you wish to manage.

Step 3: Click DNS from the row of options in the menu at the top to open the DNS Management tool.

You will be presented with a list of your current DNS records and some options.
Breaking Down the DNS Editor

There’s a lot of information on this screen, so let’s examine it before we go further.
In the upper left of the DNS management tool is the + Add Record button. We’ll talk about this later.
Adjacent to the + Add Record button is the Search Field. This is really handy if you are managing a domain that has a lot of DNS entries, as it allows you to search through them to find what you’re looking for faster.
The first column is the DNS Record Type. This is to indicate to you which type of DNS record the line entry is, be it an MX, CNAME, or A Record.
The second column is the Name of the DNS record.
The third column is the Content of the record. Depending on the type of record, this can be a domain name, an IP address, or other mixed alphanumeric and symbol characters.
The TTL column represents the TTL of the Record. TTL is a numerical value that determines how long a DNS cache server can serve a DNS record before reaching out to the authoritative DNS server and getting a new copy of the record.
The Proxy Status column indicates whether Cloudflare is proxying this record, thereby obfuscating the origin IP address/network where the resource is hosted/located.
The last column is the Edit option to allow you to edit a record.
Are you tired of slow web hosting? We use LiteSpeed caching to deliver content to your visitors almost instantly. ⚡ Check out our web hosting plans!
How to add DNS Records in Cloudflare
Adding a DNS Record is very straightforward.
Step 1: Click the blue + Add Record button in the top left of the DNS tool.

Step 2: You will be given the option to choose the record Type & Name, Value, and TTL.
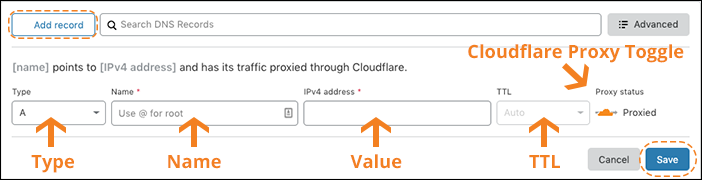
Some record types, such as A, AAAA, and CNAME, allow you to toggle the Cloudflare proxy on or off.
- An orange cloud icon proxies traffic through Cloudflare for the DNS record Name.
- A grey cloud icon ensures traffic for the DNS record Name is not proxied to Cloudflare. Cloudflare still serves DNS for grey clouded DNS records, but no other Cloudflare features such as SSL, page rules, caching, WAF, etc.. are applied to these records.
You should know, when adding a new record in Cloudflare, the record Type will always default to n A record.
A Records
A Records are necessary to direct a visitor’s browser requests to an origin web server.
To add an A record:
Step 1: Replace Value with a real IP address (you cannot use a Cloudflare IP address).
Step 2: Click Add Record.
Multiple A records for the same subdomain can be added with different IP addresses.
Cloudflare’s DNS will alternate requests to the various IP addresses provided. However, Cloudflare’s DNS will continue to alternate traffic to all specified IP addresses even if an IP address is unreachable.
CNAME Records
CNAME Records are necessary to direct a visitor’s browser requests to an origin web server. Unlike an A record, the CNAME will point to a hostname like www.example.com instead of an IP address. www.example.com would then either have an A record that lists the IP address or uses another CNAME record that points to a different hostname. Eventually, a chain of CNAME records must point to a hostname that resolves to an IP address.
To add a CNAME record:
Step 1: Replace Value with the target (destination) domain. Example: mysite.myhost.com Example: s3-eu-west-1.amazonaws.com
Step 2: Click Add Record.’
TXT Records
TXT records are commonly used for mail authentication.
To add a TXT record:
Step 1: Replace Value with real data, the contents of the record.
TXT @ v=spf1 include:example.net -all
Step 2: Click Add Record. ‘
MX records are necessary for the delivery of email to a mail server. Any MX record Server name requires a corresponding A record that lists the IP address of the mail server.
To add an MX record:
Step 1: Click Add Record.
Step 2: Choose MX From the Type field to display the required MX record details.
The mail server is the NDS hostname of the mail server.
Priority is a relative number. The lowest Priority number in a group of MX records will have priority over the rest.
Step 3: Click Save.
DKIM Records
There is no DKIM record type. DKIM is instead configured as a DNS TXT record.
DKIM records can often exceed the 255-character limit for TXT records. Therefore, Cloudflare will automatically split these into multiple records at the same domain name, producing a record with a format similar to the following when queried:
default._domainkey.example.com. 299 IN TXT "v=DKIM1; k=rsa; p=<encoded public key>" "<rest of public key>;"
Remove quotation marks and spaces when adding DKIM records to your zone. Also, you do not need to prefix (escape) semicolons with a “\” character for DKIM records added to Cloudflare.
Some services require additional CNAME records for DKIM verification. Verification will fail for CNAME records used to verify DKIM unless there is a grey-cloud icon beside the CNAME record in the DNS app.’
SPF Records
Although DNS specifications have deprecated the SPF record type in favor of TXT records, some DNS clients may still look for a TXT Record. You can add both an SPF record and a TXT record to ensure backward compatibility.
SPF content as a TXT record will look similar to the following. If you host with ChemiCloud, be sure to use our SPF record:
TXT @ v=spf1 a mx include:relay.mailchannels.net ?all
Contact your mail provider about SPF record content if you observe SPF failures in your email headers or if your mail is undeliverable.
To add an SPF Record:
Step 1: Replace Value with real data.
Step 2: Click Save.
DMARC Records
Domain-based Message Authentication, Reporting & Conformance (DMARC) allows an email recipient to know if the email is protected by SPF and/or DKIM. DMARC describes how the email recipient should process the email if neither of those authentication methods passes.
To learn more about DMARC records, visit the DMARC project.
Deleting DNS Records in Cloudflare
Deleting records in the Cloudflare DNS editor is very straightforward.
Step 1: Click the Edit button on the far right of the row of the record you wish to remove.

Step 2: The editor tool will expand. You will have the option to edit the contents of the record or delete the record.
To delete the record, click the Delete button in the bottom left of the record editor.

You will be asked to confirm you are sure you wish to delete the record. Click the red Delete button to confirm the removal of the entry.

Summary
As you can see, adding and removing DNS records in your Cloudflare editor is fairly straightforward and easy, but if you get confused, we’re always here to help!