
You’ll see a lot of people talk about Cloudflare services a lot. This is because they’re actually pretty good. Think about it, they offer domain registrations, free DNS hosting with a firewall, and a powerful CDN at no extra cost, as well. It’s no wonder they are so popular with people who need their free, and eventually move up to their paid services. Among those paid services is the Cloudflare APO, or Automatic Platform Optimization service. This service is especially useful for WordPress.
In testing, Cloudflare APO for WordPress showed a 72% reduction in Time to First Byte (TFFB), 23% reduction to First Contentful Paint, and a 13% reduction in Speed Index for desktop users at the 90th percentile, by serving nearly all of your website’s content from Cloudflare’s network.
This means visitors to your website see not only the first content sooner but all content more quickly, as a result. With Automatic Platform Optimization for WordPress, your customers won’t suffer any slowness caused by common issues like shared hosting congestion, slow database lookups, or misbehaving plugins. This service is now available for anyone using WordPress.
In this blog, we’ll talk about Cloudflare APO, what it is, and how you can get started with it.
Let’s begin!
Table of Contents
What is Cloudflare APO?
Cloudflare APO is a service that serves your entire site from Cloudflare’s edge network and provides a set of performance benefits that are unmatched by typical cache services or other WordPress plugins. The Time to first byte (TTFB) is massively reduced since the first file served, the HTML is served directly from our edge. This along with reducing other requests that might leave Cloudflare’s network means sites start to display content sooner (First Contentful Paint or FCP).
This service, called Cloudflare APO, is available as a paid subscription service with a very affordable price point – starting at $5 per month.
One of the top benefits of APO is the consistency of performance for serving your site no matter where your visitors are in the world. The consistent sub-second performance shown with APO versus two or three-second load times in other setups makes it clear that if you have a global customer base, APO delivers an improved experience for all visitors.
How Does CloudFlare APO Work?
Cloudflare’s Automatic Platform Optimization works by using the power of Cloudflare Workers to intelligently Cache dynamic content. By caching this content, Cloudflare can serve the entire website from its edge network. Doing this results in no origin requests or origin processing time, which means all communication occurs between the user’s device and the edge of Cloudflare’s network. Think of Cloudflare as your other web host!
Victor is in Germany and visits awebsite.com. Victor is the first to access awebsite.com from Germany for some time, and therefore the HTML is not cached at Cloudflare’s node in Germany. The content needs to be fetched from the origin server. From the origin server to Victor, the content is cached by Cloudflare’s node in Germany.
John visits awebsite.com, not long after Victor, and John is also in Germany. Cloudflare has cached the content at their node in Germany already and can deliver the content from their node. This much faster than fetching it from the origin server.
Finally, Robert from the United Kingdom visits awebsite.com. Cloudflare has no cached content at their node in the UK yet because no-one in the United Kingdom has visited the website.
In our short example, John is served cached content. Anyone that is visiting the same website after Victor from Japan will be served cached content as long as the cache is not stale, meaning the cache is fresh. Anyone who comes after Robert in the United Kingdom will also be served cached content.
Now let’s examine some images from Cloudflare that let us visualize how APO works:

The image above represents what it looks like when a browser requests the content to a WordPress site that utilizes Cloudflare, but not APO.
As you can see, Cloudflare is able to serve quite a bit of this content to the user, but not all of it. There is still a lot going on between the WordPress at its origin (your web host, like us!). You can see Cloudflare is getting your homepage and some fonts. If you’re a website performance enthusiast and let’s be honest, everyone wants their site to be as fast as possible, eliminating the need for the browser your visitors are using to communicate with the WordPress origin server is a huge bonus. Your web host is fast, but not as fast as Cloudflare’s network and that’s where APO comes in.

The image above represents what happens when someone accesses the same WordPress site using Cloudflare and APO. Virtually everything is served from the Cloudflare network and there’s no resource grabbing from the origin server. It’s the difference from a Mazda Miata to a Lamborghini Aventador. Zoom zoom that one, Mazda. 😏
Is Automatic Platform Optimization Worth the Cost?
It depends on what kind of website you have.
If you have a website with a lot of content that would bypass the Cloudflare Cache because of how dynamic it is, such as a forum or WooCommerce store, then I’d really think about it and do an analysis of how much of your sites traffic will benefit from APO.
However, if you have a blog or personal portfolio site and your content is semi-static, Cloudflare APO for WordPress is perfect for you! It costs about as much as a couple of lattes, and everyone could do with less cream anyway, right, and it’s for a good cause – your own website!
Keep in mind, if you’re already using Cloudflare on a Pro, Business, or Enterprise plan, you already get APO for free, so why not use it, if your site is compatible?
How to Configure Cloudflare APO for WordPress
Cloudflare has made enabling APO and optimizing your WordPress site super easy.
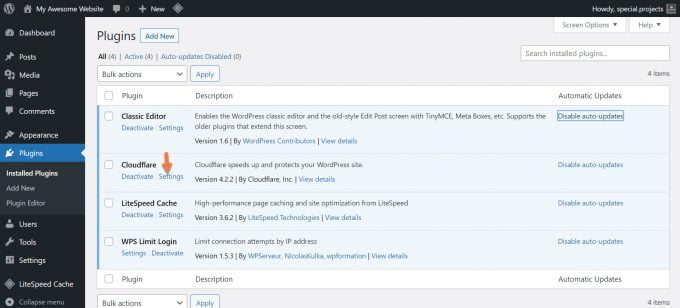
Step 1: Log in to your /wp-admin and in the Admin menu on the left, hover over Plugins, and click Add New.

Step 2: Use the search in the top right corner, and type Cloudflare. Then press return on your keyboard to execute the search.
When the results come up, look for the Cloudflare plugin and click Install Now.

After clicking Install Now, the plugin will be downloaded from the WordPress repositories and installed, but you need to activate it by clicking Activate.

After clicking Activate, you will be returned to your Plugins area where you can see the other WordPress plugins you have installed.
Step 3: Click Settings underneath Cloudflare.
The Cloudflare Plugin will load and you will be given the option to log in to your Cloudflare account.

Go ahead and click login. You will be prompted for your Cloudflare API key or an API token.
You probably don’t have this handy, so let’s walk thru the process of getting this.
First, click here to open the Cloudflare login page in a new tab. After logging in, click your profile icon in the top right corner of the page, then click My Profile.

After clicking My Profile, look in the menu at the top for API Tokens. Click that option to open the menu selection.
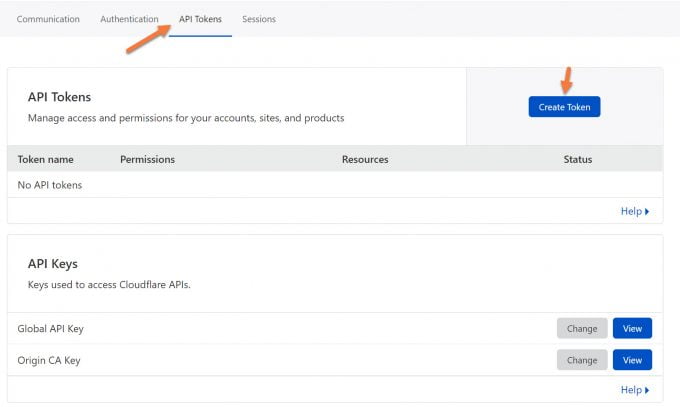
When the API tokens page is open, click Create Token. You’ll need to make a new token for the WordPress login.
On the Create API Token page, click the Use Template button next to WordPress.

You will be presented with the default token settings for a WordPress system. You won’t need to make any changes to these settings, just scroll down and click the blue Continue to the summary button.

The last page is a confirmation page, just click Create Token.

You will be presented with your token on the last page. Click the copy button to copy the token to your clipboard.

Now, return to the tab where your WordPress /wp-admin is open with the login page for the Cloudflare plugin and enter the e-mail address to your Cloudflare account and paste the token on your clipboard into the token box. Then click the green Save API Credentials button.
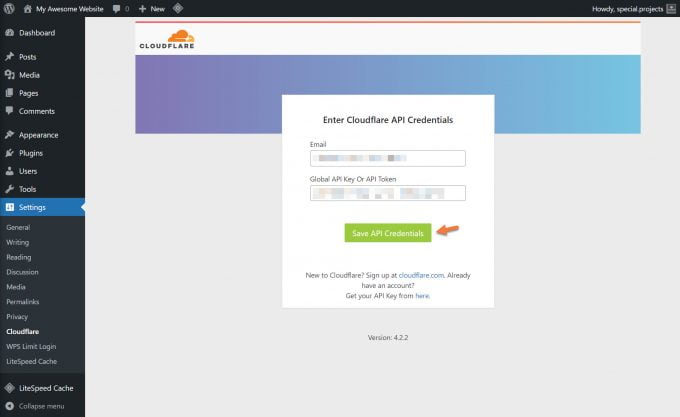
You will now be signed into your Cloudflare account.
Step 4: To optimize your site, you’ll need to do 2 things. First, click the Apply button next to Apply Recommended Cloudflare Settings for WordPress.

Next, click the toggle next to Automatic Platform Optimization to enable the setting.

The toggle will look green when it’s enabled:
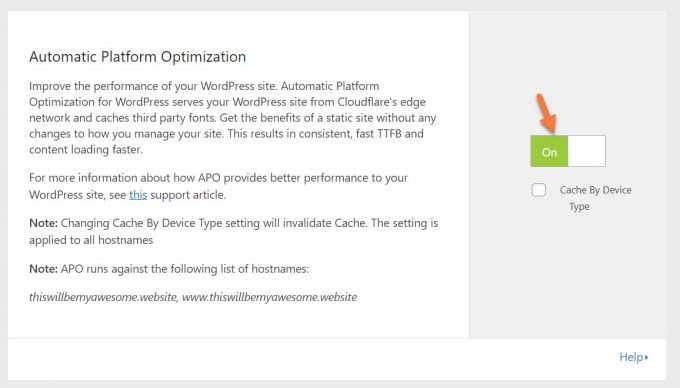
And that’s it! Now Cloudflare APO is enabled on your WordPress website! Congrats!
Exciting News: Introducing Our fastest WordPress Hosting stack 🚀 Ready for speed? Try it for just $1!
How to Check that APO Is Working on Your Website
You can use the Developer Tools in your browser to inspect the HTTP headers for a request to your website. We’ll be using Google Chrome in our example below.
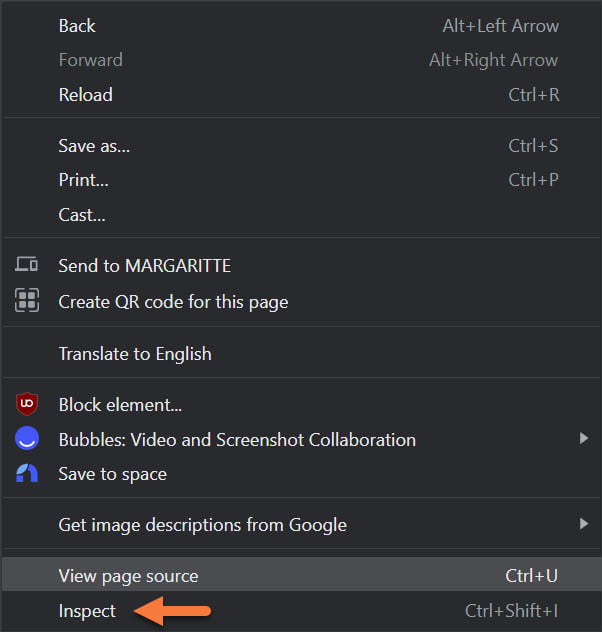
To get started, open your website in an Incognito tab. Next, right-click on the page and click Inspect to open the browser’s inspector tool.
When the inspector appears, click the Network tab. Next, look for the default request to your website, which looks like your domain name:

Double click this request to open its headers:

When APO is enabled, you will see a few APO-related headers.
- cf-apo-via indicates where a request is being served from. There are a few possible values for this header – “origin, no-cache”, “origin, bypass”, and “cache”. If you see a “origin, no-cache” value for this header, it means the origin server is sent a “Cache-Control: no-cache” header to Cloudflare. A “origin, bypass” value indicates Cloudflare’s HTML cache was bypassed and the request was served from the origin. Finally, a “cache” value indicates the request was served from Cloudflare’s cache.
- cf-cache-status indicates whether or not the page is being served from Cloudflare’s CDN. After refreshing the page a few times, you should see a “HIT” status. If your cf-cache-status header is displaying “DYNAMIC” after a few refreshes, it’s possible that APO is being bypassed due to a configuration error or cookie-related incompatibility.
- cf-edge-cache indicates the page’s cache compatibility as per caching instructions from your origin server. There are two possible values for this header – ”no-cache” and “cache, platform=wordpress”. When APO is properly configured with the Cloudflare WordPress plugin, this header will return “no-cache” for pages that should not be cached and “cache, platform=wordpress” for cacheable pages.
- age indicates the number of seconds that a page has been cached in Cloudflare’s CDN.
If you see the headers above when inspecting your WordPress site, that means APO is setup and working!
Summary
In summary, Cloudflare’s Automatic Platform Optimization is a fantastic service that’s incredibly affordable ($5 per month! Wow!) and can really boost the speed of your site. If you run a busy blog and have a lot of readers, this could be the perfect service for you, no worrying about bandwidth costs, and one easy-to-manage subscription with huge performance gains.
But on the other hand, if you run a busy eCommerce website, the service probably won’t benefit you as much and you could be wasting your money. You’ll definitely want to do an audit to find out how much of your website’s content is cacheable to make a determination on whether the service is right for you.
Questions? Comments? Let us know in the comments!