Ready to jump-start your web hosting business and start reselling domains? Then you have come to the right place. WHMCS is here to provide easy-to-use automation tools that will take your enterprise to the next level. This guide will walk you through everything from becoming a domain reseller to automating domain renewals, transfers, and other tasks.
Let’s dive in and explore how you can leverage WHMCS for maximum success when reselling domains.
Table of Contents
- What is Domain Reselling?
- How to Get Started with Domain Reselling
- Benefits of Using WHMCS for Domain Reselling
- Getting a WHMCS License
- Installing WHMCS
- Configuring Domain Registrars in WHMCS
- Configuring the Domains Settings in WHMCS
- Configuring the Domain Renewal Notices in WHMCS
- Customizing the Domain Renewal Notice Email Templates in WHMCS
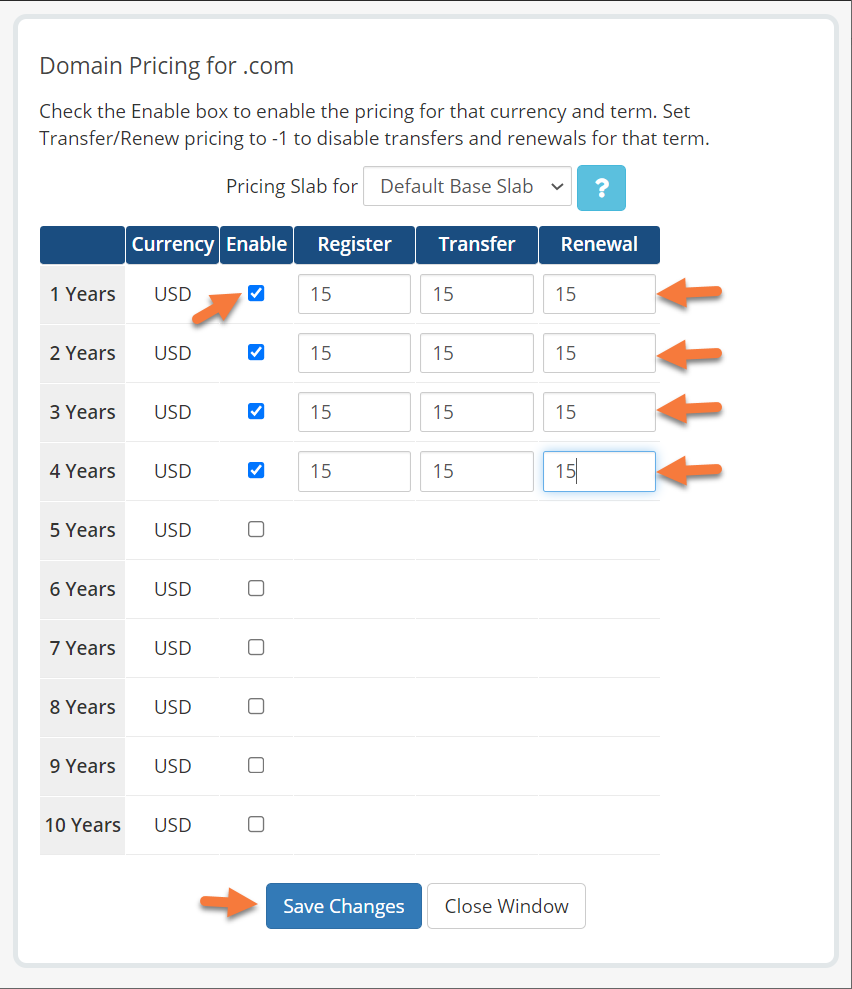
- How to Configure Domain Pricing in WHMCS
- Conclusion
What is Domain Reselling?
Domain reselling involves buying domain names from a domain registrar and then reselling them to customers for a profit. As a domain reseller, you don’t need to create or manage the domain names yourself; instead, you act as a middleman between the registrar and the end customer.
Let me provide a real-world illustration of this idea: When your domain registrar lets you resell .com registrations at $9.95, you can raise the price to $15.95 and generate an extra $6.
For those in the domain reselling business, customer service and efficient billing are among the most important aspects. Several domain registrars provide tools to simplify managing these business areas; such tools include customer management systems and white-label billing solutions. This can help manage relationships with your customers, invoicing, and providing any needed support regarding domain names you’re selling.
How to Get Started with Domain Reselling
Domain reselling is a great way to make money online and is easier than you might think. With the right knowledge and resources, anyone can start domain reselling.
1. Register a Domain Name – First, you’ll need to register your domain name. This will be the main website for your business, and customers will use it when they want to purchase domains from you. Make sure that your chosen name is easy to remember and relevant to what you do as a domain reseller.
2. Purchase a web hosting plan – Once you have secured your domain, the next move is to arrange web hosting. Simply put, web hosting is like the land where you build your house. The land is the space on the Internet where you store your website’s files. Typically, web hosting service runs on a physical server owned by a web hosting company, such as ChemiCloud. When you sign up for a web hosting service, you rent a small piece of space on that server.
ChemiCloud offers all the goodies you’ll need if you’re looking for options, from buying a domain to reseller hosting plans. What’s more, we’re proud to be the only company to offer a free domain for one year when you purchase any of our web hosting plans.
3. Becoming a Domain Reseller – To become a domain reseller, you must typically sign up with a domain registrar offering domain reseller programs. The registrar will provide you with a reseller account, giving you access to their domain registration system. You can then purchase domain names at a discounted price and sell them to your customers at a markup.
4. Getting started with Domain Reselling – Beginning domain reselling may seem overwhelming, but it’ll be much more straightforward once you become acquainted with the fundamentals and gain familiarity with WHMCS.
Now let’s explore the benefits of using WHMCS for domain reselling.
Benefits of Using WHMCS for Domain Reselling
WHMCS is a powerful automation software solution for domain resellers. WHMCS provides the tools to manage and expand your domain reselling business successfully. WHMCS offers automation features, customer support tools, and much more that make it an ideal choice for those looking to get into domain reselling.
One of the most significant advantages of using WHMCS is its automation capabilities. Automated billing allows customers to be billed regularly without any manual effort from you or your staff, thus freeing up time and resources. This eliminates time-consuming tasks like manually invoicing customers monthly or sending out reminder emails when payment is due. Automated provisioning can save time and money by quickly setting up new accounts without manual input.
Other essential features are worth being mentioned:
- Real-Time Availability Checking – Check domain availability using real-time polling of WHOIS services and registrar APIs
- Automated Renewals – Automatically invoice for renewals and trigger renewals with domain registries when customers pay you
Domain Syncing – Daily synchronization of domain due dates and status, as well as auto-detection of transfers away - Free Domains – You can bundle domain registration for free with specific hosting packages
- ID Protection – Offer your customer’s ID Protection as an additional paid add-on.
- Domain Search – Integrate domain availability checking and searching directly into your website.
- Self-Management Portal – Allow customers to manage every aspect of their domain registration with you via the self-service client portal
Test-drive the leading web hosting automation platform using this WHMCS demo install. Log in at this URL and explore the power of WHMCS using the demo credentials on the login page.
Overall, there are many reasons why using WHMSCS makes sense when starting in domain reselling. Automation capabilities save time and money while providing excellent customer service via built-in ticketing systems and live chat functions, helping ensure smooth sailing throughout the entire process. This makes WHMSCS an ideal selection, no matter the magnitude or breadth of the venture.
Next, we will explore the process of starting WHMCS and reselling domains.
Getting a WHMCS License
Before you can get started, you need to purchase a WHMCS license. WHMCS licenses are available on the official WHMCS website and come with different pricing and features. Also, it’s essential to know that there are two types of licenses: branded or unbranded WHMCS.
The license you choose will depend on your web hosting business size. There are multiple WHMCS licenses available for purchase:
- WHMCS Starter License: This is the starter license of WHMCS, designed for small web hosting companies just starting. It is a branded license on which you can have up to 250 active clients.
- WHMCS Plus License: This is the starter license of WHMCS, designed for small web hosting companies just starting. It is an unbranded license on which you can have up to 250 active clients.
- WHMCS Professional License: This license is designed for medium-sized web hosting companies that have outgrown the Starter License. It is an unbranded license on which you can have up to 500 active clients.
- WHMCS Business 1000 License: This license is designed for large web hosting companies requiring more scalability. It is an unbranded license on which you can have up to 1000 active clients.
- WHMCS Business 2500 License: This license is designed for large web hosting companies requiring more scalability. It is an unbranded license on which you can have up to 2500 active clients.
The following license tiers are Business 5000, Business 10000, to Business Unlimited.
WHMCS License: Branded or Unbranded?
There are two types of WHMCS licenses available: branded and unbranded. Let’s go through each type of license and find out the difference between each type of license.
What is a WHMCS Branded License?
A branded WHMCS license will show the link “Powered by WHMCompleteSolution” on your WHMCS installation at the bottom of every client area page. So, clicking on this link will direct visitors or users to WHMCS’ website.
WHMCS Starter is a branded type of license. It will allow you to use it for up to 250 Clients and include WHMCS Branding.
What is a WHMCS Unbranded License?
An unbranded WHMCS license, on the other hand, will not include the “Powered by WHMCompleteSolution” on pages of your WHMCS installation.
Plus, Professional and Business are the unbranded type of licenses.
What’s the difference between Branded and Unbranded WHMCS Licenses?
As you can see, there’s not much difference between branded and unbranded WHMCS licenses. All licenses are fully templated, so you can customize the appearance and set your logo for the public pages and for the emails.
How about getting a free WHMCS license?
While most providers of domain reseller programs offer a control panel where you can log in, manage domains, or register new ones, they may not offer the tools you’ll need to automate these functions so you can offer the same level of service to your customer. This includes offering free licensing for automation platforms like WHMCS, which works with most domain reseller platforms, and giving your customers access to a front end to purchase new domains and manage their existing ones.
You usually must pay top dollar to obtain a WHMCS license. However, we’ve got you covered if you’re a ChemiCloud customer! We offer a free WHMCS license with select reseller hosting plans.
Now, the only thing remaining is – How do I install WHMCS, go through the setup wizard, and how to configure domain registrars and pricing in WHMCS?
Not to worry! This tutorial was built with you in mind and will answer all those questions and then some! By the end of this guide, you can automate your domain reselling business like a WHMCS Pro!
Now, make a pot of coffee or tea, whichever you prefer, grab a snack, and let’s do this!
Installing WHMCS
Before going further with the WHMCS installation, we assume you already have an active reseller hosting plan with cPanel as the control panel. If you’re looking for options, check out our reseller hosting plans.
WHM/cPanel is bundled with every plan and provides an intuitive interface to help you manage websites. Also, our Softaculous 1-click app install makes it easy to get started with the app you love.
To install WHMCS in cPanel, using Softaculous, you can follow the steps below:
1) Log into your cPanel account.
2) Scroll to the Softaculous section and click the Softaculous Apps Installer icon.
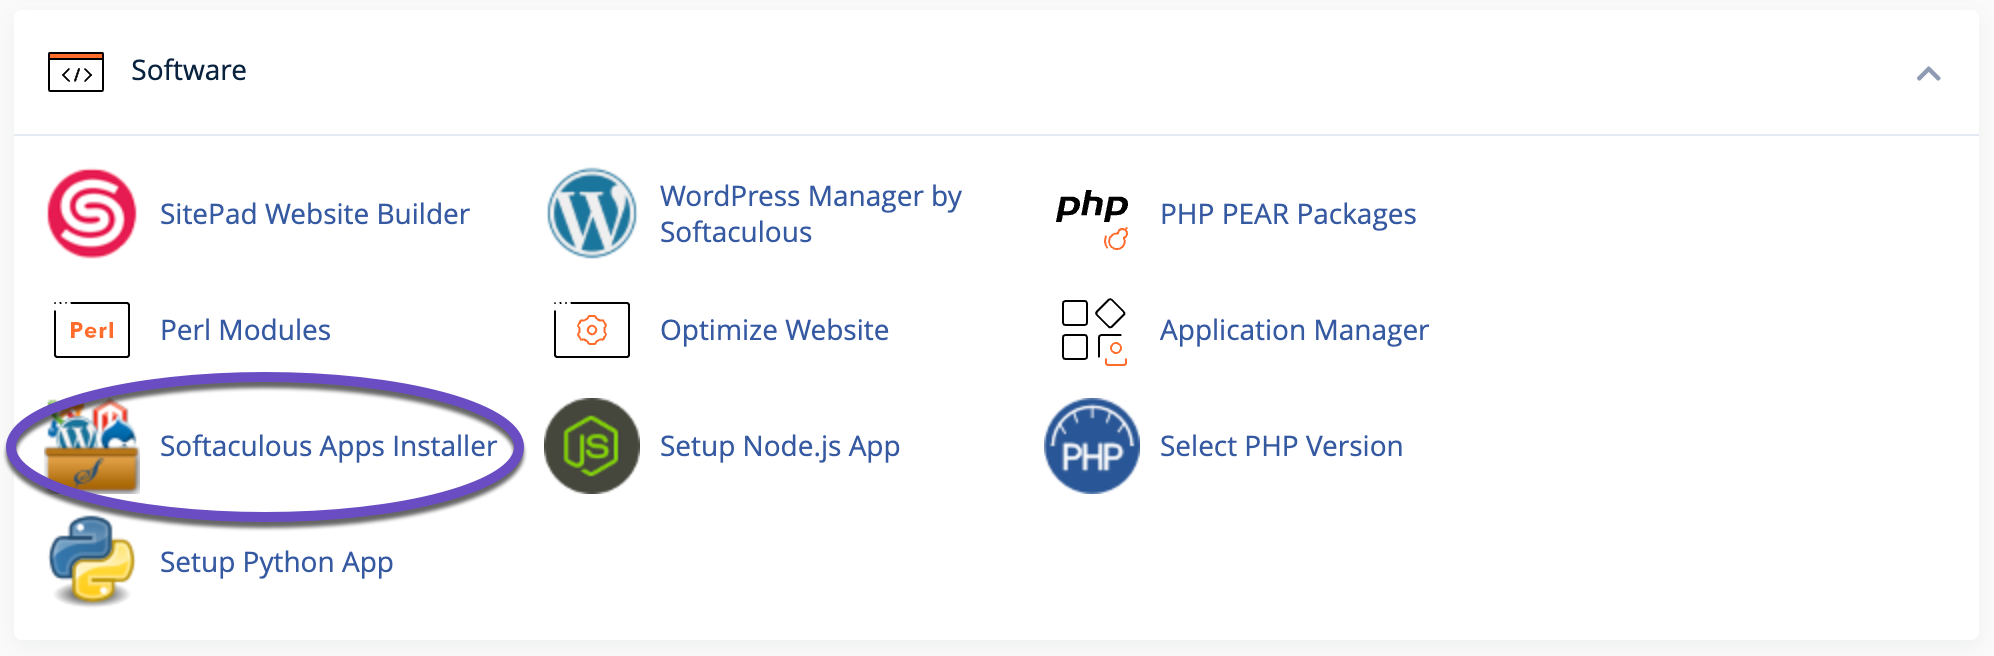
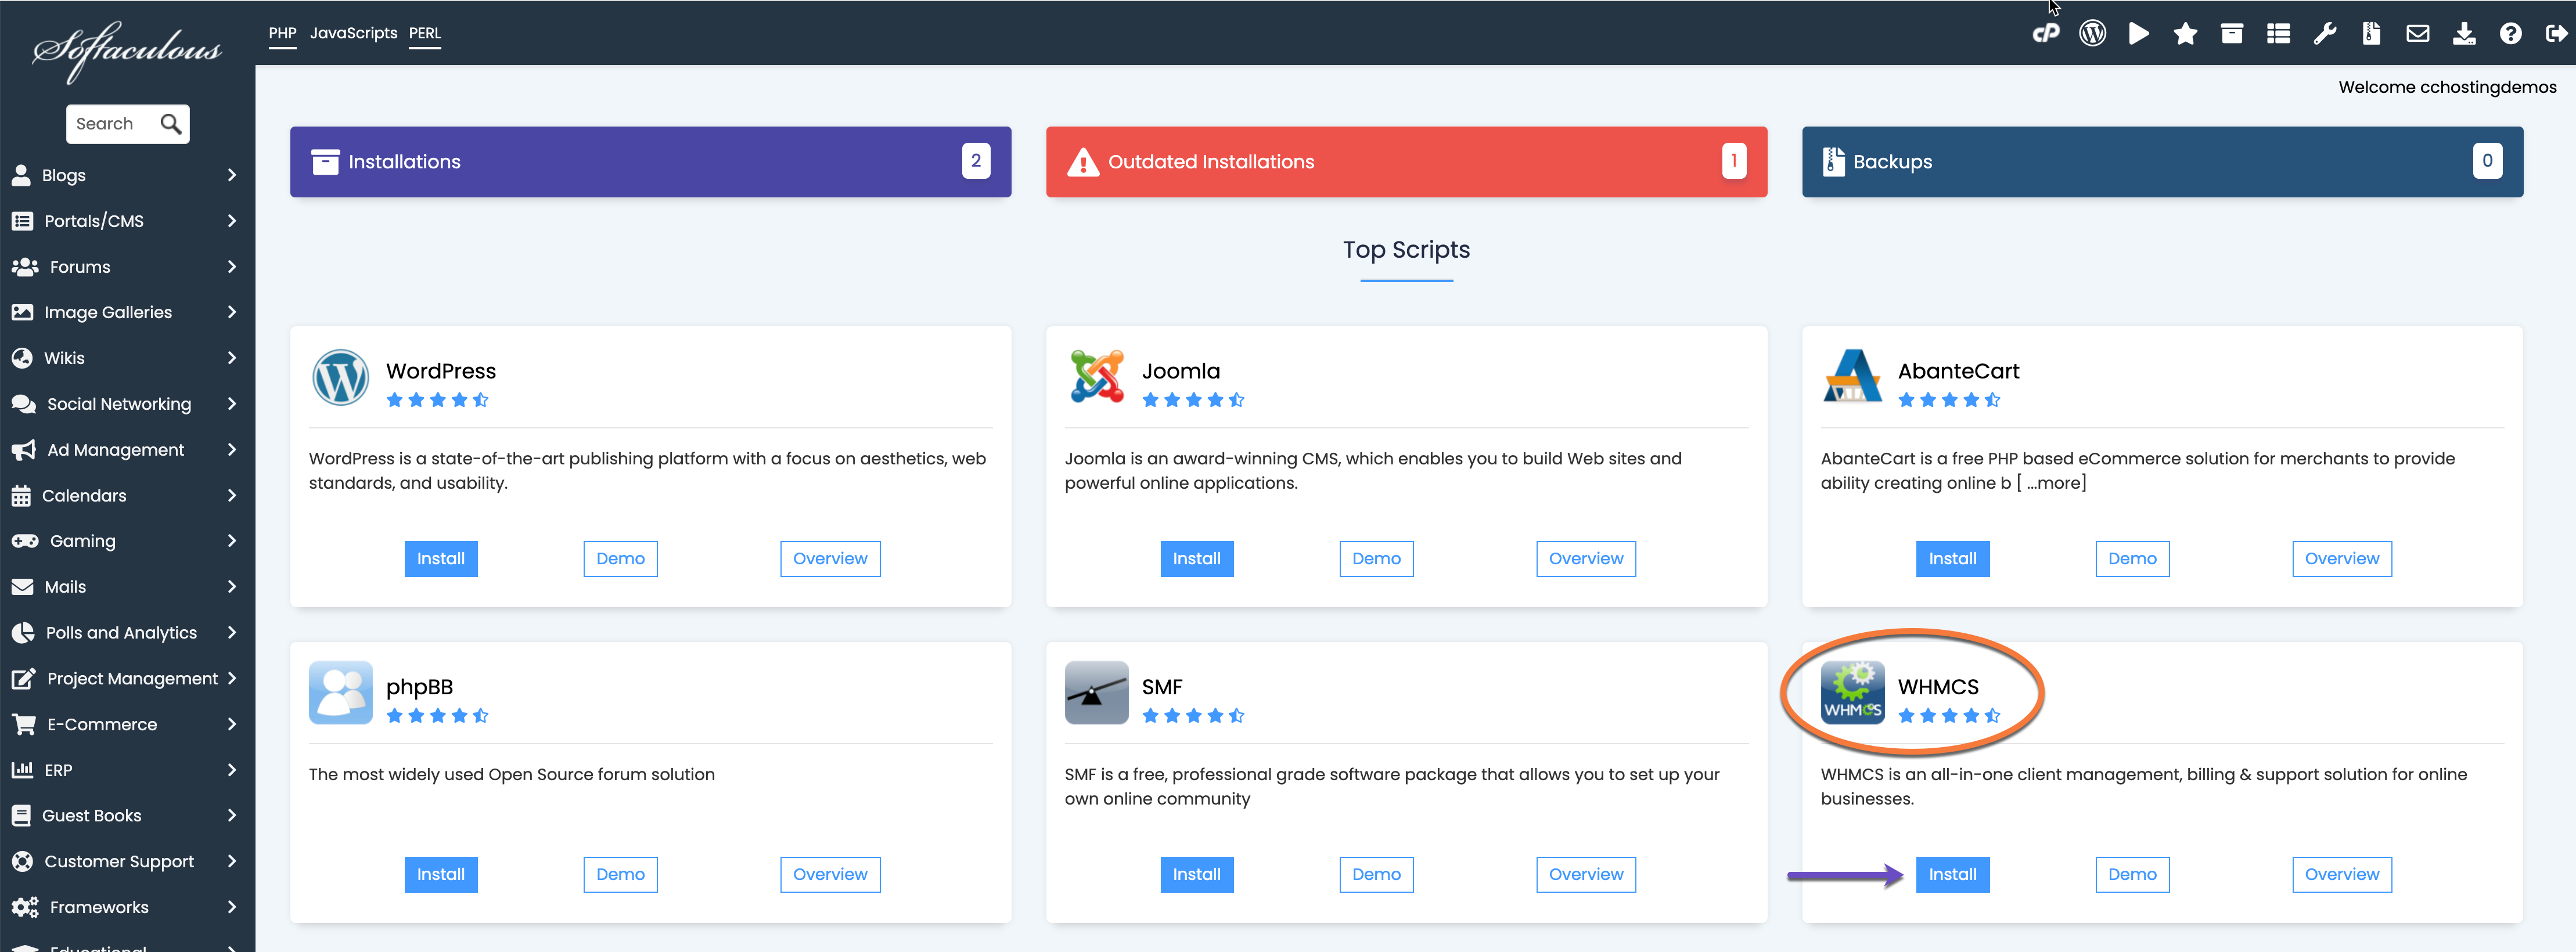
3) In the Softaculous dashboard, you’ll have a list of top apps. Look up WHMCS and click on the Install button.
4) Now, it’s time to choose a protocol for your WHMCS install.
If your site has an SSL installed, then you would use HTTPS. The HTTP protocol will be accepted if your site doesn’t use an SSL.
5) Next, you’ll need to set the Directory in which WHMCS will be installed. E.g.:
- Please type billing to install WHMCS in a subfolder such as “billing” (https://domain.tld/billing).
- If you want WHMCS to be installed on https://domain.tld, leave the “In Directory” field empty.
6) Next, you will need to fill out the details of your WHMCS installation:
Site Settings:
- Company Name: Type in the name of your company
- Admin Folder: Type in the name of the folder that you’d like to use for the administrator panel description. I advise using a different name and not the default “admin” for improved security.
- Company Email: Type in the email address for your company
- Valid License Key: Type in the WHMCS license. If the license was purchased through us, search through your emails and see the welcome email sent to you once the WHMCS license was issued.
Admin Account:
In this area, you must enter the login details you’d like to use for your WHMCS admin panel. Please make sure to use a strong password and a personal email address to which you have access.
Advanced Options:
We advise you to leave the advanced options that are configured by default for the database. You can enable auto-updates from this area for your WHMCS version, theme, and plugins.
7) When ready, scroll down and hit the Install button.
In a few moments, you will see the message that WHMCS has been successfully installed.
That’s it! You can now go ahead and log into your WHMCS Dashboard.
Once logged in, you’ll be presented with the Getting Started Wizard modal. This tool will walk you through the initial configuration of WHMCS. If the wizard does not appear, it can be opened manually via the Help menu > Setup Wizard.
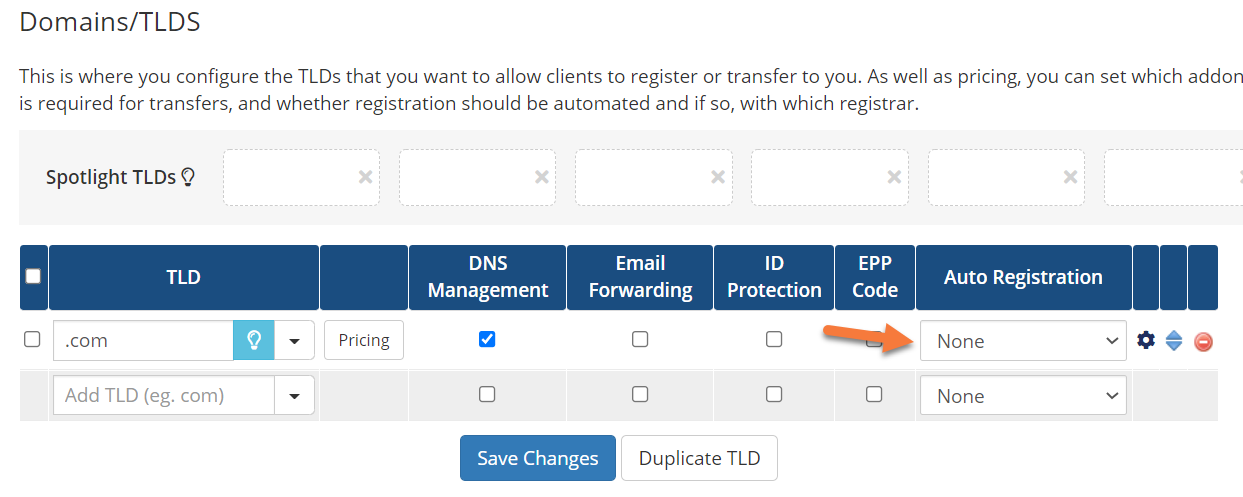
Configuring Domain Registrars in WHMCS
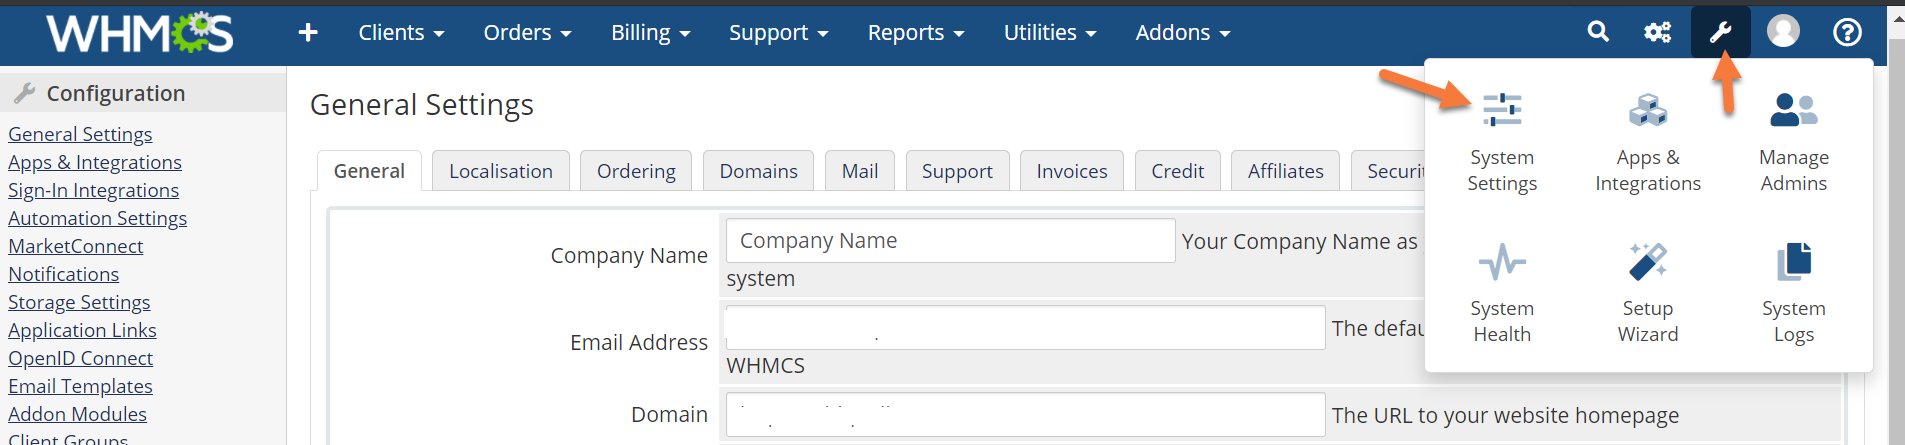
Step 1) First, log in to your WHMCS Admin. Once logged in, click the wrench in the top right corner, then click System Settings.

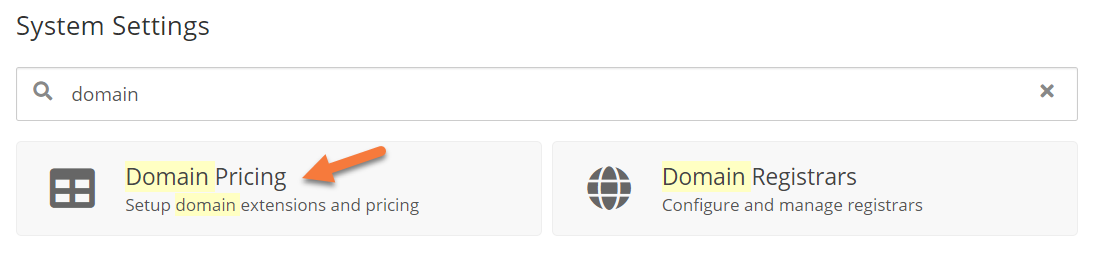
Step 2) Once the System Settings panel loads, use the search feature at the top of the page to search for domain; then when the results load, click Domain Registrars.

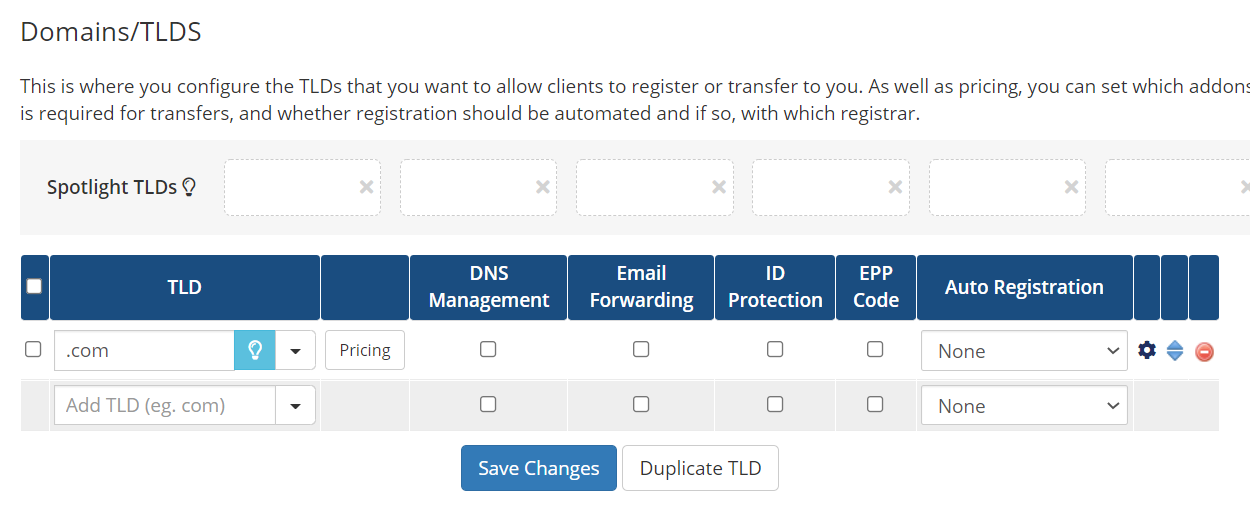
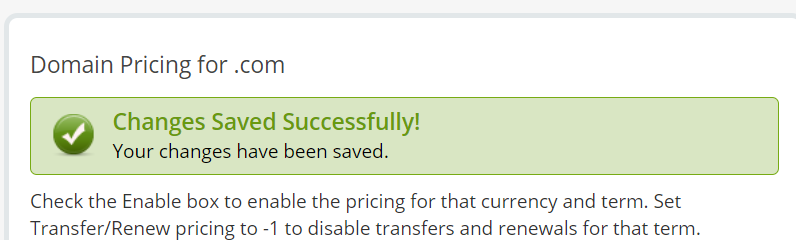
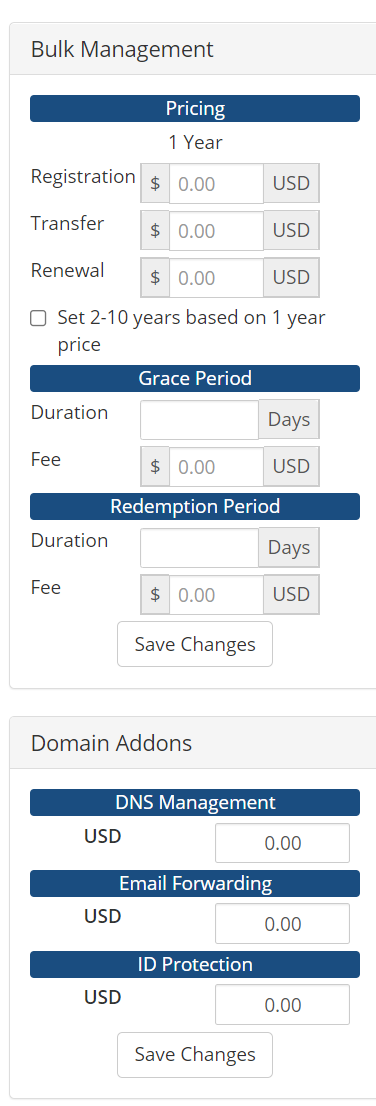
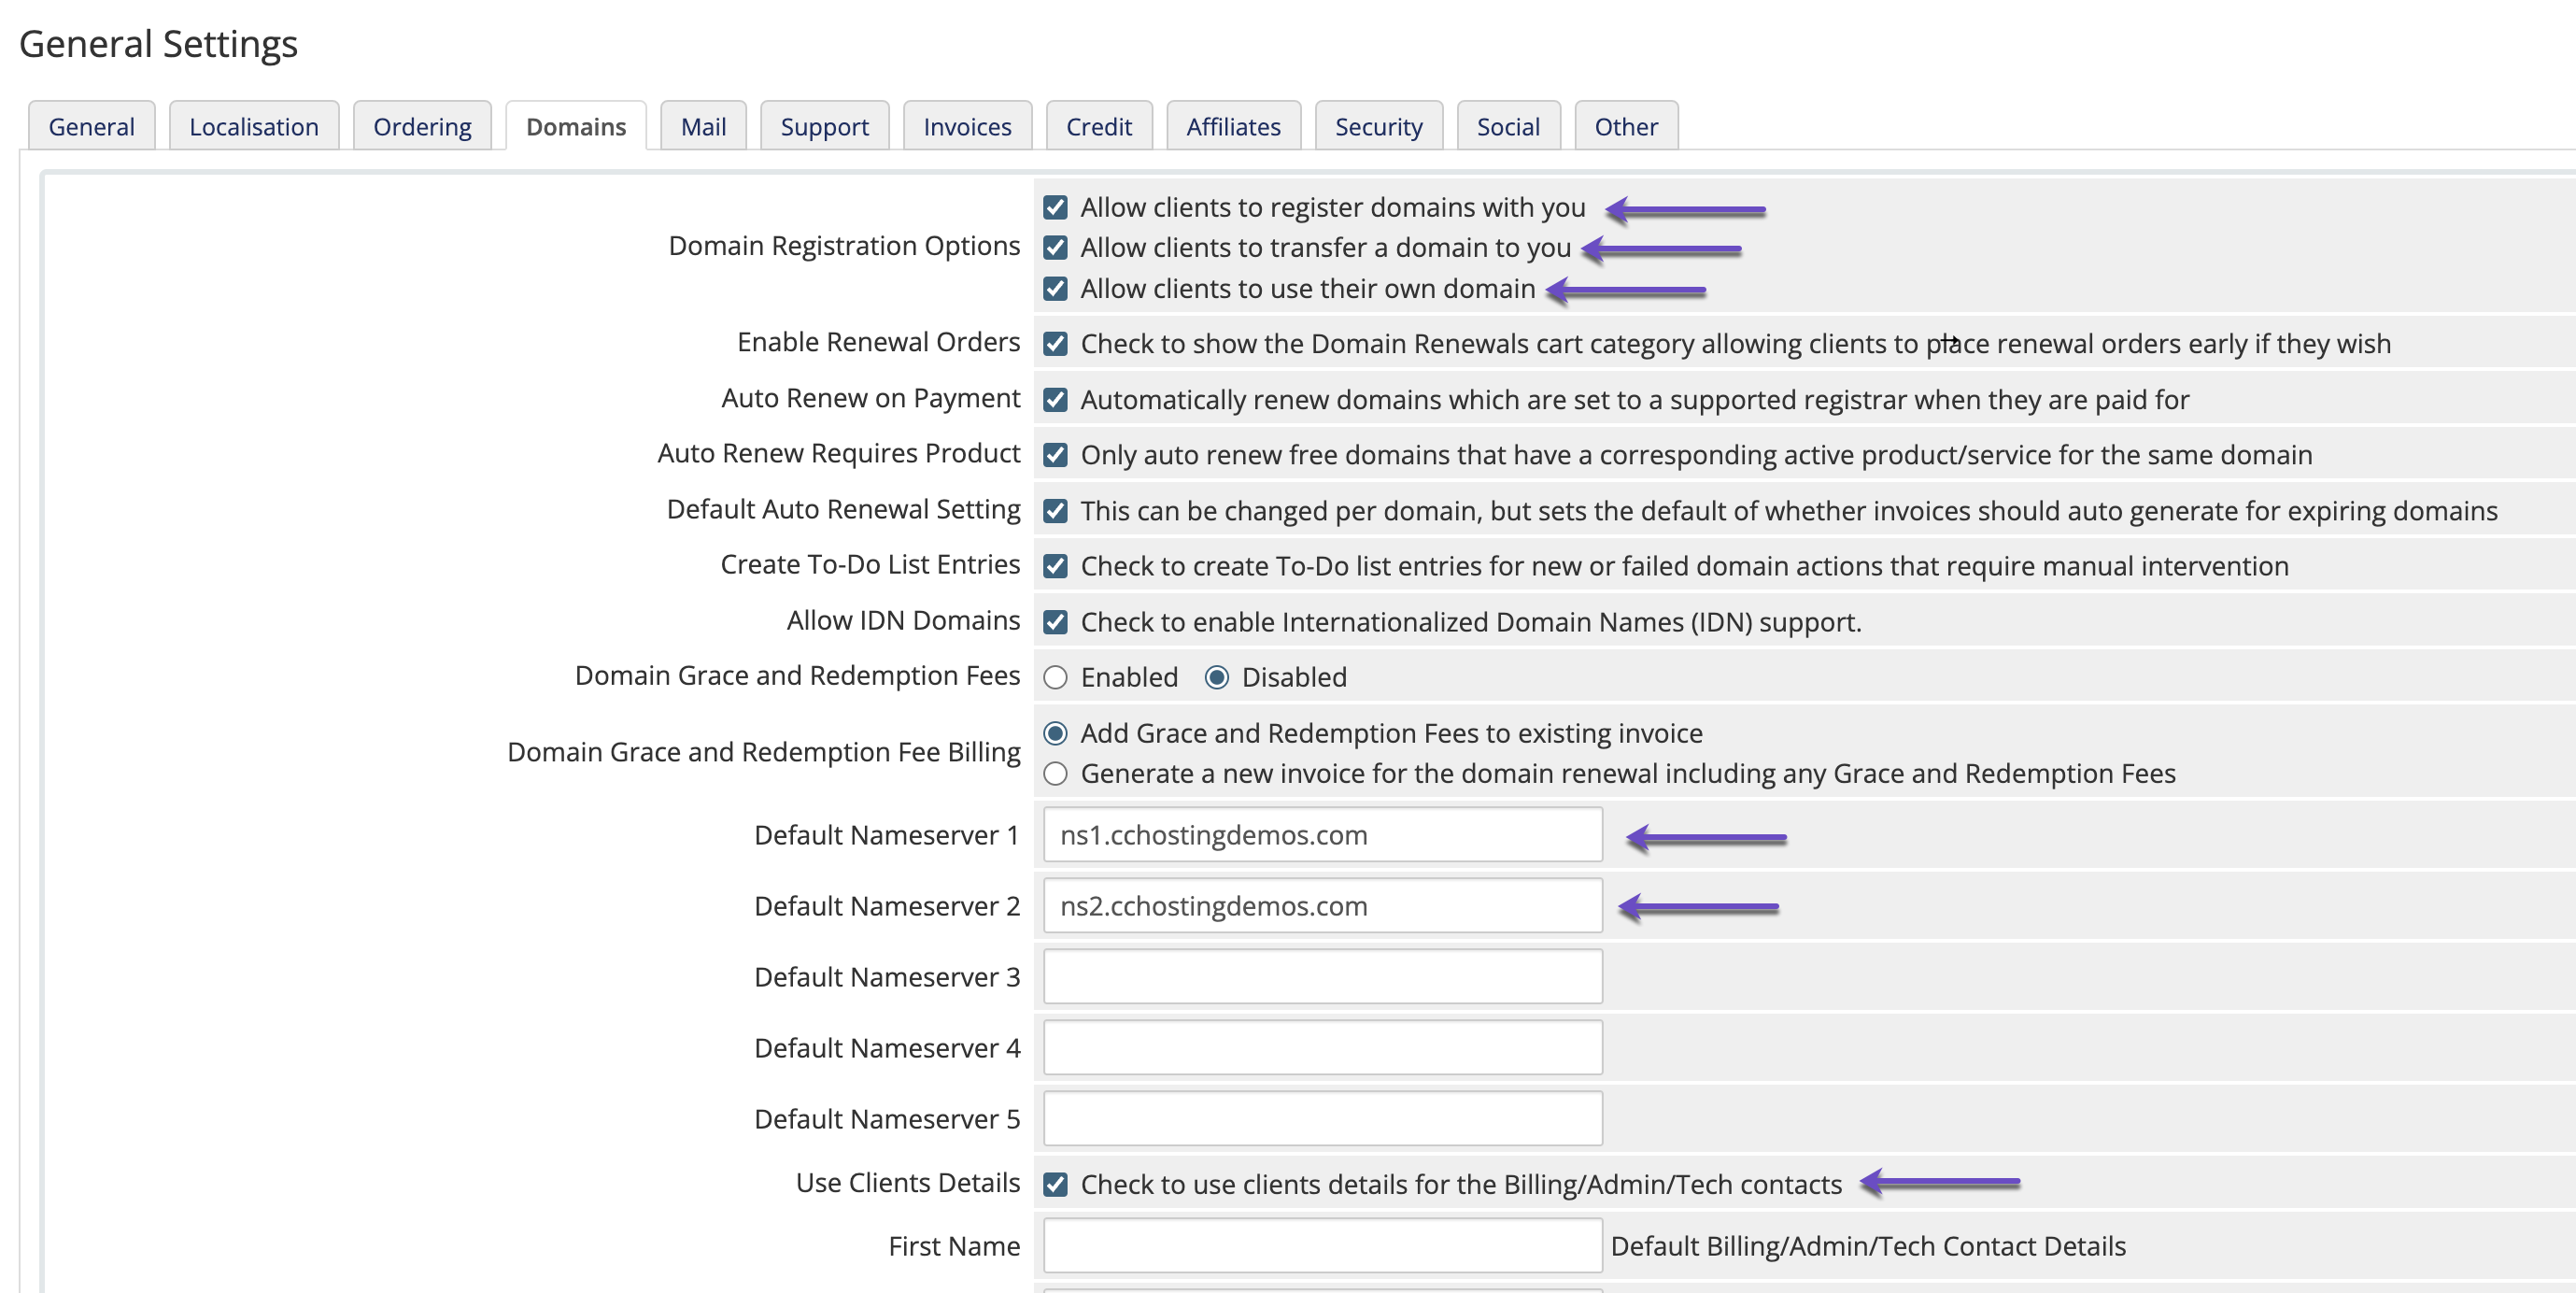
After linking your Domain Reseller Account to WHMCS, there are a few Domains settings that you should check out. These settings can be easily enabled in WHMCS → System Settings → General Settings → Domains tab.
The Domains tab allows you to configure how WHMCS registers and renews domains.
Please find below a few Domains settings that require your attention:

Two email templates are used for domain renewal notices:
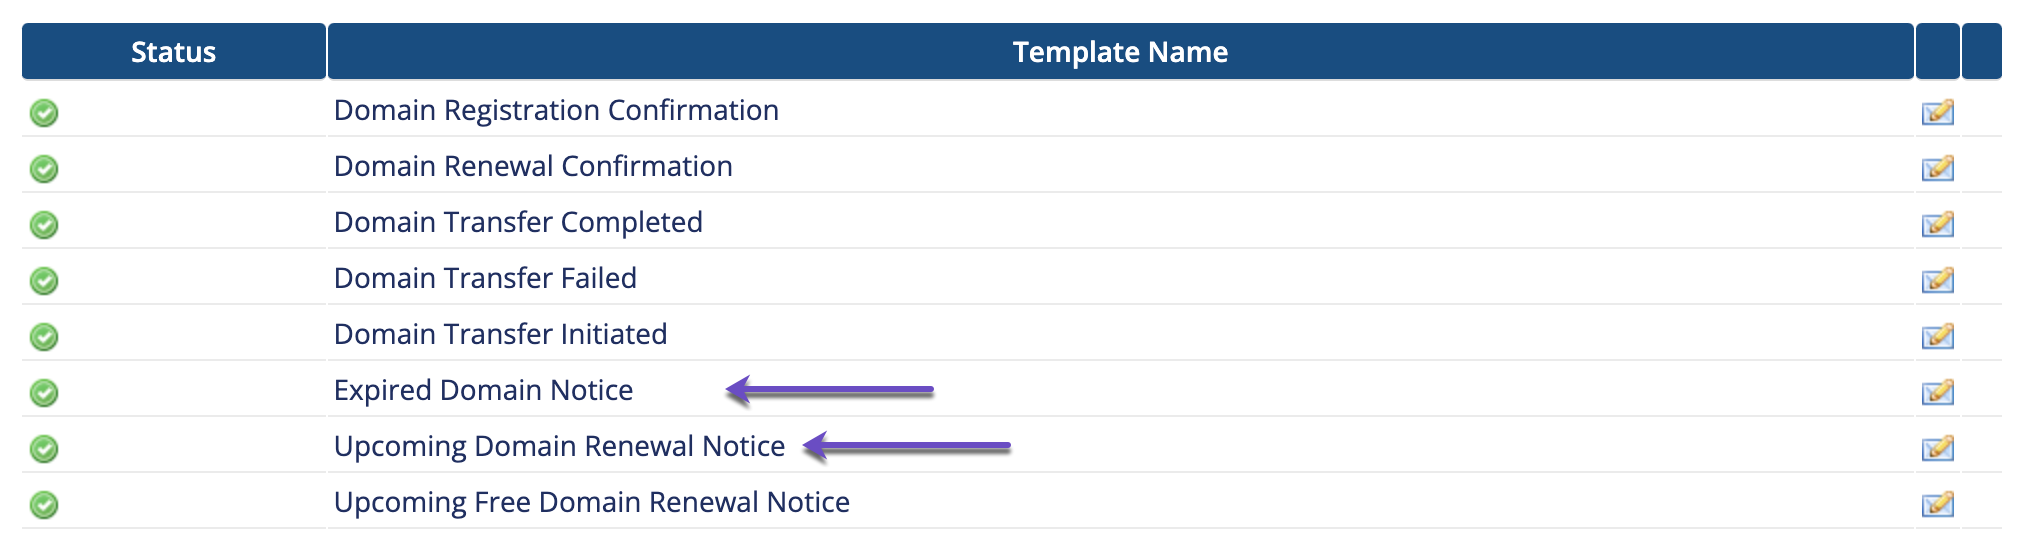
- Upcoming Domain Renewal Notice – Used for notices sent before the domain’s Next Due Date
- Expired Domain Notice – Used for notices sent after the domain’s Next Due Date (if the domain remains unrenewed)
You can easily customize renewal notice emails at Configuration → System Settings → Email Templates