
Suppose you’re looking to transfer a domain from FastComet. In that case, this guide will provide step-by-step instructions for beginners or advanced users, including obtaining the authorization code, unlocking your domain at the current registrar, and considering ICANN’s policies. This comprehensive guide will provide step-by-step instructions for transferring your domain easily and confidently, ensuring you will find valuable insights.
This blog post covers essential topics such as obtaining the authorization code from FastComet’s client area, and unlocking your domain at the current registrar. Additionally, we’ll discuss temporarily disabling Domain Privacy during transfers and updating registrant email addresses for smooth communication.
Table of Contents
Things to Consider Before Transferring Your Domain Away from FastComet
- Before going further with the domain transfer, it is essential to know that when a domain name is transferred away, the name servers associated with your domain stay the same during the transfer from one registrar to the other. So, for example, if your domain name uses the default name servers of FastComet, those name servers will be preserved during the transfer, and you won’t be able to change the name servers until the transfer is complete.
This means that if you switched to another web hosting provider and your website was migrated already, before initiating a domain transfer, ensure that your domain name is pointed to the new provider’s name servers. As we previously mentioned – you won’t be able to change the name servers until the transfer is complete. - Domain Name Registrations and Web Hosting are separate services. The domain name transfer process will not automatically migrate your website. If you are a ChemiCloud customer and wish to transfer your website from FastComet, please submit a migration request from your client area. Our migrations experts will move your existing sites and emails free of charge, seamlessly, and with zero downtime.
- Transferring your domain name will include your domain renewal for another year. So, for instance, if your domain is due to expire on the 1st of January 2025, once the transfer is complete, the new expiration date will be the 1st of January 2026.
- Ensure the domain is in the ‘Active Period’ and not the ‘Redemption Grace Period’ or ‘Pending Delete’ period.
Preps for Transferring a Domain Away from FastComet
Before initiating the transfer process at the new registrar, essential steps must be taken at the existing domain registrar. These include obtaining your domain’s authorization code (also known as EPP or auth code), unlocking the domain at your current registrar, ensuring 60 days have passed since initial registration, temporarily disabling privacy protection features during the transfer period, and updating your admin email address.
Step 1: Ensuring 60 Days Have Passed Since Initial Registration
ICANN’s Transfer Policy mandates that domains must be registered for at least 60 days before they can be transferred. This rule applies to new registrations and any recent transfers or updates to domain registrant information.
Step 2: Obtaining Domain EPP Code from FastComet
To transfer a domain from FastComet, you must first obtain an authorization code (Secret Key, EPP or auth code). ICANN’s transfer policy requires this unique identifier and is a security measure to prevent unauthorized transfers.
1) Log in to your FastComet account, then click on the Domains tab on the left-hand side menu.
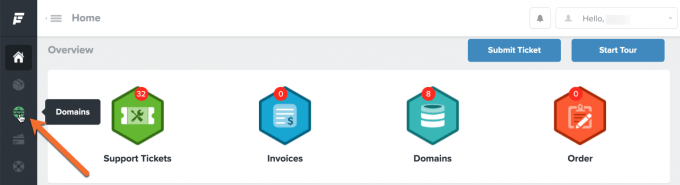
2) When the domain management page opens, click Manage Domain for the domain you want to transfer away.
3) To obtain your EPP Code (transfer code), click on the “Get EPP Code” section of the menu.

Note: Auth/EPP codes are required for all .com, .net, .org, .us, .biz, .info, .me, .co, .io, .ca, .tv, .in, .mobi, .cc, .pe, .com.pe, .net.pe, .org.pe, .tech, .top, .party, .loan, .faith and other new gTLD domains. If you cannot request an EPP code in an account with your Registrar, contact them and ask them to provide it.
4) Copy the EPP Key to your clipboard and paste it into a Notepad or text editor file for safekeeping. You can use this code at the new registrar to transfer the domain away from FastComet.
Looking for a FastComet alternative? 👀 Then make the switch to a superior web hosting service and join the ranks of satisfied customers 🤟. On top of that, we offer complimentary website migration with no downtime!
Step 3: Unlocking Your Domain at FastComet
The domain must be unlocked at its current registrar for a successful domain transfer. To disable the domain locking for your domain with FastComet, follow the steps below:
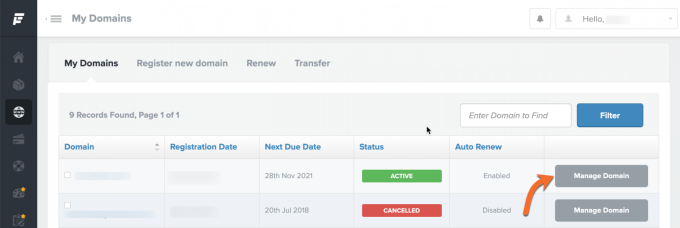
1) Log in to your FastComet account, then click on the Domains tab on the left-hand side menu.
2) When the domain management page opens, click Manage Domain for the domain you want to transfer away.
3) To unlock your domain name, click on the “Registrar Lock” section of the menu.
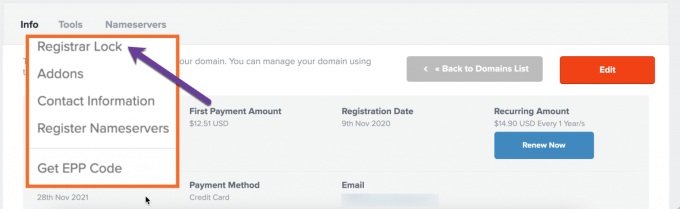 4) Under Options, click on “Disable Registrar Lock“
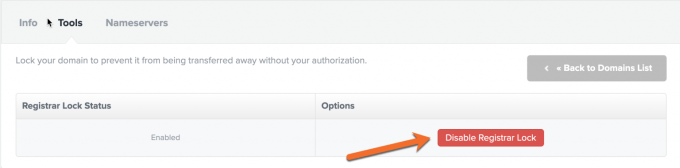
That’s it; you have now disabled the registrar lock for your domain. The changes may take a few minutes to be reflected on public WHOIS.
Step 4: Disabling Domain ID Protection Feature at FastComet
If you have enabled privacy protection features on your domain, such as WHOIS privacy or ID Protect, these must be temporarily disabled during the transfer process.
To do this in FastComet, please follow the steps below:
1) Log in to your FastComet account, then click on the Domains tab on the left-hand side menu.
2) When the domain management page opens, click Manage Domain for the domain you want to transfer away.
3) Look for the Tools section and click on Addons
4) The next step is to click “Disable” under the ID protection
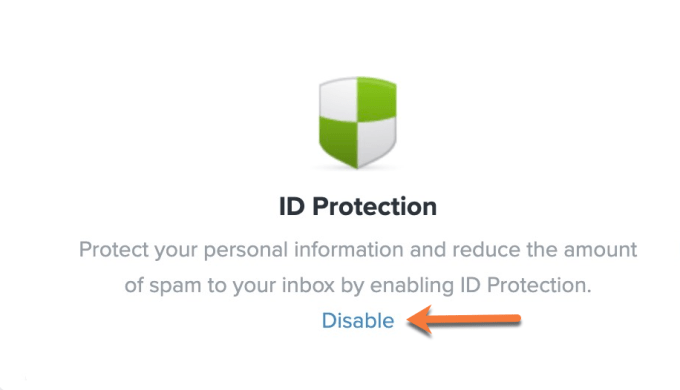
That’s it; whois privacy protection is now disabled for your domain name. The changes may take a few minutes to be reflected on public WHOIS.
Step 5: Ensuring Registrant’s Email Address Is up-to-Date
Lastly, ensure that your registrant email address is up-to-date with FastComet. This will help facilitate communication between both parties during the domain transfer process. In case of any issues or additional actions required by either registrar, an accurate email address will expedite the resolution.
1) Log in to your FastComet account, then click on the Domains tab on the left-hand side menu.
2) When the domain management page opens, click Manage Domain for the domain you want to transfer away.
3) Look for the Tools section and click on Contact Information
4) Check on the listed email address under the Registrant section and ensure you have access to it.
Once you have prepared your domain for transfer, it is time to initiate the process from the new domain registrar.
Step 6: Initiate the Transfer Request at the New Registrar
Once you have the EPP code and have completed the previous steps, you can initiate the transfer request at the new registrar. This can usually be done through their website or by contacting their customer support team.
Step 7: Monitor the Domain Transfer Process
After initiating the transfer request, you must monitor the process to ensure everything goes smoothly. Keep an eye out for emails from both registrars and complete any required actions promptly.
Transferring a domain can take up to 7 days to a couple of weeks, depending on various factors such as the response times of involved parties and specific TLD requirements. If you’re transferring a UK domain, there may be additional steps you need to take. Make sure you’re familiar with specific requirements for your domain extension.
If you’re transferring a currently locked domain, you’ll need to unlock it in your FastComet account before initiating the transfer request. Additionally, if your domain uses FastComet’s nameservers, you’ll need to update the DNS settings to the new host’s nameservers after the transfer.
It’s important to note that if your domain is within 60 days of initial registration or a previous transfer, you won’t be able to transfer it.
Transferring a domain from FastComet to another registrar can be straightforward if you follow the correct steps and ensure compliance with ICANN rules. Some registrars even offer free domain transfer when you transfer your domain to them, so it’s worth considering your options before making a decision.
That’s it! You know how to transfer your domain away from FastComet, whether with another company or us. (But we are pretty awesome, 🌟🌟🌟🌟🌟).
How about transferring your domain for free?
Grab an annual hosting plan which you’ll need anyway, and get a free domain transfer. Moreover, we’ll migrate your website(s) free of charge and with zero downtime from FastComet to us.
You’ll get more than a free domain transfer:
- Great renewal rates: When renewing your domain, you’ll never have to worry about breaking the bank.
- User-friendly domain management: Manage your domain with an easy-to-use control panel and dashboard.
- Industry-leading Customer Support – Day or night, our 24/7 happiness engineers are here to offer struggle-free support when you need it.
👉🏻 Claim your free domain transfer now.
Transferring a Domain Transfer from FastComet to ChemiCloud
Transferring your domain registration from FastComet to ChemiCloud is a straightforward process. Follow these step-by-step instructions to ensure a smooth transition:
We’ll assume that you have unlocked the domain at its current registrar and have the authorization code (sometimes called an EPP key) from FastComet.
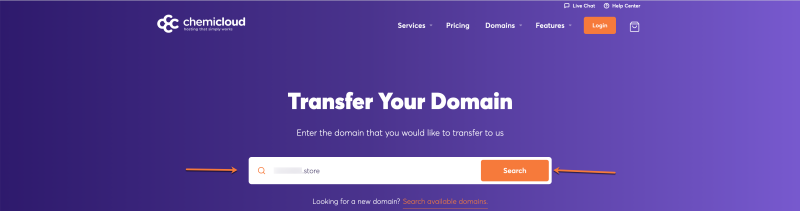
Step 1
Head to our Domain Transfer page, enter the domain name you wish to transfer to ChemiCloud, and click the Search button.
Step 2
Enter the domain Transfer Code (EPP) in the appropriate text field
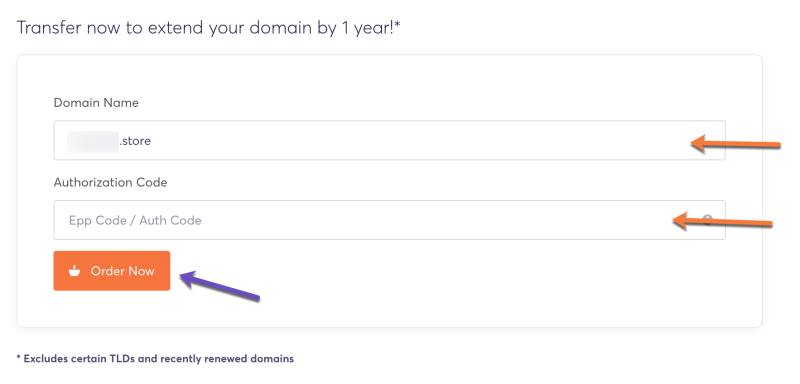
2) Click the “Order Now“ button.
3) You will be asked if you require hosting as well. Click the “Continue“ button to finalize only the domain transfer without hosting.
Click the ‘Checkout‘ button to send your domain transfer request.
A domain name transfer can take up to seven (7) days. Once the domain name transfer is complete, you will receive a confirmation by email.
That’s it! You know how to transfer your domain away from FastComet to ChemiCloud.
Completing the Domain Transfer Process
Upon receiving confirmation that your domain has been successfully transferred from FastComet or another provider to a new registrar, it’s time to complete the process by re-enabling any previously disabled privacy protection features and verifying DNS settings within the new control panel provided by them. This will ensure a smooth transition and allow you to manage all domains under one roof easily.
Verify DNS Settings Within the New Control Panel
The final step is ensuring your domain’s DNS settings are correctly configured within the new control panel.
If required changes have been made after the transfer (e.g., updating nameservers), give it time for DNS propagation before checking if your website is functioning correctly. Typically, DNS changes can take a few minutes to 48 hours for full propagation.
Once the transfer is complete and you’ve verified everything is functioning correctly, congratulations – you have successfully transferred your domain away from FastComet. You have successfully transferred your domain from FastComet or another provider to a new registrar and can now easily enjoy the benefits of managing all domains under one roof.
Troubleshooting Domain Transfer Issues
If you encounter any issues during the domain transfer process, it’s essential to contact the new registrar and FastComet customer support team for assistance. They can help resolve common problems, such as authorization code errors or delays in the transfer timeline. In this section, we’ll discuss some steps you can take to troubleshoot domain transfer issues.
Contact FastComet Customer Support If Needed
In case of any difficulties obtaining your authorization code or unlocking your domain at FastComet, their customer support team is available 24/7 via live chat, phone, and email. Ensure you have all relevant details handy when reaching out to them, including your account username and domain name.
Besides contacting both registrars’ support teams if needed, here are a few additional tips that might help resolve common issues:
- Double-check Authorization Code: Ensure you’ve entered the correct authorization code provided by FastComet when initiating the transfer-in request at the new registrar. Any typos could lead to an unsuccessful attempt.
- Verify Domain Status: Ensure your domain is not transfer-locked or under any other restrictions that might prevent the transfer process. You can check your domain’s status using a WHOIS lookup tool.
- Review ICANN’s Transfer Policy: Familiarize yourself with the ICANN transfer policy, which outlines rules and regulations governing all domain transfers.
- Monitor Emails Regularly: Keep an eye on emails from both new and old registrars, as they may contain important information or instructions related to the transfer process.
These steps should help you troubleshoot the most common issues from FastComet to a different domain registrar during the domain transfer process. Remember, both registrars’ customer support teams are always available for assistance.
Conclusion
Transferring a domain from FastComet to another registrar can be daunting, but it can be done smoothly with the right steps. Here’s a recap on how to transfer a domain from FastComet:
- Obtain an authorization code from FastComet’s control panel. The new registrar requires this code to initiate the transfer process.
- Unlock the domain at your current registrar. This is usually done through the registrar’s control panel.
- Consider any transfer restrictions that may apply to your domain. For example, some domains may have a 60-day transfer lock after registration or a previous transfer.
- Temporarily disable domain privacy if it’s enabled. This ensures that the administrative email address associated with the domain is visible to the new registrar.
- Update the administrative email address associated with the domain. This is important as the new registrar will send transfer-related emails to this address.
- Initiate the transfer process through the new domain registrar’s control panel. This involves entering the authorization code and the new registrar’s information.
- Monitor the progress of the transfer and resolve any potential issues that may arise.
It’s important to note that the transfer process may take up to 7 days to complete.
That’s it! You know how to transfer your domain away from FastComet, whether with another company or us.