

For those who want to learn more about how to transfer a domain name, this guide provides comprehensive instructions on the process. Transferring domain names can be daunting, especially for beginners and small business owners who may not have prior experience with the process. This blog post’ll take you through the complete domain transfer process, providing valuable tips and advice to ensure a smooth transition.
From choosing the right domain registrar to understanding the limitations when dealing with different top-level domains (TLDs), our in-depth coverage ensures you’ll be well-equipped to handle any challenges during your domain transfer journey.
Table of Contents
- What Is a Domain Transfer?
- Reasons to Transfer a Domain Name Between Registrars
- Choosing the Right Domain Registrar
- How to Transfer a Domain (Transfer Process)
- How to Transfer a Domain (Tutorials for Top Domain Registrars)
- How to Transfer a Domain to ChemiCloud
- 6 Common Reasons for a Domain Transfer to Fail
- How to Transfer a Domain Name FAQs
- Conclusion
What Is a Domain Transfer?
When it comes to changing domain registrars, the process of transferring an already registered domain name is known as domain transfer. This is made possible by the Internet Corporation for Assigned Names and Numbers (ICANN) or the country’s respective domain authority (for instance, Nominet, the official registry for UK domain names) that grants authorization to companies or organizations to manage domain registrations.
Reasons to Transfer a Domain Name Between Registrars
There can be several reasons why you might consider transferring your domain name away from your current domain registrar:
- Better Pricing: Switching your domain to a different registrar could be beneficial in terms of pricing and promotional offers. This could lead to a decrease in the cost of registering or renewing the domain, thus helping you save money.
- Enhanced Features and Services: Switching to a new registrar could provide you with advantages that your current one does not. These might include advanced DNS management, domain privacy protection, domain forwarding, or superior customer support.
- Consolidated Domain Management: If you have multiple domains registered with different registrars, transferring them to a single registrar can simplify domain management. This allows you to manage all your domains from a centralized control panel, streamlining administrative tasks.
- Better User Experience: If you’re dissatisfied with the user interface, account management, or customer support provided by your current registrar, transferring your domain to another registrar with a better user experience can improve your overall satisfaction.
- Reliability and Stability: If you’ve experienced downtime or technical issues with your current registrar, transferring your domain to a registrar known for its reliability and stability can ensure a more robust domain management experience.
- Specific Domain Extensions: Different registrars may have different offerings when it comes to specific domain extensions (TLDs). If you’re interested in registering or managing a specific TLD that your current registrar doesn’t support, transferring to a registrar that specializes in that TLD can be beneficial.
- Business or Personal Preference: Your decision to transfer your domain may be a matter of personal or business preference. You may have heard positive reviews about another registrar or received recommendations from trusted sources that make you want to explore transferring your domain.
Choosing the Right Domain Registrar
When transferring a domain name, it’s essential to compare offerings from various registrars. Consider factors such as features, ease of use, customer support services provided along with pricing before making your decision. After assessing various factors such as features, ease of use, customer support services and pricing.
Things to consider when comparing different Domain Registrars
To make an informed choice when selecting a new registrar for your domain transfer process, take note of the following key aspects:
- Transfer Process: Understand the registrar’s domain transfer process. Check if they provide clear instructions and guidance on initiating the transfer.
- Pricing and Renewal Fees: Compare the pricing structure of the new registrar, including registration and renewal fees. Ensure that the pricing aligns with your budget and offers competitive rates. Additionally, some registrars offer discounts on domain transfer or provide a free domain transfer with their hosting plans.
- Domain Extensions: Check if the registrar supports the specific domain extension (TLD) you want to transfer. Ensure that they offer a wide range of TLDs
- Features and Services: Evaluate the features and services offered by the registrar. Consider essential features like DNS management, domain privacy protection. Look for additional services to enhance your domain management experience, such as web hosting, SSL certificates, email hosting, or domain forwarding.
- Customer Support: Assess the quality and availability of customer support the registrar provides. Look for multiple support channels, such as email or live chat, and ensure that their support team is responsive, knowledgeable, and able to assist you promptly.
- Reputation and Reviews: Research the registrar’s reputation and read reviews from other customers. Look for feedback on their reliability, customer satisfaction, and overall performance. Online forums and review websites can provide insights into the experiences of other users.

- Security and Privacy: Consider the registrar’s security measures and commitment to protecting your domain and personal information. Check if they offer domain privacy protection (WHOIS privacy) to keep your contact details private and ensure they have safeguards against unauthorized domain transfers.
- Interface and User Experience: Evaluate the registrar’s control panel and user interface. A user-friendly and intuitive interface can make domain management tasks easier and more efficient.
It’s important to weigh the overall value of each registrar’s offerings and not just focus on the lowest price. Think about any other bonuses they may provide, such as round-the-clock customer assistance, special rates for new customers, or combined services that can save you cash over time.
Choosing the right domain registrar is essential to ensure your website has all the features and benefits you need. Time to move ahead with the transfer.
How to Transfer a Domain (Transfer Process)
Different top-level domains have unique requirements and restrictions when it comes to transferring domain names. For example, country code top-level domains (ccTLDs) like .co.uk or .de might have specific rules regarding transfers between registrars or even changing ownership details during the transfer process. To avoid any issues, research your current domain’s TLD policies by visiting its registry website or consulting online resources such as TLD List.
To start the transfer process for your domain name to another registrar, you’ll need to obtain an authorization code (EPP) associated with your specific URL. This can typically be found within the control panel of your current service provider. The following steps will guide you through this process:
Step 1: Ensuring 60 Days Have Passed Since Initial Registration
ICANN’s Transfer Policy mandates that domains must be registered for at least 60 days before they can be transferred. This rule applies to new registrations and any recent transfers or updates to domain registrant information.
Step 2: Obtaining Domain Authorization Code
To transfer a domain, you must first obtain an authorization code (also known as EPP or auth code). This unique identifier is required by ICANN’s transfer policy and serves as a security measure to prevent unauthorized.
Step 3: Unlocking Your Domain
A successful domain transfer must be unlocked at its current registrar. Under the Manage Registered Domains section, you should find an option called “Transfer Lock“. Disable this feature for the domain you wish to transfer away.
Step 4: Disabling Whois Privacy Protection Feature
If you have enabled privacy protection features on your domain, such as WHOIS privacy or ID Protect, these must be temporarily disabled during the transfer process.
Step 5: Ensuring Registrant’s Email Address Is up-to-Date
Lastly, ensure that your registrant email address is up-to-date at your current registrar. This will help facilitate communication between both parties during the domain transfer process. In case of any issues or additional actions required by either registrar, an accurate email address will expedite the resolution.
Taking care of these prerequisites will ensure a smooth and hassle-free domain transfer process, allowing you to enjoy all the benefits your new registrar offers. It’s important to note that the transfer process may take several days to complete, depending on the domain registrar and nameserver records involved. Additionally, changing ownership of a domain name may also affect its pricing, so be sure to check with your new registrar for any potential changes in cost.
Step 6: Initiate the Transfer Request at the New Registrar
Once you have the EPP code and have completed the previous steps, you can initiate the transfer request at the new registrar. This can usually be done through their website or by contacting their customer support team.
Step 7: Monitor the Domain Transfer Process
After initiating the transfer request, you must monitor the process to ensure everything goes smoothly. Keep an eye out for emails from both registrars and complete any required actions promptly.
Transferring a domain can take up to 7 days to a couple of weeks, depending on various factors such as the response times of involved parties and specific TLD requirements. If you’re transferring a UK domain, there may be additional steps you need to take. Make sure you’re familiar with specific requirements for your domain extension.
That’s it! You know how to transfer your domain away, whether with another company or us. (But we are pretty awesome, lol 🌟🌟🌟🌟🌟).
How to Transfer a Domain (Tutorials for Top Domain Registrars)
- How to Transfer a Domain from GoDaddy (step-by-step instructions, including obtaining the authorization code, unlocking your domain, and disabling domain privacy)
- How to Transfer a Domain from Namecheap (step-by-step instructions, including obtaining the authorization code, unlocking your domain, and disabling domain privacy)
- How to Transfer a Domain from DreamHost (step-by-step instructions, including obtaining the authorization code, unlocking your domain, and disabling domain privacy)
- How to Transfer a Domain from HostGator (step-by-step instructions, including obtaining the authorization code, unlocking your domain, and disabling domain privacy)
- How to Transfer a Domain from Bluehost (step-by-step instructions, including obtaining the authorization code, unlocking your domain, and disabling domain privacy)
- How to Transfer a Domain from SiteGround (step-by-step instructions, including obtaining the authorization code, unlocking your domain, and disabling domain privacy)
- How to Transfer a Domain from Hostinger (step-by-step instructions, including obtaining the authorization code, unlocking your domain, and disabling domain privacy)
- How to Transfer a Domain from 123-reg (step-by-step instructions, including obtaining the authorization code, unlocking your domain, and disabling domain privacy)
- How to Transfer a Domain from FastComet (step-by-step instructions, including obtaining the authorization code, unlocking your domain, and disabling domain privacy)
- How to Transfer a Domain from IONOS (step-by-step instructions, including obtaining the authorization code, unlocking your domain, and disabling domain privacy)
How to Transfer a Domain to ChemiCloud
Transferring your domain registration from your existing registrar to ChemiCloud is straightforward. Follow these step-by-step instructions to ensure a smooth transition:
We’ll assume that you have already unlocked the domain at its current registrar and that you also have the authorization code (sometimes called an EPP key).
Step 1
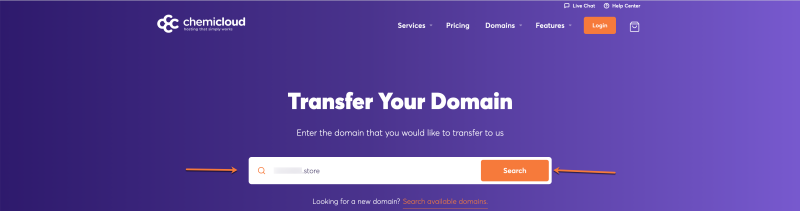
Head to our Domain Transfer page, enter the domain name you wish to transfer to ChemiCloud and click the Search button.
Step 2
Enter the domain Transfer Code (EPP) in the appropriate text field
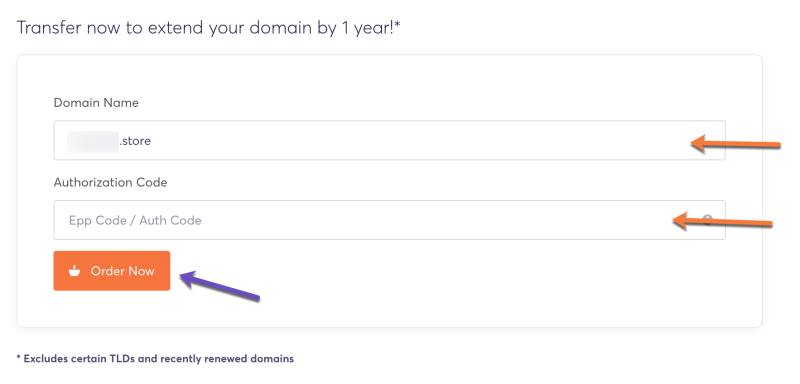
2) Click the “Order Now“ button.
3) You will be asked if you require hosting as well. Click the “Continue“ button to finalize only the domain transfer without hosting.
Click the ‘Checkout‘ button to send your domain transfer request.
A domain name transfer can take up to seven (7) days. Once the domain name transfer is complete, you will receive a confirmation by email.
That’s it! You know how to transfer your domain away from your domain registrar to ChemiCloud.
6 Common Reasons for a Domain Transfer to Fail
Occasionally when transferring domains, even though you thought you had everything sorted, you initiate that domain transfer, and it fails. We’ve created a list highlighting some reasons a domain transfer has failed.
1) Awaiting the Owner’s Response or Approval
When you attempt to transfer a domain away from a registrar, an email will be sent to the listed registrant/owner email address in the WHOIS for that domain. If you see the status “Awaiting Owner Response or Approval,” it means the domain owner hasn’t authorized the transfer but also hasn’t denied it. They need to take action on the email they received regarding the transfer.
2) Check Admin Email Address (May Be Incorrect)
As mentioned above, to transfer a domain, the current owner contact must approve the transfer. Suppose you see the status “Check Admin Email Address (May Be Incorrect)” when attempting a domain transfer. In that case, it means the email address for the Administrative Contact is probably invalid or an old email that is now undeliverable. You’ll want to update this in that domain’s WHOIS records.
3) Domain is Locked
Your domain transfer request will fail if the domain is currently locked. To proceed with the transfer, you must unlock the domain at its present registrar.
4) 60-Day Post-Renewal Waiting Period
A domain must be at least 60 days past its registration date or the date when it was last transferred. You’ll need to wait until 60 days have passed, then you can resubmit your request.
5) 60-Day Ownership Update Waiting Period
If the domain owner has changed their first or last name in their WHOIS, the domain may be locked for transfer for another 60 days. This is to prevent fraud.
6) Domain Set to Private
Your domain transfer request will fail if the domain privacy or WHOIS Privacy on your domain is enabled. To complete the transfer, you must disable the domain privacy feature at the current registrar.
How to Transfer a Domain Name FAQs
We’ve compiled a list of frequently asked domain name transfer questions:
Is it easy to transfer a domain name?
The ease of transferring domain names depends on factors such as familiarity with both registrars’ platforms and adherence to their guidelines. Generally speaking, most transfers are straightforward when following proper procedures; however, some TLDs may have specific requirements that can complicate matters. Reaching out for assistance from support teams is recommended in case of difficulties.
How long does a domain transfer take?
Typically, a domain transfer should take between five and seven days to complete. However, this timeframe can be extended due to certain factors, such as an outdated registrant email address or difficulty verifying your identity.
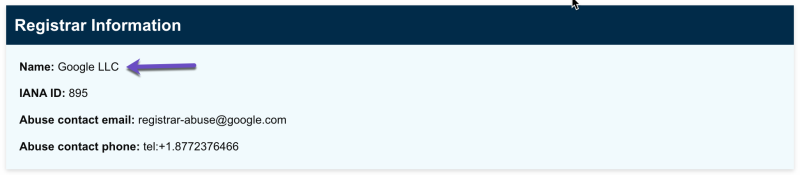
I don’t know who my domain registrar is. What should I do?
To find out who your domain name registrar is, use the ICANN lookup tool. You can locate this information in the “Registrar Information” section:
I’ve just registered a Domain. Why can’t I transfer it to another registrar?
For a period of 60 days, any transfer or change in registrant of the domain name will be restricted. This is due to the Change of Registrant lock that has been placed by the domain registrar. Furthermore, should you have recently completed a transfer, it won’t be possible to switch registrars for another 60 days.
What if my domain has expired? Can I still transfer it to another registrar?
In accordance with ICANN’s policies, a transfer request will not be denied due to the expiration or non-renewal of a domain name. It is only possible to move the domain to another host while it is in its expiry grace period after expiring.
Before the domain name is released back to the registry for someone else to register it, a transfer must be completed within its grace period. The exact length of this period varies depending on the type of domain name extension.
Does transferring my domain hurt my site’s SEO?
Generally speaking, the answer is no. Provided that your domain transfer goes off without a hitch, there should be no detrimental effects on your SEO rankings.
Can I transfer a domain that is in the redemption period?
Whether you can transfer a domain in the redemption period depends on the policies of the domain registrar and the registry governing the specific top-level domain (TLD) of your domain. Some domain registrars may allow transfers during the redemption period, while others may not. The redemption period is a stage that occurs after a domain has expired and before it becomes available for registration by others. During this period, the domain owner typically has a chance to renew the domain, but it usually involves additional fees. To determine if a domain transfer is possible during the redemption period, it’s best to contact your current registrar or the registrar you wish to transfer the domain to.
Can I cancel a domain transfer after it has started?
In most cases, it is not possible to cancel a domain transfer after it has started. This is because the transfer involves coordination between multiple parties, including the losing registrar, the gaining registrar, and the registry that manages the specific top-level domain (TLD).
Conclusion
Transferring a domain to another registrar can be daunting, but it can be done smoothly with the right steps. Here’s a recap on how to transfer a domain:
- Obtain an authorization code from the current registrar’s control panel. This code is required by the new registrar to initiate the transfer process.
- Unlock the domain at your current registrar. This is usually done through the registrar’s control panel.
- Consider any transfer restrictions that may apply to your domain. For example, some domains may have a 60-day transfer lock after registration or a previous transfer.
- Temporarily disable domain privacy if it’s enabled. This is to ensure that the administrative email address associated with the domain is visible to the new registrar.
- Update the administrative email address associated with the domain. This is important as the new registrar will send transfer-related emails to this address.
- Initiate the transfer process through the new domain registrar’s control panel. This involves entering the authorization code and the new registrar’s information.
- Monitor the progress of the transfer and resolve any potential issues that may arise.
It’s important to note that the transfer process may take up to 7 days to complete.
That’s it! You know how to transfer your domain away, whether with another company or us.
⏭️ Please join us in the following tutorial, where we will walk you through How to Buy a Domain Name: A Step-by-Step Guide