
It’s no secret everyone has an opinion, that’s why so many blogs run on WordPress! However, not everyone enjoys fighting the battle that can be the comments section of your website. What battle, you ask? The one waged by bots and spammers online – but you can protect yourself with a CAPTCHA!
CAPTCHAs were created in the early 2000s as a type of challenge-response test to determine if the person submitting a form, for example, is a Human or Computer. In the beginning, they were pretty annoying and looked like some text a Doctor scribbled on some paper. In recent years, however, they have become easier to implement and solve, at least for Humans. 😉
This guide will educate you on the history of CAPTCHAs, how they can be created, and how they can be used to protect your comments section from hackers, botnets, and spammers. Let’s begin!
What is CAPTCHA?
CAPTCHA is an acronym, albeit a contrived one, for “Completely Automated Public Turing test to tell Computers and Humans Apart“. Their origin is rooted in a desire Internet Users have had since the early days of the Internet – to make text non-readable to machines. Why? To circumvent moderation or censorship by computer automation. In the early days of the Internet, users would often use various methods to circumvent detection on BBS and early forums when they wanted to write something which the system would normally detect and disallow. This could have been specific words or phrases, for example. Using these techniques would allow unsavory users to flood these BBS and forums with inappropriate comments and spammy links.
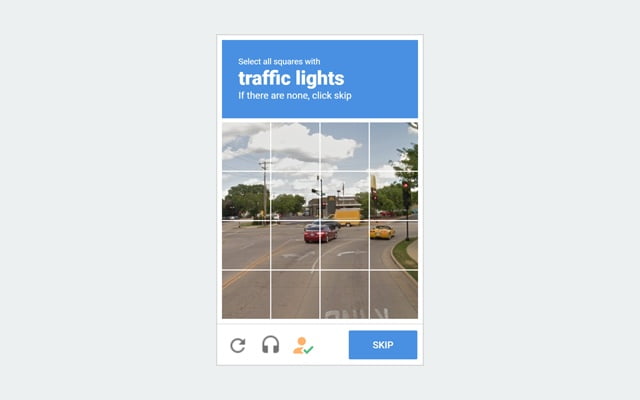
You’ve probably seen one before but may not have known what it was called. The example above is an image CAPTCHA, but they can take other forms, the most common of which until a year or two ago was the distorted text CAPTCHA.
For all CAPTCHAs, the intent is to present a task that most humans should be able to easily complete within a few seconds, or thereabouts. Whatever the task (or challenge) presented by the CAPTCHA, the goal is to ensure a machine or advanced bot isn’t able to make sense of it and stops.
This is notably important because bots are often used for nefarious purposes the goal of which is to often disrupt the availability of your website and compromise its integrity and security. A common style of attack with WordPress pages is a brute force attack on your /wp-admin area, where a bot repeatedly attempts to log in using generic or maybe even phished credentials.
Comment spam bots can seriously affect your SEO performance as they normally don’t leave links to pleasant places on the Internet. If I were visiting your site and saw you had a lot of spammy comments with links to sites that might contain malware, I would probably not visit your site again and may think you have abandoned it, rather than taking it offline.
Other types of attacks include Cross-Site Scripting attacks, or XSS attacks, which is where a bot would hijack the convenience of a contact form on your website and use the process of submitting their request for contact to inject malware-laden code into your website. This could cause your visitors to get a virus or malware warning when they visit your site, or it could be a simple keylogger that is capturing all the usernames and passwords entered into the log in area of your website. If you run a site where many users login, such as a forum or private members website, this would jeopardize the trust your users have on your website, and exposure of the compromised credentials could have unforeseen consequences on your customers or users.
The general rule of thumb is – anywhere a user can enter data, be it a username or password field, a comments box, or a contact form – you want to protect it with a CAPTCHA.
Where do I get a CAPTCHA?
You might be wondering by now, where do I get one for my website? Let’s talk about three mainstream CAPTCHA ‘services’ on the market today:
- Google reCAPTCHA
- visualCaptcha
- hCaptcha
Google reCAPTCHA
Google introduced reCAPTCHA in 2007 and has iterated on the project several times since it’s original creation by Carnegie Mellon University. Their CAPTCHA service has been reported to process over 100 million CAPTCHAs every day and is used on some of the most trafficked websites on the Internet such as Facebook, Twitter, and Craigslist.
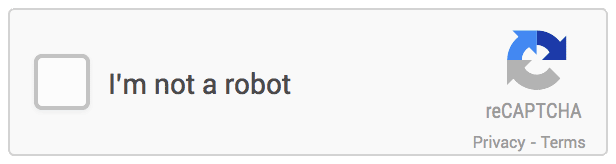
In 2014, Google released the No CAPTCHA reCAPTCHA, aka v2 of their product, which removed the distorted word images you probably disliked ever so much and replaced it with a simple checkbox:
According to Google, reCAPTCHA uses an advanced risk analysis engine and adaptive challenges to keep malicious software from engaging in abusive activities on your website. Meanwhile, legitimate users will be able to log in, make purchases, view pages, or create accounts and fake users will be blocked.
reCAPTCHA is available from Google as a free product for your website(s) and can process up to 1 million CAPTCHAs per day on your site before you would need to upgrade to a paid plan. reCAPTCHA is relatively easy to set up and doesn’t require a CAPTCHA-specific plugin or app be installed on your website.
visualCaptcha
visualCaptcha is an Open-Source Project that aims to provide CAPTCHA solutions for people who prefer a little more control over the CAPTCHA system implemented on their website. For most people, Google’s reCAPTCHA will be a perfectly acceptable solution, however, if you are concerned about privacy, aren’t a fan of Google, or just like running your own apps and solutions, visualCaptcha might be a perfect solution!
It is important to note that development for visualCaptcha has stopped, save for bug fixes or security updates. That doesn’t mean it’s not worth trying out though, visualCaptcha is being used on millions of websites and should continue to work for the foreseeable future.
visualCaptcha is available for free and since you are using your own web hosting server to process the CAPTCHAs, you can process an unlimited amount of them with the application. For WordPress users, the visualCaptcha application is available to install as a WordPress Plugin.
hCaptcha
hCaptcha is the new guy on the block as CAPTCHA services and applications are concerned. If you’re not a fan of Google, are privacy-minded, or aren’t the type of person who wants the trained results derived from testing CAPTCHAs on humans to benefit just one company (Google), hCaptcha is the service for you. Also, if you have a lot of visitors from China, as Google’s services are routinely blocked by the Great Firewall, hCapatcha might perform better for you.
Famously, Cloudflare recently switched to hCaptcha citing similar reasons.
How To Setup WordPress CAPTCHA
For most users, Google’s reCAPTCHA will be a perfectly suitable solution. In this section, we’ll cover creating your first reCAPTCHA in Google’s Admin Console and installing a WordPress plugin that makes it work.
Step 1: Create your reCAPTCHA.
To create your first reCAPTCHA, click here to open the Google reCAPTCHA site. Once it opens, in the top right of the page, click Admin Console.
Step 2: Register a new site.
After opening the Admin Console, you’ll see a screen that looks exactly like the one below:
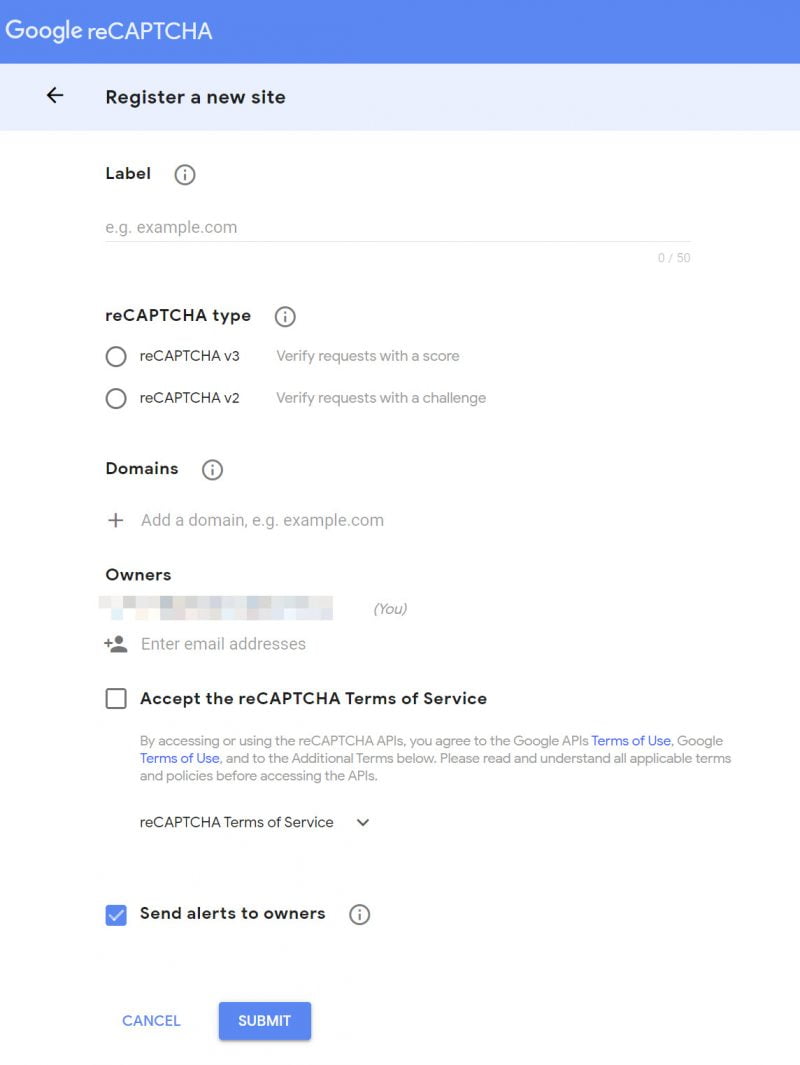
Let’s break down the options on this screen.
Since this is your first reCAPTCHA, you’ll need to give it a name to identify it, should you need to create a Label for it. You can call it whatever helps you identify the reCAPTCHA in case you ever need to make changes to it. Here are some examples you could use:
- My Blog’s Contact Form
- My Store’s Newsletter Sign-Up
- Our Homeowners Association Website Registration Form
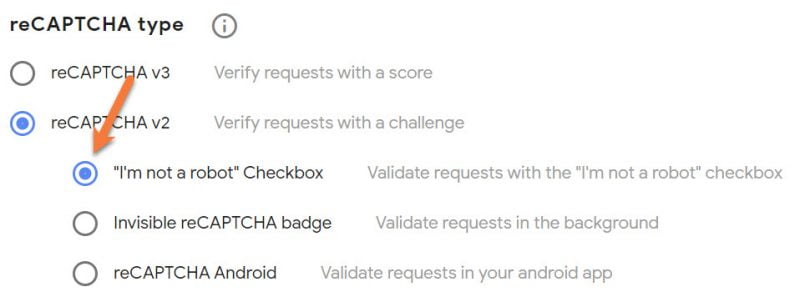
The reCAPTCHA type you select will present a different challenge type to the user on your website. reCAPTCHA v3 for example will measure visitors submitting a form or logging in with a score and may present a challenge to them if they don’t meet certain criteria. However, they won’t see the “I’m not a robot” checkbox. reCAPTCHA v2 on the other hand gives you some options, including the option to only display a ‘protected by reCAPTCHA’ badge on your forms, rather than a checkbox.
For this setup, let’s select reCAPTCHA v2 and the “I’m not a robot” checkbox, as shown below:
Next, you’ll want to enter the domain or domains where reCAPTCHA will be used. This can be very useful if you own the .com and .net variants of your domain (for example) and want the reCAPTCHA to work on both domains.
After this, you’ll have the option to add additional Owners to this reCAPTCHA. If you have other people who manage your website or help out from time to time, it might be helpful to add them here so they can receive notifications in case there’s reCAPTCHA trouble or they need to login and change some settings for the reCAPTCHA.
The last 2 options are very important. First, you will need to accept Google’s reCAPTCHA Terms of Service in order to use the reCAPTCHA you’ve created, and second, I highly recommend checking the box “Send alerts to owners”. In the event your website is under attack or something phishy is going on with your reCAPTCHA, Google’s service will send owners listed a notification as an advisory of the behavior.
Lastly, click the blue Submit button to create the reCAPTCHA. After it’s created, you’ll see a screen which looks like the one below:
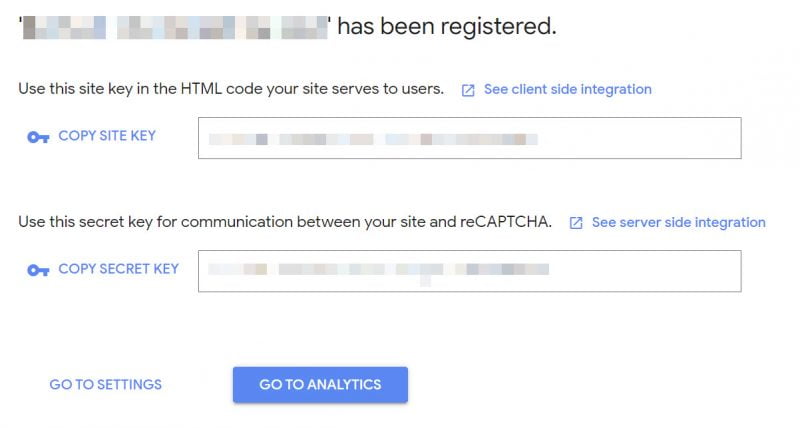
These Site and Secret Keys, are, well, the keys to our reCAPTCHA so don’t close this page!
Step 3: Installing the reCAPTCHA on your WordPress Site
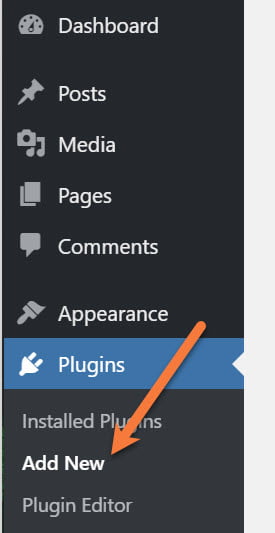
Next, log in to your WordPress’s wp-admin area and click Plugins from the left menu, then click Add New.
In the Plugins Search, enter recaptcha and press enter/return on your keyboard to search. You should see some results returned similar to the one below:
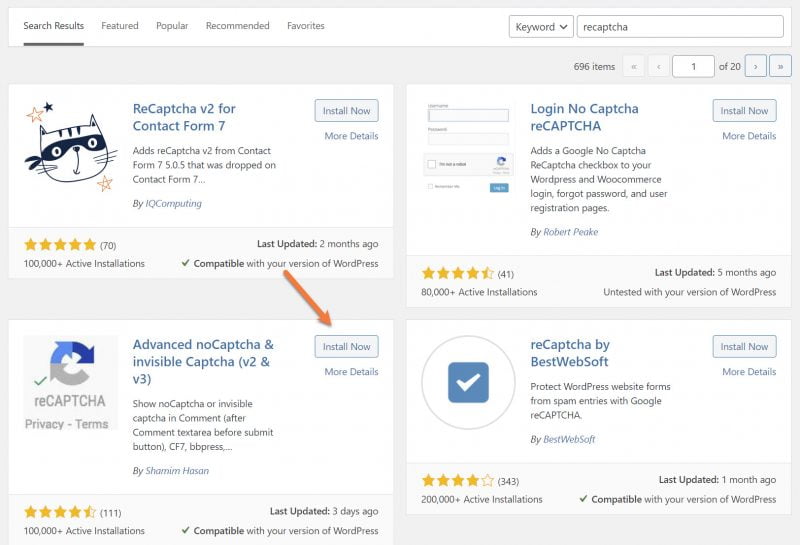
I’m really partial to the Advanced noCaptcha & Invisible Captcha (v2 & v3) Plugin from Shamin Hasan and that’s what we’ll be using for the rest of this guide, so go ahead and click Install Now to install the plugin. After it’s been installed, click the blue Activate button.
After clicking activate, you will be returned to your Plugins area where you will see a list of plugins installed. Beneath the title of the Advanced noCaptcha & Invisible Captcha plugin, click Settings.

The plugins settings page has a lot of options on it, but don’t worry, you won’t need to tinker with most of the options! Let’s review the settings we need to configure by using the screenshot below as an example:
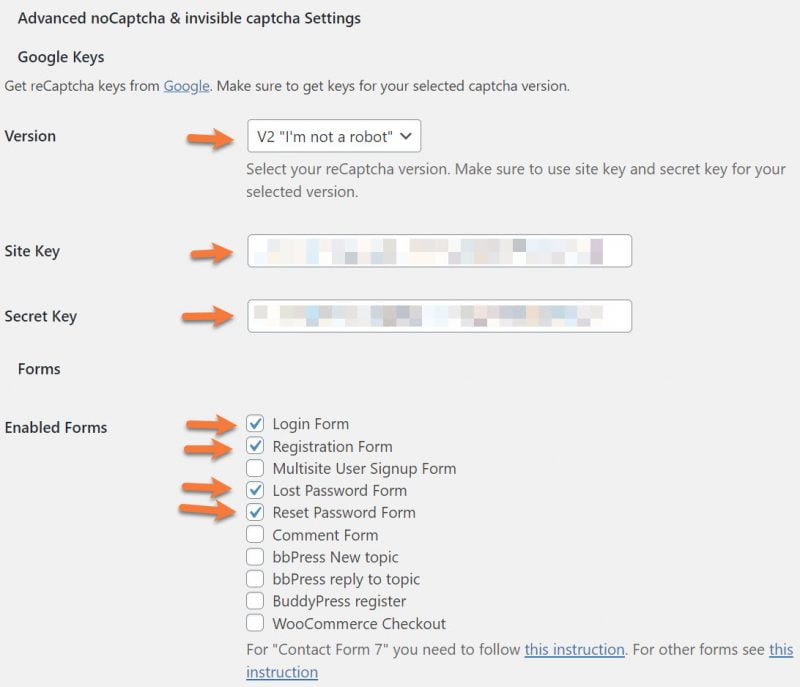
Under Version, I’m using the v2 “I’m not a robot” option. If you remember back to when we created the reCAPTCHA earlier in the Admin Console, we selected reCAPTCHA v2 – “I’m not a robot” as our challenge.
Next, under Site Key and Secret Key, go back to that very same Admin Console and copy your keys using the copy shortcut to the left of each key, one at a time:
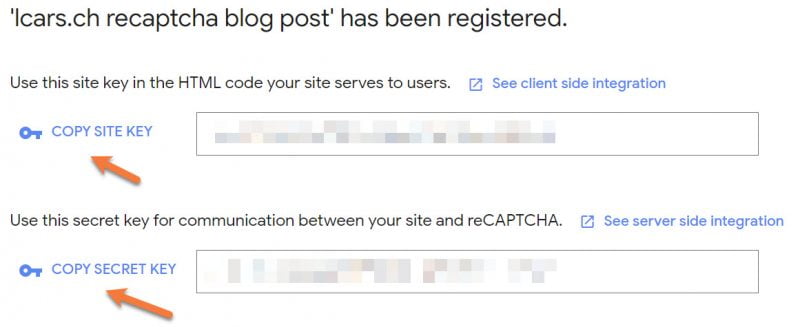
After you have copied your Site Key, go back to the Plugin Settings and paste it in the box adjacent to Site Key. Do the same for the Secret Key.
Next, under Forms, you have the option to choose which forms/areas of your site you want the reCAPTCHA to be used on. For this example, I’m electing to use this reCAPTCHA on my Login Form, Registration Form, Lost Password Form, and Reset Password Form.
And believe it or not, those are the only settings you need to adjust on this screen to get your reCAPTCHA up and running! Scroll to the bottom of the reCAPTCHA plugin page and click Save Changes.
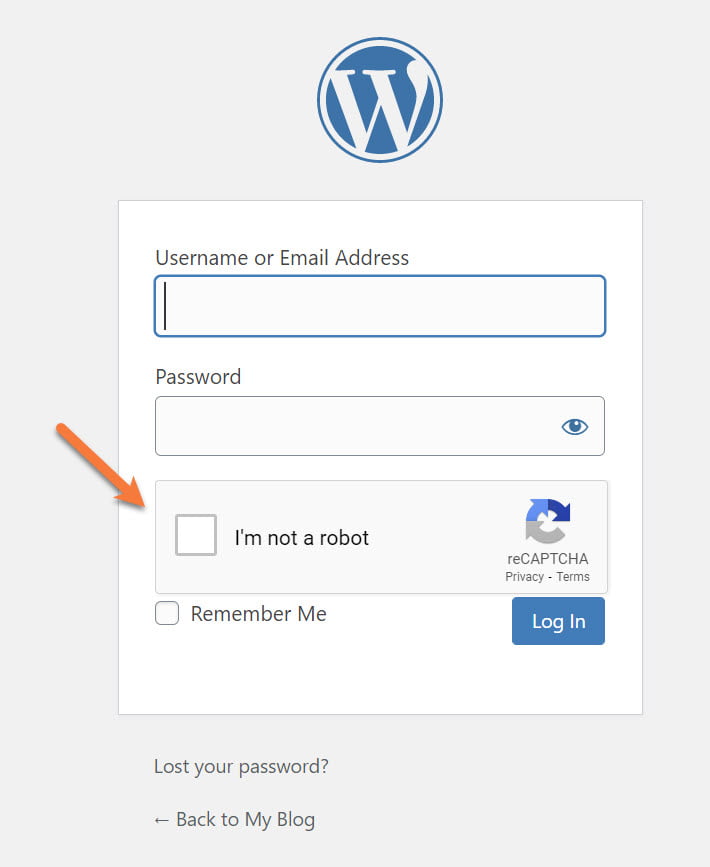
Now, the next time you go to log in to your wp-admin area, you will see the reCAPTCHA is present at the login screen:
Now, while this reCAPTCHA will protect the login forms for my WordPress site, the current configuration doesn’t protect my contact form. Protecting your contact form is super important because of Cross-Site Scripting Attacks and spam botnets. These types of attacks can completely compromise a WordPress site which will negatively affect your users. Adding our reCAPTCHA to a contact form is really easy!
Step 4: Enabling your new reCAPTCHA On Your Website’s Contact Form
For this example, we’re going to use one of the most popular Contact Form Plugins, Contact Form 7 from Developer Takayuki Miyoshi.
If you don’t already have this plugin installed, go ahead and log in to your wp-admin and click Plugins, then Add New Plugin. In the Plugin Search, type contact form 7 and press enter/return on your keyboard. You should see some results like the ones in the image below:
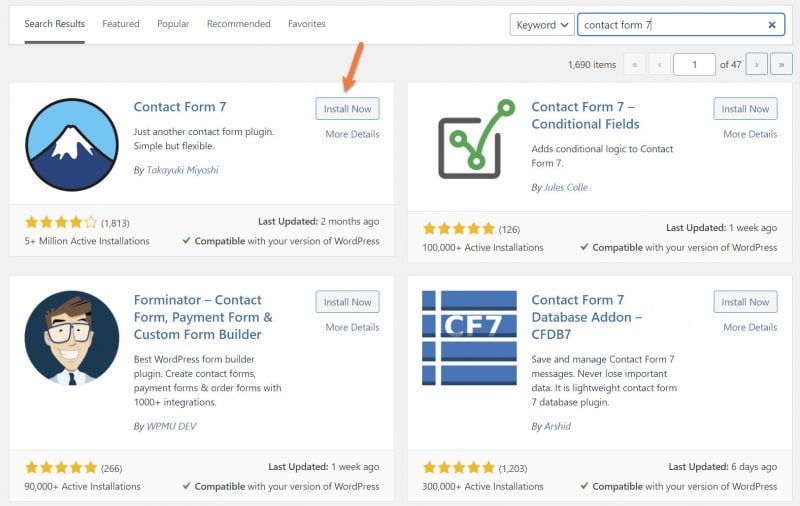
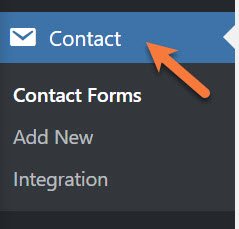
Look for Contact Form 7 and click Install Now to install the plugin. Once it’s installed, click Activate. After the plugin activates, you’ll be taken to your list of plugins. You’ll also see a new option called Contact in the menu on the left side of your WordPress Dashboard. Click Contact to open the Contact Form 7 Settings area, then click “Integration” below.
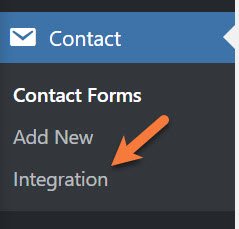
You’ll have two options for integration on this page, Constant Contact and reCAPTCHA. Click the Setup Integration button beneath reCAPTCHA.
On the page that opens, you’ll be prompted to paste the Site Key and Secret Key which were generated on the Google reCAPTCHA Admin Console earlier.

After entering your keys, click Save Changes.
Next, we need to make one more change in order for the reCAPTCHA to appear on the contact form. On the left side of your WordPress Dashboard, click Contact to re-open the settings for Contact Form 7.
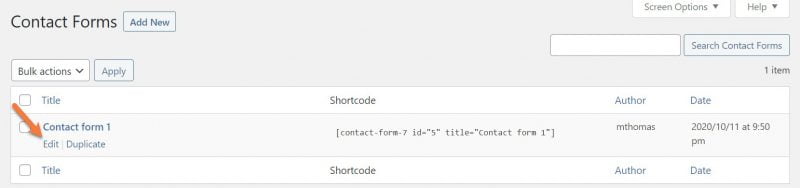
You will see a list of contact forms, including the one that already comes pre-configured with the plugin. If you hover over it’s title, you will see the option to click Edit appear. Proceed by clicking Edit to open the configuration for this form.
The fields on this pre-configured form work fine for me, but you can add any fields you need by clicking the various options at the top of the text box to insert those fields.
In order for the reCAPTCHA to appear on the contact form before people are able to submit their message, I need to add this line of text just below <label>:
[anr_nocaptcha g-recaptcha-response]
After adding this text to your form configuration, it should look similar to the configuration below:
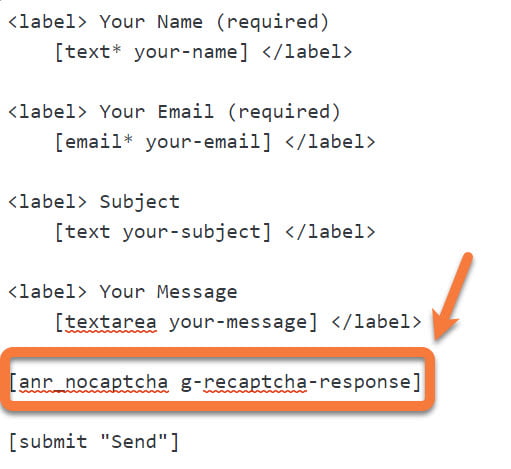
You can see where I have highlighted the line of text I added for the reCAPTCHA. Once you’ve added this text, click the blue Save button to save your changes.
We’re almost done!
In order to use our Contact Form on our WordPress site, we need to insert it on a page or post. With Contact Form 7, your forms are inserted into Pages or Posts as a shortcode. Shortcodes, if you aren’t familiar with them, are little bits of text that add some nifty features to a page or post with minimal effort.
You can find the Shortcode for your contact form by clicking Contact, on the left side of your WordPress Admin Dashboard and looking in the Shortcode Column. It will look similar to this:

Highlight that text using your mouse, then right click on the selection and click Copy to copy this shortcode to your clipboard.
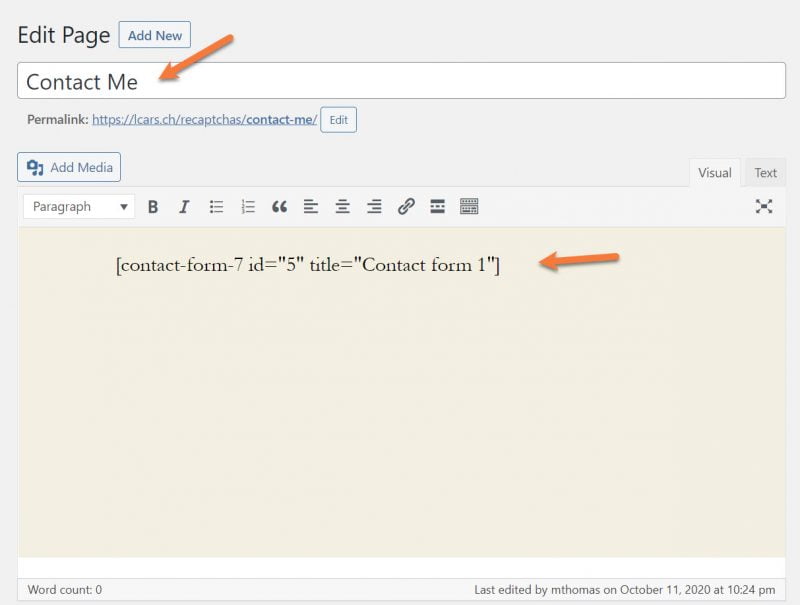
Next, I want a separate contact page for my visitors to use, so I’m going to click Pages on the left of my WordPress Admin Dashboard, then Add New, to add a new page.
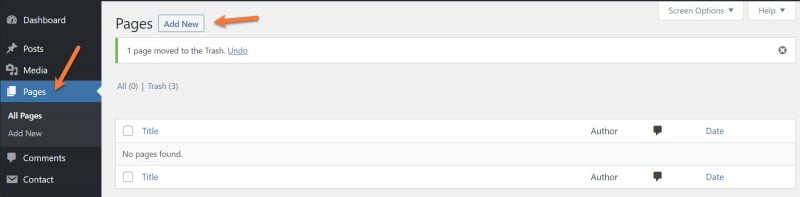
I’m giving my new page the title of Contact Me and in the body of the page, I’m going to paste the shortcode from the form, just like below:
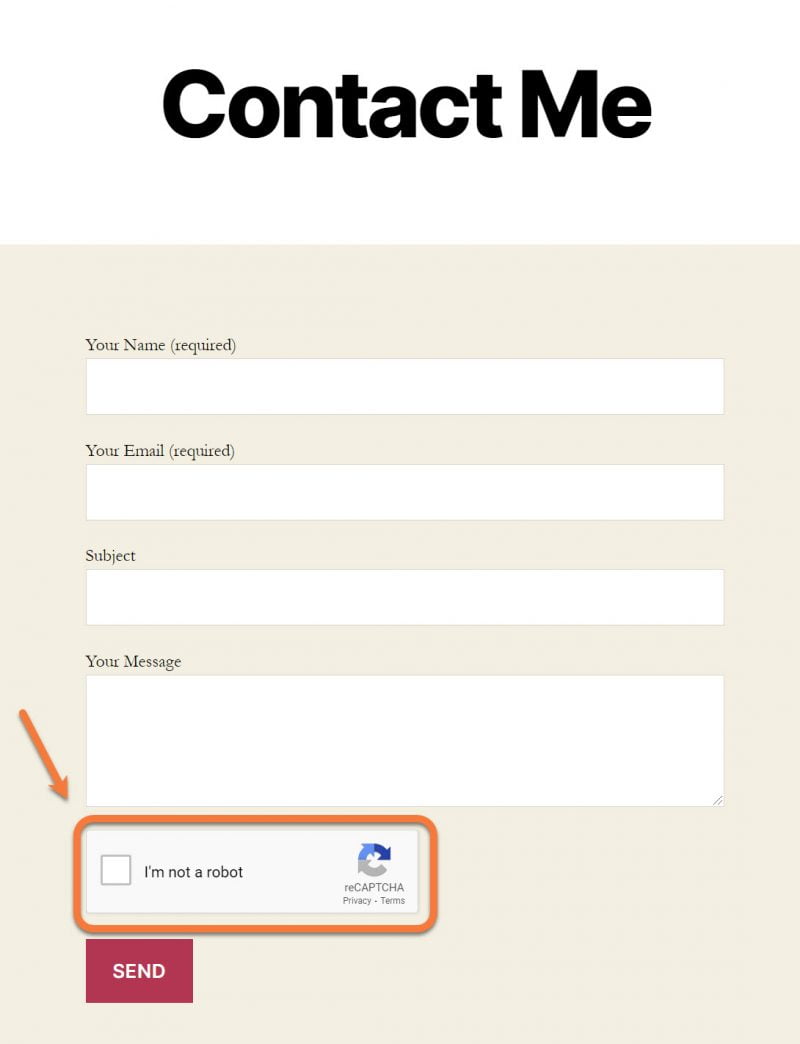
After you’ve added your shortcode and any other information you want to add to your contact form, click Publish to make the page public. You can test if the reCAPTCHA appears by logging out of your WordPress Admin and going to the URL of your contact page. If you see the I’m not a robot reCAPTCHA, it works! Congratulations!
Conclusion
In summary, by following the steps in this blog post, you will know what CAPTCHA and reCAPTCHA are. Additionally, you will know how to create a reCAPTCHA and install 2 WordPress plugins that make it work – Advanced noCaptcha & invisible Captcha and Contact Form 7.
By using reCAPTCHAs or similar CAPTCHA services, you can eliminate the vast majority of comment spam and contact form spam from your website, but also prevent your website from being exploited in scripting attacks that could give you or your visitors malware or steal your user’s login information.
We hope this post on reCAPTCHAs was very helpful! If you enjoyed it, you’ll probably enjoy our Managed WordPress hosting even more – check out our plans!