At a quick look, you may find all the options overwhelming, so in this tutorial, we’ll cover the basic LiteSpeed Cache Settings configuration. At the end of this tutorial, you will find a reference to a more comprehensive and advanced tutorial that will help you get the most of the WordPress Cache plugin.
By default, all the LiteSpeed Cache settings are configured to work out of the box with the majority of WordPress-based websites and to offer optimal performance. However, the plugin provides a wide range of settings that are customizable and it will help your site to deliver the best speed performance.
So now that you’ve installed the LiteSpeed Cache plugin, let’s dive in and check on a few settings for your site.
1) We’ll assume that you are still logged into your WordPress admin panel (wp-admin).
2) In the left sidebar, hover on LiteSpeed Cache, and then click Cache.
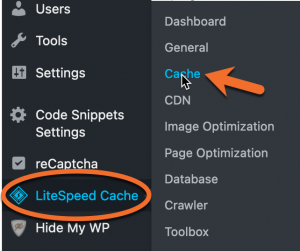
The LiteSpeed Cache Settings page will appear. We’ll explore some of the most important options in each tab.
Cache Tab
Enable Cache – ON. When enabled, the cache plugin will cache your website’s pages. Disabling will stop any caching from occurring and purge the cache of all WordPress cache entries.
Cache Logged-in Users – OFF. This setting allows content to be cached for logged-in users. Pages will be stored in a private cache by IP/session ID.
Cache Commenters – OFF
Cache REST API – ON. This feature won’t apply to most of you. Leave it ON, but turn it OFF if any functions break.
Cache Login Page – ON
Cache favicon.ico – ON
Cache PHP Resources – ON. This feature helps with poorly-coded themes/plugins.
Cache Mobile – OFF for most websites! Don’t turn it ON unless you have AMP or mobile-specific design/content. Sites with responsive design don’t need this enabled.
List of Mobile User Agents – leave it as it is. It’s only used if “Cache Mobile” is ON.
Private Cached URIs – this feature is for pages that need to be cached separately for each visitor.
Force Cache URIs – pages listed here will be cached regardless of no-cacheable settings.
Drop Query String – incredibly useful to avoid unnecessary page-caching for some query strings. Other query strings don’t cause content changes (e.g. FB/Google trackers, affiliate cookies) and are only used for tracking, so these should be listed:
fbclid
gclid
utm*
_ga
Exciting News: Introducing Our fastest WordPress Hosting stack 🚀 Ready for speed? Try it for just $1!
TTL Tab
Safer to leave these as they are set by default.
Default Public Cache TTL – don’t modify.
Default Private Cache TTL – don’t modify.
Default Front Page TTL – don’t modify.
Default Feed TTL – don’t modify.
Default REST TTL – don’t modify.
Default HTTP STATUS 404 Page TTL – don’t modify.
Default HTTP STATUS 403 Page TTL – don’t modify.
Default HTTP STATUS 500 Page TTL – don’t modify.
Purge Tab
Purge All on Upgrade ON – This option selects whether to purge all pages when any plugin, theme, or WordPress core is updated.
Excludes Tab
This option comes in handy if you have any pages that you don’t want to be cached at all. This section will allow you to exclude specific parts of your site from being cached.
Object Tab
Object Cache OFF – Object caching refers to the storage of database results and it helps the system to not process the same queries over and over again. This caching system is particularly useful for websites with heavy databases.
Object Cache is disabled by default. Learn How To Enable Redis On Your Website
Browser Tab
Static content such as images, video, or fonts is not included in any full-page cache. And yet, this content may be requested from the server repeatedly. Take, for instance, your site’s logo. That image is likely to be displayed on every page that the user visits, which means the server has to repeatedly transfer that same image to that same user. This is where browser caching comes in handy.
At ChemiCloud, browser caching is enabled at the server level, so you don’t have to enable it through the LiteSpeed Cache for WordPress plugin’s settings.
Advanced Tab
Instant Click Off – It takes time for a user to click a link on your website. First, they hover over it, then they depress the mouse button, and then, only after the button is released, is the link considered “clicked” and the new page loaded. With Instant Click enabled, the page begins to load as soon as the user hovers over the link. By the time the mouse button is released, enough of the page has been loaded that the display can seem almost instant.
If you make any changes to the settings, click to save the new configuration.
That’s a wrap! Now you know how to easily configure the LiteSpeed Cache Settings in WordPress.
▶️ Please join us in the next tutorial, where we will walk you through how to configure the LiteSpeed Cache Image Optimization Settings in WordPress
i need a blog post about using cloudflare (free plan) with Litespeed WP Plugin
All settings for both when used together.