
Have you ever loaded a website with a lot of images and even with your fast fiber connection, the page still took a few extra seconds, maybe minutes even, to load completely? Well, the owners of that site probably didn’t consider to optimize images when they built their site or uploaded that content specifically. Ten years ago, optimizing images for the web wasn’t anything like what it is now, and twenty years ago, it was a huge mess that almost required Photoshop or Illustrator, depending on your image types, to manage.
One key issue people face when optimizing images is the loss of image quality. Especially if your site is heavy on media. I was chatting about photo optimization for the web with a friend of mine who is the photographer for the Zoo and he scoffed, “Optimizing is just technobabble for taking precious quality away from my images? Not on my watch.” That was until I showed him some of the methods we’re going to discuss below, which you can use to keep your high-quality images from looking like they were shot on a potato but also use on your site and maybe reduce the load time of your content!
What is Image Optimization?
First, before we demonstrate how you can optimize images that you use on your website, we need to talk about what image optimization is, and more importantly – isn’t.
Modern smartphones now have the equivalent of 100+ megapixel photos and when sharing those images, they can be pretty hefty. My phone has a 108-megapixel sensor and when using it, images come out at around 22-25MB. Imagine if your blog was using 5-10 of these in a single post. That’s a lot of bandwidth being consumed every time those images are being served, I hope you have a CDN. But at the same time, those large file sizes are probably resulting in a page load time that is more than what you’d call ideal.
A properly optimized image has fewer kilobytes than the original without any visible loss in quality. There’s no real best practice for this. Why? Because it depends on you. Everyone is different, some people are going to spend more time on grades and scores in compression and perhaps even over-optimize, than someone who’s going to install a plugin and let it do it’s the thing.
Image optimization is the process of delivering high-quality images in the right format, dimension, size, and resolution while keeping the smallest file size possible. Whether this is done by resizing the image, caching, or compressing the file is irrelevant. It’s all part of image optimization in the grand scheme of things.
I’m more of a set it and forget it kinda guy, which is why we’ll spend more time in this post discussing plugins and services that do the heavy work for us, rather than getting down to the nitty-gritty in Photoshop. After all, WordPress is meant to be easy-ish, right?
Why is image optimization important?
A picture is worth a thousand words, right? Then I ask you, what’s the worth of that image if it’s not getting you (or helping you get you) to the top of Google?
Exactly!
The importance of images in connecting to your customers has been proven time and again.n If your website takes more than 3 seconds to load, the users visiting are more likely to abandon the page, which dramatically increases your bounce rate and eventually conversions.
Image optimization helps in improving page load times, which in turn helps websites their SEO rankings, and improves the user experience overall.
What are the benefits of optimizing my images?
So you have a lot of images, none of which have been optimized, and in your opinion, your SEO and traffic are just fine. What about the future? Are you just going to rely on the same thing for eternity and organically grow traffic that way, or are you hoping something goes viral and takes your site to the next level? You should always be planning your site for growth, and if it takes optimizing your images to do it, then so be it.
According to HTTP Archive, a site that measures various internet statistics, the average weight of a website these days is 2038.4 KB on a desktop and 1879.1 KB on a phone. Of that weight, 948.1 KB on desktop and 902.9 KB on mobile are images.
That means roughly 1/3 of the content on a website being loaded in the browser is images. This is the first place you should start when you think about optimizing your existing website without having to make huge changes.
(Okay, some may argue that video would be the first place you should start if you wanted to optimize your website, but this post focuses on image optimization. Maybe in the future, we’ll cover ways to optimize your website if you have a lot of video content.)
What about other benefits?
Not only will your page loading speed improve by optimizing your images, combined with a great SEO plugin, but it also improves your SEO. This means your page will rank higher in Google.
Also, doing general maintenance tasks like creating backups will not take as long.
If you use a CDN, you’ll notice less and less data being transferred over the CDN because your images are now properly sized for the devices requesting them. If the internet were a real creature and could say thank you for “lightening the load”, it would.
You’ll need less server-side storage space. This is super helpful because I know there are website owners who constantly battle themselves over web storage. It’s either email consuming a lot of space, due to attachments, or media on your blog. Trust me, I know the feeling!
How To Optimize Images for Web and Performance
When you start a project to optimize the images on your blog, you really need to consider your overall goal is to find a balance between the lowest file size and acceptable quality for your images. You could sit there for hours and look at thumbnails of your images at ‘x’ setting, and ‘y’ setting, and ‘z’ setting all night, but please don’t.
Okay, I lied earlier when I said there aren’t any best practices for this. There are, we’ll talk about them at the end of this blog, but the very first one is don’t obsess over your images. You’ll end up spending hours on the task and it will be for naught.
But before you go installing any ole’ WordPress app that comes up when you search the plugins repository for image optimization, you need to choose the right file format.
There are several file types you can choose from, including:
- PNG – This produces higher quality images, but also often results in larger file sizes. The PNG format was originally created as a lossless image format, although it can be lossy.
- JPG/JPEG – this uses lossy and lossless optimization. You can adjust the quality level in most photo editors to achieve a good balance of quality and file size.
- GIF – this format is limited to 256 colors. It’s the perfect choice for animated images.
Generally speaking, you should use JPEG/JPG for images with lots of colors, like photographs, and PNG for images, like those you’d custom design or use a graphic designer to make.
Compression – Quality vs. Size
Below is a beautiful image of the Atlantic Ocean I captured on my Smartphone. The image weighs in at 3.784 MB:
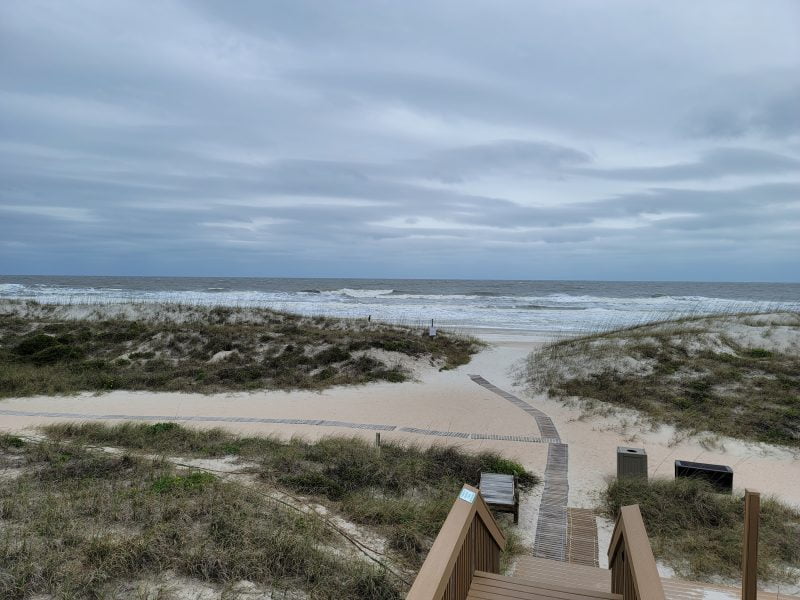
I’ve inserted a medium-sized version (800×600) of the image using WordPress’s integrated thumbnail tool, but you can right-click the image and open it in a new tab to see how large the image truly is.
Here’s what that image looks like when I max out the quality by opening the image in Photoshop, exporting it as a JPEG with max quality:

Looks to be about the same to my eyes. But open that image in a new tab, download it to your computer, and look at the file size. It’s bigger than the original! The reason for that, that’s a story for another blog.
Let’s look at the same image, but with max compression in Photoshop:

Right-click this image, and open it in a new tab. Really look at it compared to the one above. You can see a lot of artifacts in the clouds, the ocean is nowhere near as detailed, and if you zoom in on the picture, it becomes pixelated almost instantly. The new file size? A respectable 561 KB! I’d say the image is still usable as a thumbnail or medium-sized image at this compression, to be honest. Go Photoshop!
Lossy vs. Lossless Optimization
If you know about audio, then you know about fidelity, compression, and you’ve probably heard of lossy vs lossless. But, if these are terms you’ve never heard in this context, don’t worry! They’re really easy to understand:
- Lossy – When using lossy compression, it’s basically acting as a filter that will only eliminate some of the data. You’ll see minor degradation in the quality the further you go, so you have to be very careful when reducing the image using Lossy Compression. This method is great for achieving great gains in file size reduction if that’s your goal. Most mainstream photo editors, like Photoshop, Affinity Photo, and GIMP use lossy compression in their editor.
- Lossless – When using lossless compression, it’s basically acting as a filter that only compresses the data that’s there. This type of compression doesn’t reduce the quality of the image, but it will require the images to be uncompressed before they can be rendered out. You can perform lossless compression using mainstream apps like Photoshop, Affinity Photo, and GIMP, or you can use dedicated apps for this, like pingo (donation-ware) on Windows, ImageOptim on Mac, or Optimizilla, if you prefer a web-based tool.
What about Scaling Images?
Back in the day, it was important you upload images to scale and not let CSS resize them. This is no longer a thing now because WordPress supports responsive images not (scaled down by CSS). As of now, WordPress simply creates several thumbnail versions of each image uploaded to the media library. By including these available sizes in a srscset attribute, browsers are automatically given the most appropriate size and the others are ignored.
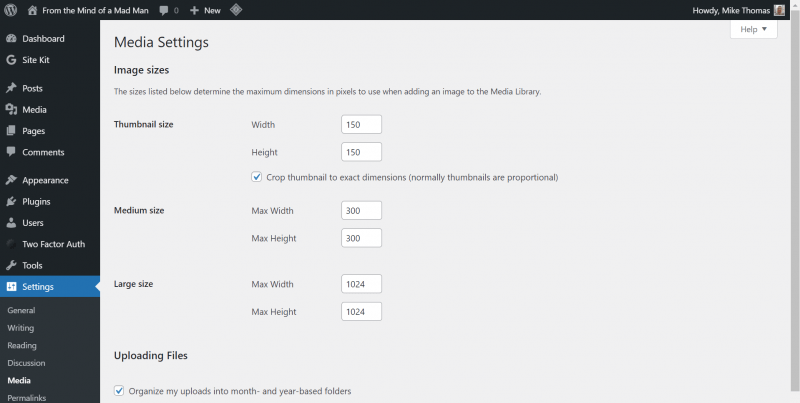
Image Optimization WordPress Plugins
WordPress makes things super easy for us and with a great plugin or two, you can get everything done automatically, rather than the old way, by bringing your images into an app like Photoshop, doing the compression, and exporting the image, i.e. in batches. There are several great plugins that will automatically optimize your image files as you upload them, plus they can even optimize the images you’ve already uploaded. This is a super great feature, one I pointed out to my Zoo photographer friend.
Here are our picks for image optimization plugins in WordPress:
- Optimole
- EWWW Image Optimizer
- Imagify image Optimizer
- ShortPixel Image Optimizer
- Compress JPEG & PNG Images
- reSmush.it
- Image Optimizer by WebDorado
- Optimus
Best Practices
When thinking about whether to optimize your images moving forward or going back in time and retroactively optimizing, as well (pro-tip: you should do both, thank me later), here are some best practices you can think about:
- Don’t obsess over your images. You’ll spend hours doing it and then you may not remember how you did it, and your images could look weird because the compression method on them will vary each time.
- Use a service, app, or plugin that can do compression for you in batches or one-offs.
- Use vector images in PNG format where possible on your site for things like logos and simple images.
- Use a CDN to serve up your images fast. Optimized images or not, you should be using a CDN.
- Use web fonts instead of placing text within images.
- Use GIF if you need animations, but please compress your GIFs!
- If your posts or page is overall very media-heavy, consider using lazy load images.
- Save images as ‘optimized for web’ if you’re working in apps like Photoshop.
- Experiment and find a repeatable method if you’re compressing images manually.
- Use raster images only for scenes with lots of images and shapes.
Summary
Once you’ve got a practice down pat, either by doing your images manually every time or leaving it to a plugin or service, your site will be better respected by the major search engines, your SEO rankings will climb, and most important of all, your media will load faster for your readers!
If you enjoyed this article, you’ll love our web hosting platform even more! Try us out free for 45 days, worry-free, and if you’re not happy, you get your money back!