A DMARC (Domain-based Message Authentication, Reporting, and Conformance) record is a DNS (Domain Name System) record that helps protect email senders and recipients from email spoofing and phishing attacks.
DMARC is an email authentication protocol that allows domain owners to specify how email messages from their domain should be handled when received by email receivers.
Table of Contents
Here’s what a DMARC record does and why it’s important:
Functions of a DMARC Record
- Authentication: DMARC builds upon two other email authentication methods, SPF (Sender Policy Framework) and DKIM (DomainKeys Identified Mail), by providing a policy framework for email authentication. It allows domain owners to instruct email receivers on how to handle emails that fail authentication checks.
- Reporting: DMARC enables domain owners to receive reports from email receivers about email traffic claiming to be from their domain. These reports include information about email delivery, authentication results, and potential abuse.
- Policy Enforcement: DMARC policies define how email receivers should handle messages that do not pass SPF and/or DKIM authentication checks. DMARC policies can instruct receivers to accept, quarantine, or reject such emails.
Components of a DMARC Record
A DMARC record includes several components:
- _dmarc subdomain: The DMARC record is published as a DNS TXT record under a subdomain called “_dmarc.” For example, if your domain is “example.com,” the DMARC record would be published at “_dmarc.example.com.”
- Policy: The DMARC policy component specifies how email receivers should handle messages that do not align with SPF and/or DKIM authentication results. Common policy options include “none” (no action), “quarantine” (place in spam or quarantine folder), and “reject” (do not deliver).
- Percentage (“p”) Tag: The percentage tag specifies the percentage of messages that should be subjected to the DMARC policy. For example, “p=quarantine” means that a percentage of messages that fail DMARC checks should be placed in quarantine.
- Reporting Addresses: DMARC also allows you to specify email addresses to which aggregate and forensic reports should be sent. These reports provide information about email delivery and authentication results, helping domain owners monitor and improve email security.
Here’s a simplified example of what a DMARC record might look like:
_dmarc.example.com. IN TXT "v=DMARC1; p=quarantine; rua=mailto:[email protected]; ruf=mailto:[email protected];"
In this example, the DMARC policy is set to “quarantine,” meaning that failing messages should be placed in quarantine. Aggregate reports will be sent to “[email protected],” and forensic reports will be sent to “[email protected].”
Importance of DMARC Records
DMARC is crucial for email security because it helps prevent domain spoofing, phishing, and email fraud. It allows legitimate senders to protect their domains’ reputation and provides a mechanism for receivers to verify the authenticity of incoming email. By using DMARC, domain owners can enhance the trustworthiness of their email communications and reduce the risk of malicious emails impersonating their domains.
How to Add a DMARC Record in cPanel?
To enable DMARC in cPanel, follow these steps:
- Log in to your cPanel account
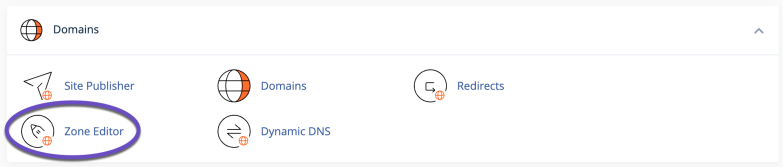
- Click on the “Zone Editor” icon under the “Domains” section
- Click on the “Manage” button next to the email domain for which you want to enable DMARC
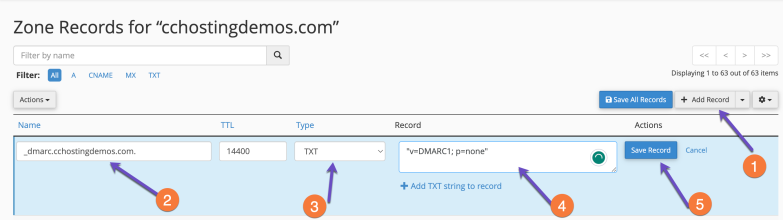
- Click on the +Add Record button and choose Add “TXT” Record from the list
- For the Name field, enter: _dmarc
- The type should be set to: TXT
- The record should be set to “v=DMARC1; p=none”
- Click on the Save Record button
- Wait for the DNS changes to propagate, which may take up to 24 hours
Once DMARC is enabled, email recipients can use the DMARC information to determine the authenticity of emails sent from your domain and take appropriate action based on your DMARC policy.
An advanced DMARC record looks like the following:
_dmarc.example.com IN TXT 14400 "v=DMARC1;p=none;sp=quarantine;pct=100;rua=mailto:[email protected]"
Make sure to change example and [email protected] to the proper ones according to your case.
In conclusion, enabling SPF, DKIM, or DMARC on cPanel is a simple process that can help improve your email’s security and deliverability.
How to Add a DMARC Record in Cloudflare?
Here are the steps to add a DMARC record in Cloudflare:
- Log In to Your Cloudflare Account:
- Open your web browser and go to the Cloudflare website (https://www.cloudflare.com/). Log in to your Cloudflare account using your credentials.
- Select the Domain:
- After logging in, you’ll see a list of domains associated with your Cloudflare account. Click on the domain for which you want to add a DMARC record to access its dashboard.
- Go to the DNS Settings:
- In the domain’s dashboard, navigate to the “DNS” tab or section. This is where you can manage your domain’s DNS records.
- Add a DMARC Record:
- To add a DMARC record, scroll down to the DNS records section. Click on the “Add Record” button or a similar option, depending on Cloudflare’s interface.
- Choose Record Type:
- Select “TXT” as the record type. DMARC records are typically TXT records.
- Configure the DMARC Record:
- You will need to create a DMARC TXT record with the following components:
- Name/Host: Enter “_dmarc” as the name or host for the DMARC record.
- TTL (Time to Live): Set a TTL value for the record. The default value should work fine for most cases.
- TXT Data: Add your DMARC policy by specifying the DMARC policy tag and value. For example, to set a DMARC policy of “quarantine,” you can use the following TXT data:
"v=DMARC1; p=quarantine; rua=mailto:[email protected];"
Replace “[email protected]” with the email address where you want to receive DMARC reports. You can customize the policy according to your preferences.
- You will need to create a DMARC TXT record with the following components:
- Save the DMARC Record:
- After entering the required information, click on the “Save” or “Add” button to create the DMARC TXT record.
- Verify and Publish:
- Review the DMARC record you added to ensure it’s accurate. Once verified, you may need to wait for DNS propagation, which can take some time. You can use online DMARC validation tools to check if your DMARC record is correctly configured.
- Test DMARC Policy:
- Send test emails from your domain and monitor the DMARC reports to ensure that the policy is being enforced correctly.
That’s it! You’ve successfully added a DMARC record in Cloudflare to enhance the security and authentication of your domain’s outgoing email messages. DMARC helps prevent email spoofing and phishing by specifying how email receivers should handle messages from your domain.