WHMCS is your ultimate companion for reselling web hosting. This guide will help you create a product group and a product in WHMCS, which is the fifth step you should take after installing WHMCS.
Let’s begin!
How to Create a Product in WHMCS
You can follow the steps in this article or watch out our video tutorial.
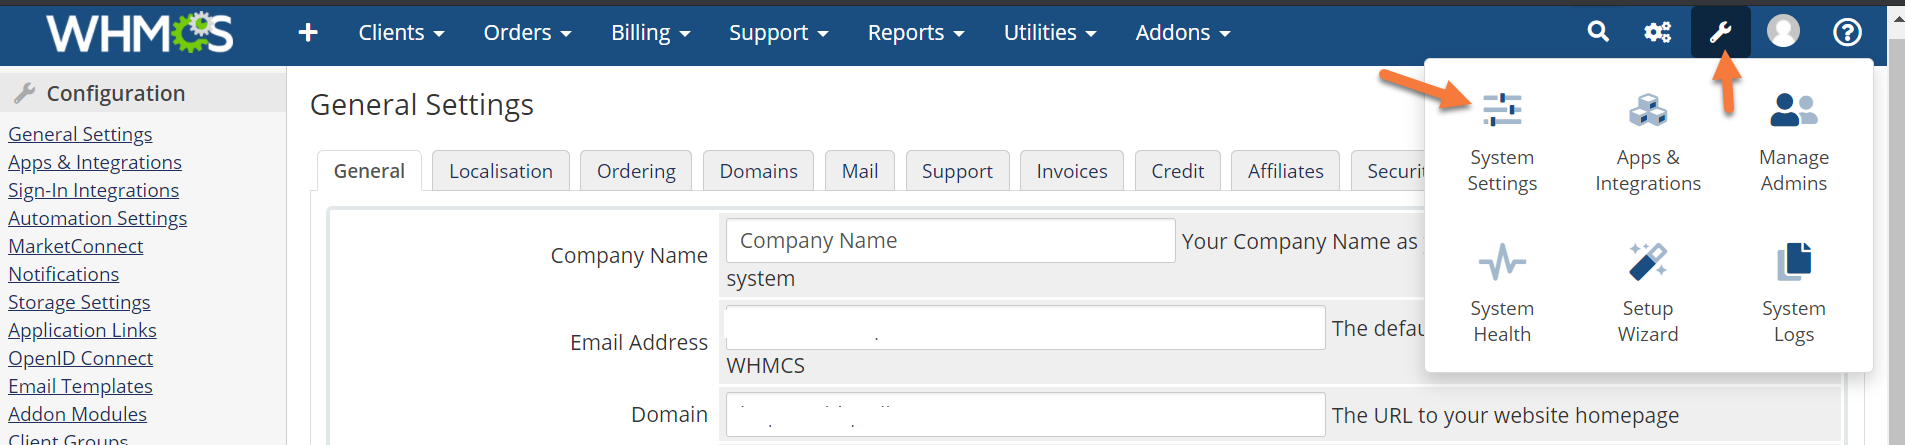
Step 1: First, log in to your WHMCS Admin. Once logged in, click the wrench in the top right corner, then click System Settings.
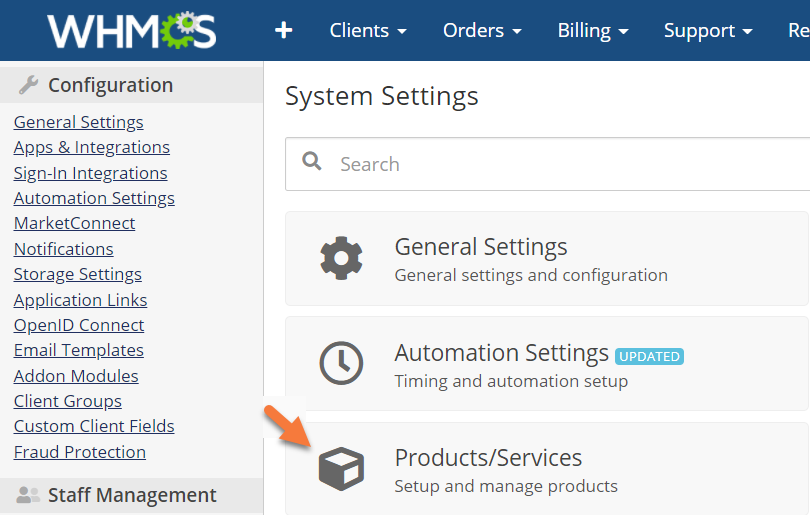
Step 2: When the list of System Settings loads, click Products/Services.
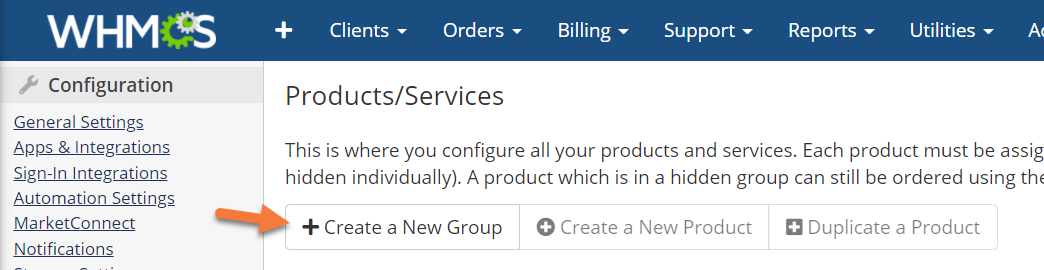
Step 3: Before creating a Product, you need to create a Product Group. To do this, click the Create a New Group button.
Step 4: When the Create Group page loads, you’ll see a screen like the one below. Let’s explore what’s on this page.
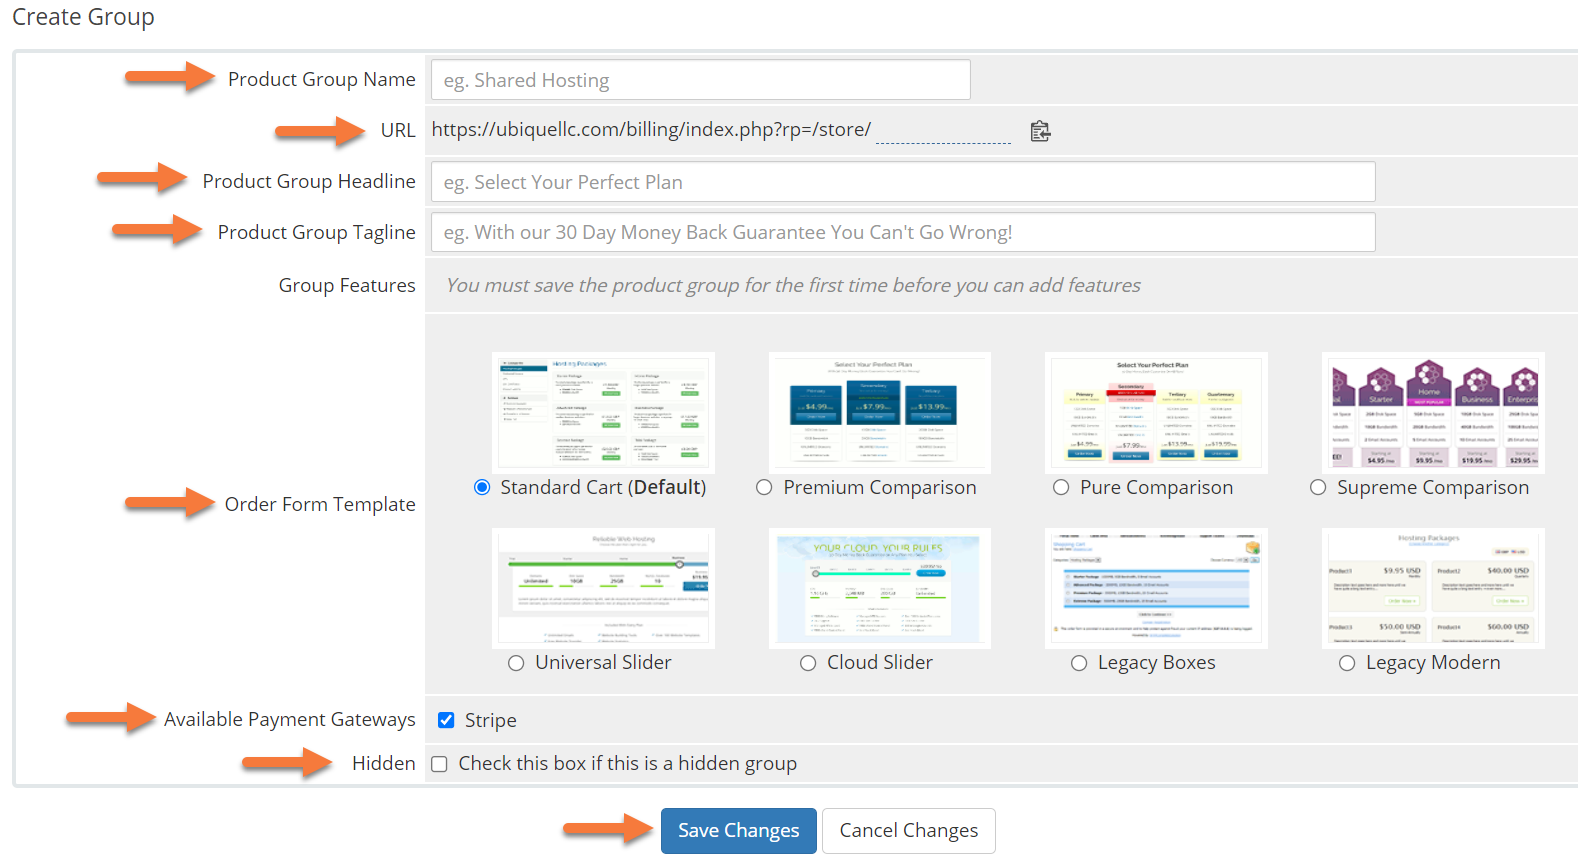
- First you need to enter a Product Group name. Remember, the product group is what will contain all the different products beneath it. For example, if you offer Shared Hosting to your customers and have 3 different plans, the plans will be individual products, while the group will be “Shared Hosting”.
- The URL will give you a friendly URL that you can use to directly link people to this product group. WHMCS will automatically create a human readable version, but if you don’t like what WHMCS creates, click the generated URL (at the end of the URL, where the end of the URL is underlined in dotted lines), and you will be able to edit the URL.
- The Headline should be a catchy call to action title for this product group, such as “The Best Hosting Around!”.
- The Tagline should be something that also grabs the customers attention, you can feel free to use the example provided in WHMCS, “With our 30 day money back guarantee, you can’t go wrong!”
- The Order Form Template changes the way your product groups and the products therein are listed when customers are shopping on your website.
- Available Payment Gateways allows you to select which payment gateways can be used for that product group, and therefore the products within the group.
- Hidden allows you to hide the group until you are ready to make it available to the public. We recommend enabling this until you’ve configured all the products within the group, that way you don’t get people accidentally buying something that isn’t quite ready yet.
When you’ve completed the form and made your choices, click Save Changes to continue.
After you save, you’ll see a notice stating your changes were saved successfully. Click Back to Product List to return to the list of products.

Step 5: Once you have returned to the Products/Services area, click the Create a new Product button.

The Create a New Product page will load. From here, you a few options to configure. Let’s take a look!
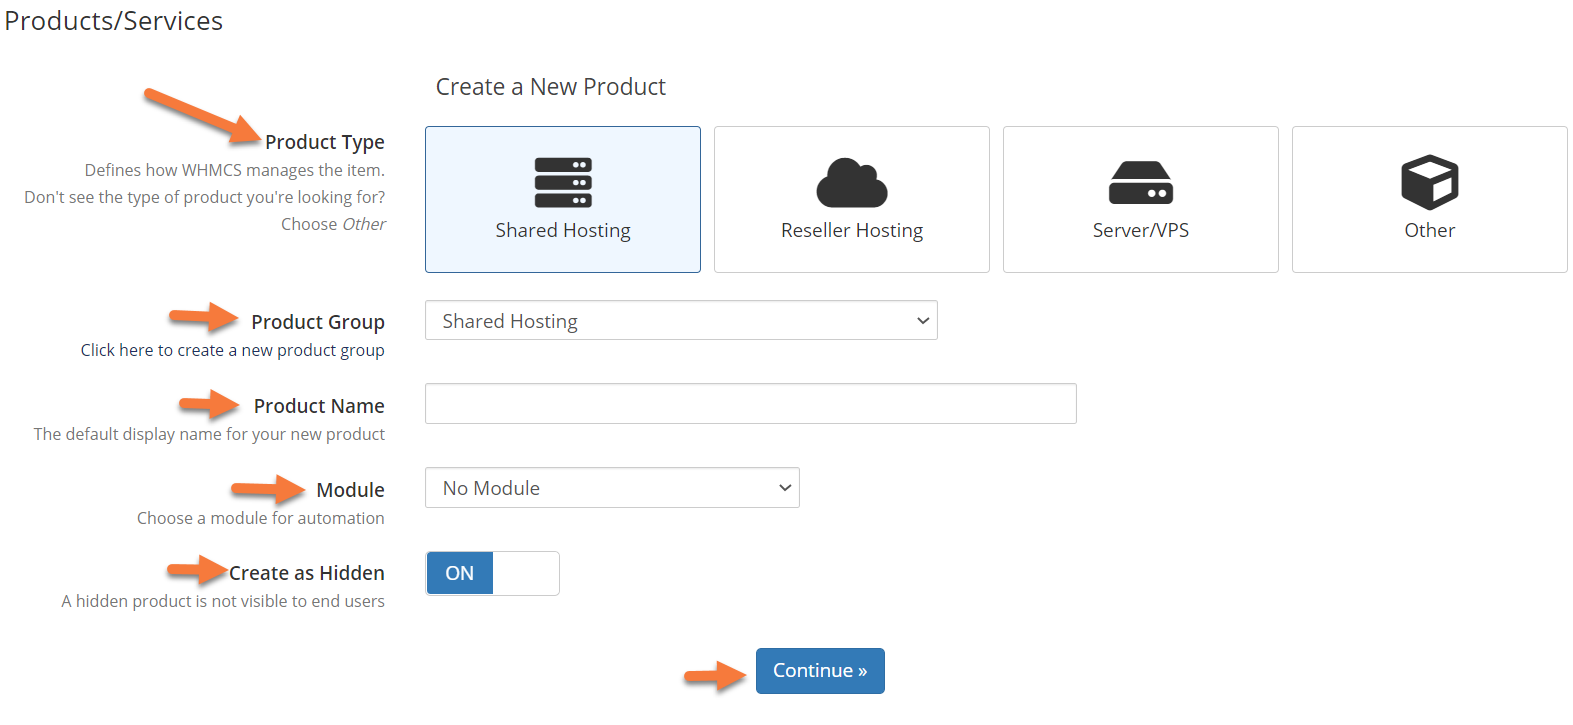
- First, you need to choose a product type. You have 4 options by default:
- Shared Hosting
- Reseller Hosting
- Server/VPS
- Other
- The product group I created originally is for Shared Hosting, so I’m going to leave that selected.
- Second, you need to select the Product Group. Using the dropdown menu, select the Product Group which goes with the Product Type you’re creating.
- Third, you need to give this product a name. Don’t name it Shared Hosting; that will confuse customers. Instead, please give it a catchy name, like Bronze, Gold, or Platinum.
- Third, you need to select a Module for this, if you want to automate the account provisioning on your Reseller Account. Then, using the dropdown menu, choose cPanel.
- Fourth, if you want to hide this product for now, leave the “Create as hidden” toggle to the On position.
Lastly, click Continue to create your Product.
Step 6: You will be taken to the Edit Product page, where there are 9 tabs for the different details that go with this new Product. We won’t cover every detail in these tabs, so don’t feel overwhelmed. We’re just going to talk about the basics.
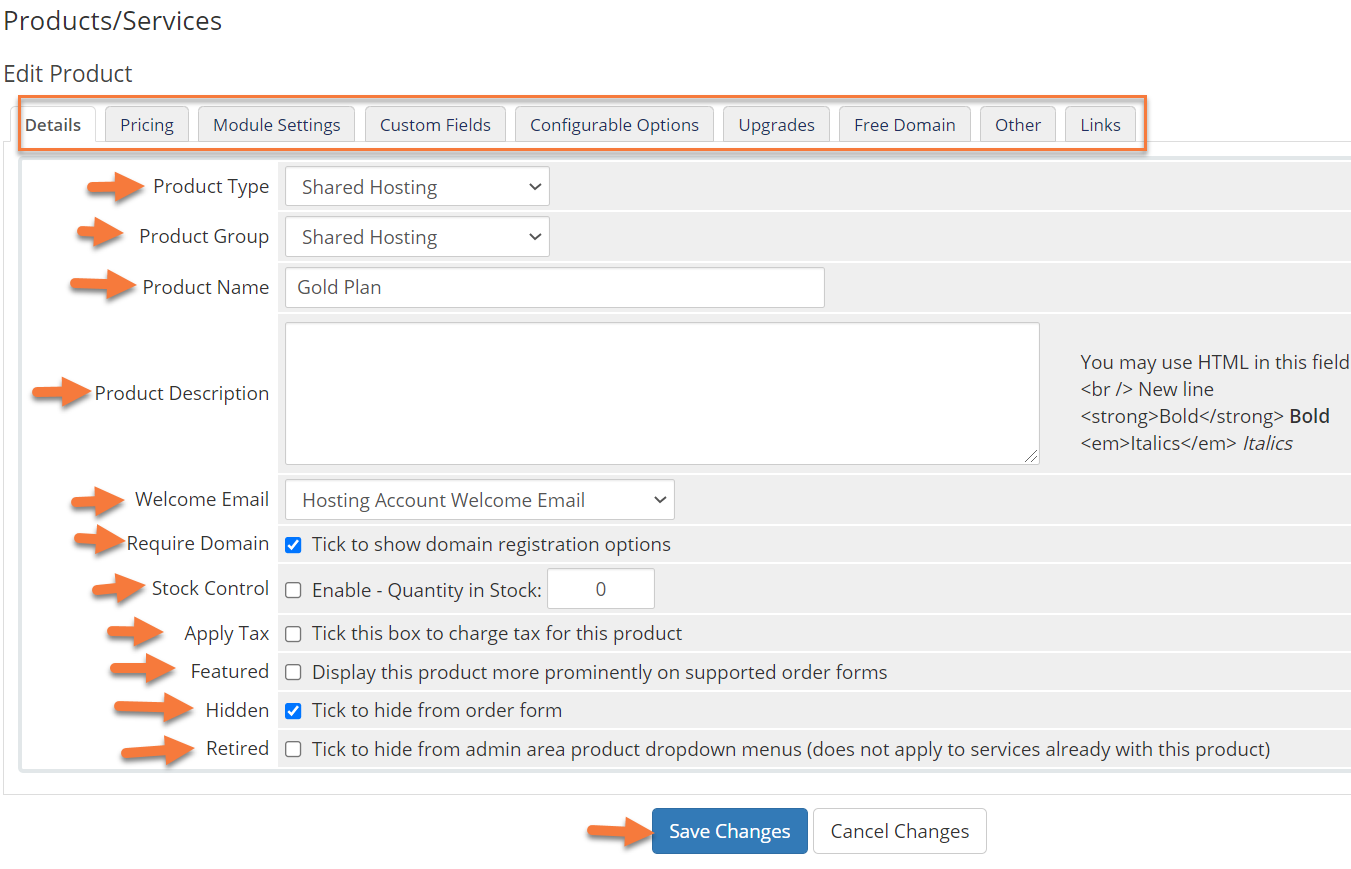
- As you can see from the top 3 fields, Product Type, Product Group, and Product Name, the settings have been carried over from the previous window.
- The Product Description is very important as this is where you will list what comes with the product you are selling as, at least in this case, the “Gold Plan”. In my case, this product comes with some pretty cool features.
- Keep in mind: You can use HTML in the Product Description Field. The contents of this field are what will display beneath the product listing in your Store when customers are viewing your product listings within the Shared Hosting category.
- The Welcome Email setting will dispatch a welcome email to customers who sign up for this product. You can use the built in templates located in WHMCS to easily send customers their new product information, or you can completely customize them to fit in with your branding.
- If checked, the Require Domain feature will not let customers purchase this product unless they have a valid domain name to go along with it. That domain name could be from a third-party registrar, or one you have sold them from another of your Product Groups. Regardless of the registrar in this case, the domain must be valid and real for the customers to be able to proceed with the purchase.
- Stock Control is a very important setting. If you’re hosting with ChemiCloud, you’ve no doubt got a finite limit to your reseller resources from which these Products & Groups you create in WHMCS draw upon. You can only sell so many of these before your Reseller Account is tapped out, so you should do some math to figure out how many of these Plans you can offer by using the Stock Control feature.
- Once stock is depleted, the product will no longer be available and WHMCS will send Administrators an email about stock being low or no longer available for the product.
- The Tax option allows you to enable or disable tax collection for this item. You should check with your Local Tax & Revenue Authority to decide which option is best for your business.
- Featured allows you to “feature” this product in a special fashion that separates it from your others. If you have a product that is selling better or is a fancier product to which you push your customers, you can set that item to be ‘featured’ by enabling this option.
- Hidden allows you to hide this product until you are ready to sell.
- The Retired option allows you to keep this product in the billing system, but no longer offer it for sale. This is helpful if you have customers who are still on a ‘legacy plan’ that they haven’t migrated off, and therefore WHMCS will be able to continue to bill them for said subscription while preventing new sign-ups.
Be sure to click Save Changes to save any changes you made to this Product.
Next, let’s look at the Pricing tab.
Step 7: The Pricing module allows you to control any/all settings related to the new product you’re adding.
There is a very important setting here you should be aware of. Let’s take a look!
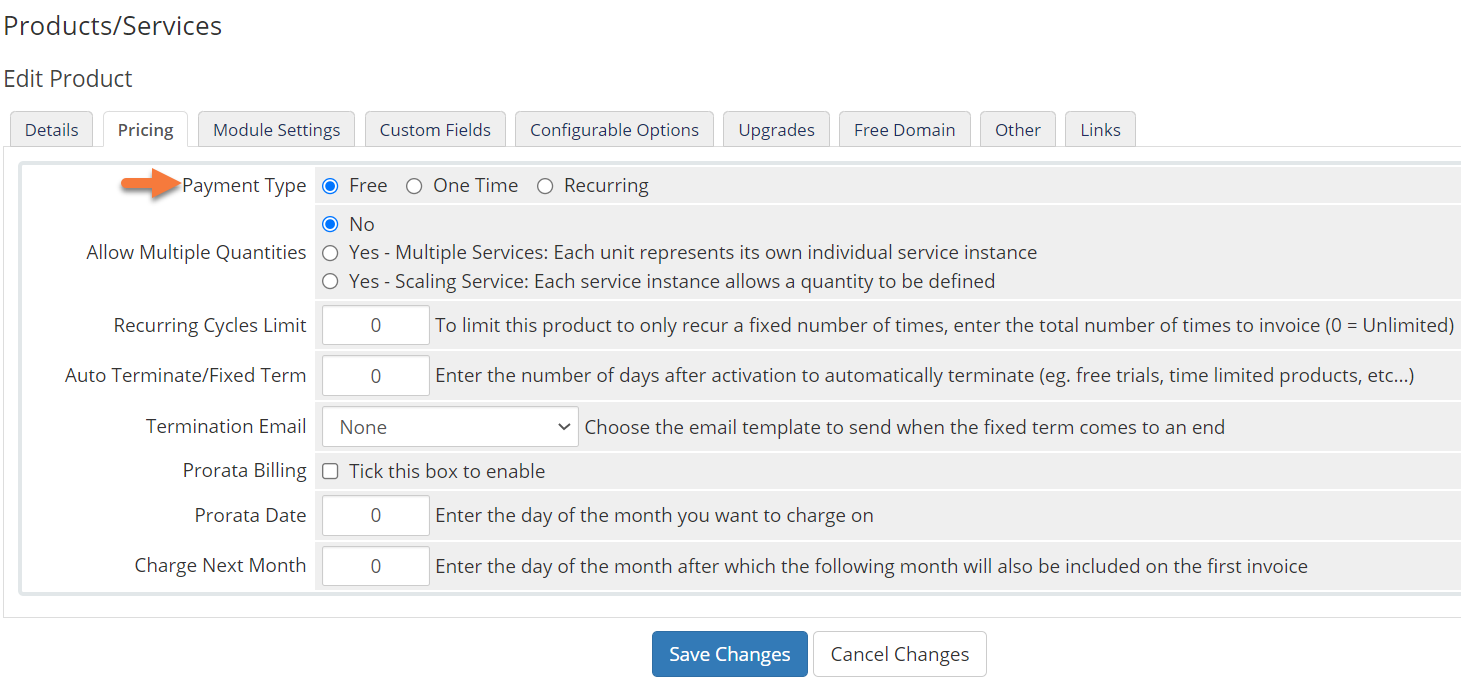
The Payment Type setting allows you to control whether the subscription for this product will be free, a one time fee, or a recurring charge.
If you are offering hosting, you’re likely offering it on a recurring basis, so be sure to choose Recurring here.
Once you do this, the box will expand and you will be able to input pricing for this product:
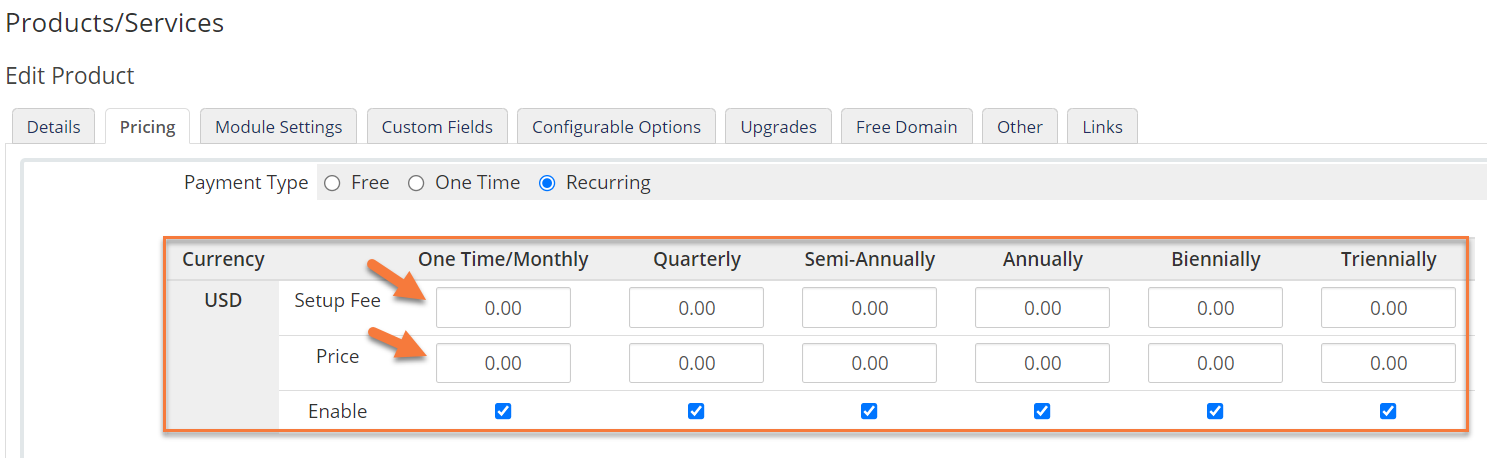
If you have Multiple Currencies installed in WHMCS, be sure to enter the pricing for the product in each Currency.
Click Save Changes when you’ve finished.
Step 8: Next you need to click the Module Settings tab to configure some additional settings.
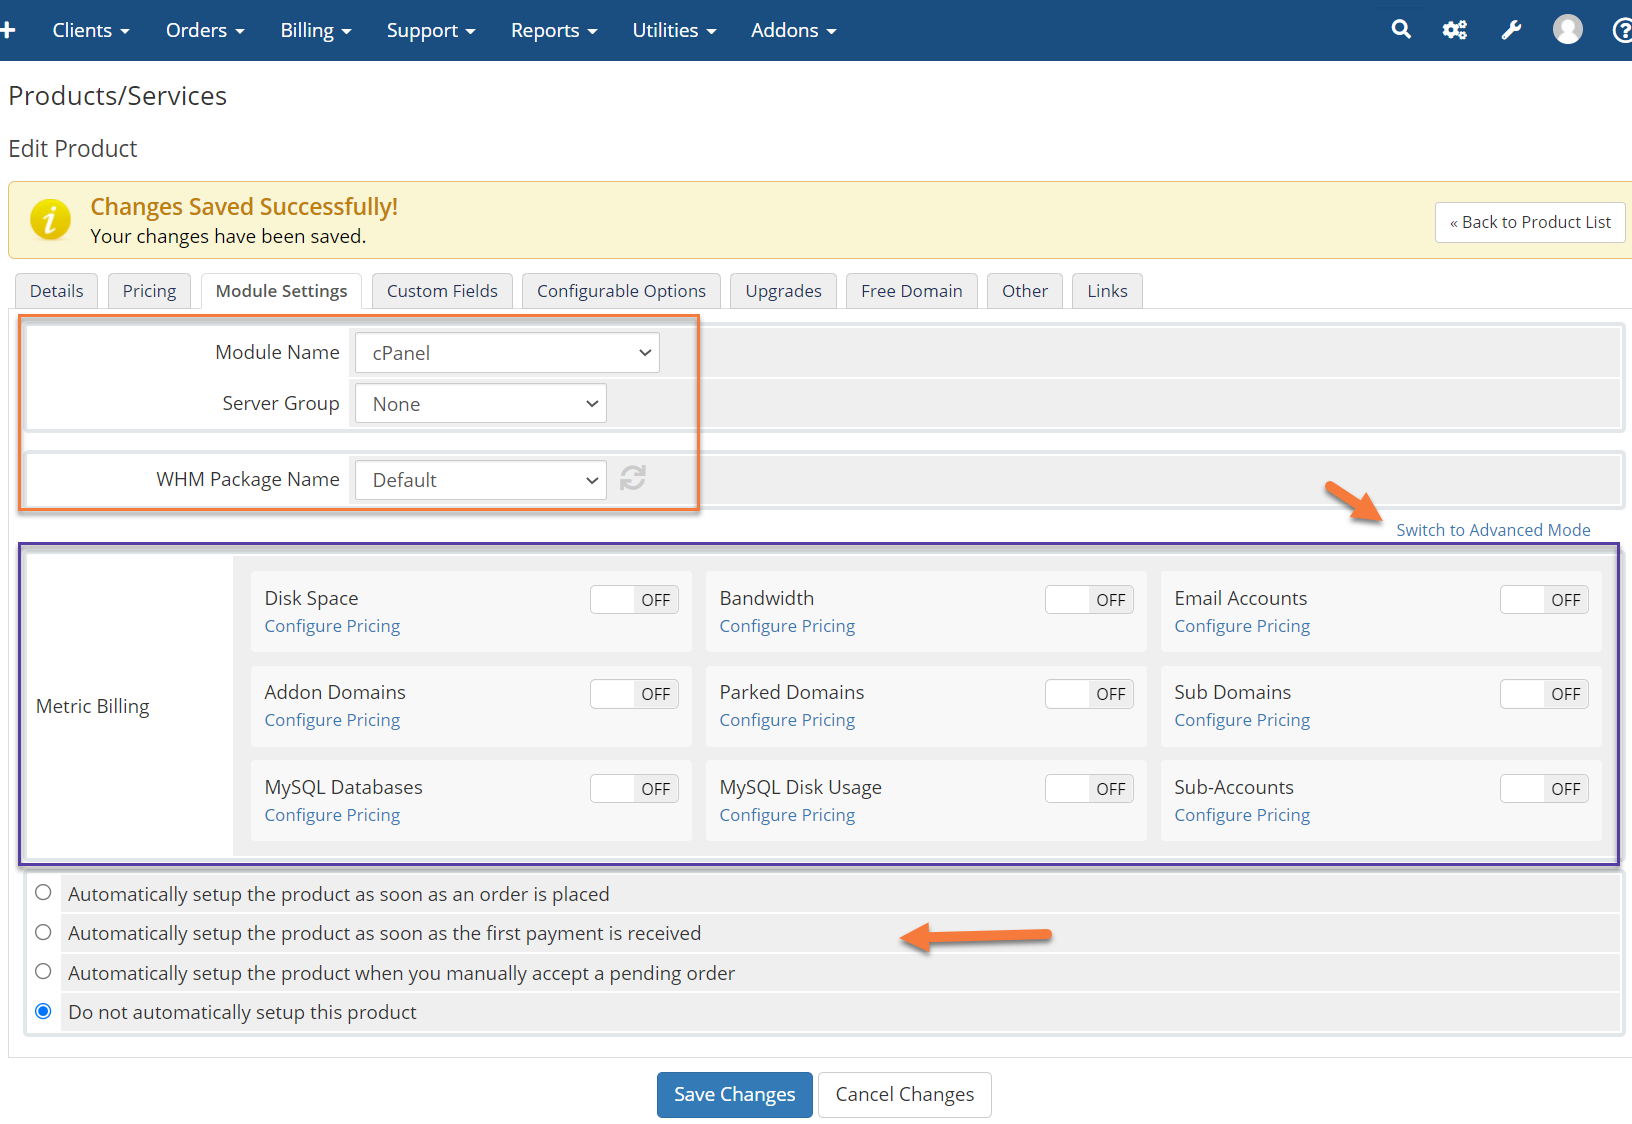
- At the very top, you have the name of the Module that is listed in the “Connect a Server” section, along with the Server Group to provision this plan to.
- Beneath that is the WHM Package Name. This is the name of the package you created in WHM that goes along with the plan in WHMCS.
- If you wish to control the configuration (Disk Space, Domains, FTP, etc) that goes with this plan, click “Switch to Advanced Mode” and you will be able to control these settings.
- The Metric Billing section is for companies who bill their customers by the GB, or by email account. You can also use this to offer additional items or “overage items” at a per-item cost, such as offering additional email accounts.
- The last section involves the automation that WHMCS has with WHM. If you want to automatically set up orders as soon as they are placed, you can enable that. Or alternatively, you can choose from three other options to set up accounts.
Be sure to click Save Changes when you’ve finished.
And that is how you create a new Product Group & Service in WHMCS!
▶️ Please join us in the next tutorial where we will walk you through Create Support Departments in WHMCS